Often we try to solve all problems with a smartphone by some kind of manipulation in the system or reinstalling the firmware. However, it is not always possible to fix the problem in this way. Sometimes the breakdown is hardware, and it needs to be repaired by a service center or repaired yourself. In this guide, we will tell you how to disassemble Xiaomi at home so as not to harm the device.
Attention! If you have never had experience in disassembling and assembling a telephone or similar devices, contact your friends or service center who are knowledgeable in this topic. Don't take risks! If you handle the parts carelessly, you have every chance of severely damaging your phone and paying even more for additional repairs.
If you are confident in your abilities, then carefully read our disassembly instructions. We will show you how to disassemble Xiaomi devices and change their components with minimal risk.
What tools will you need?
To work with the housing and its parts, you need special tools, for example, a small screwdriver and spatulas. You can buy them on the radio market or on AliExpress. However, these items can be replaced with improvised means, say, a plastic card and any other screwdriver that is suitable for screws in a mobile phone.
Here is a list of equipment that will help with dismantling:
- a spatula or a plastic card that you won’t mind accidentally breaking when you try to disassemble the Xiaomi;
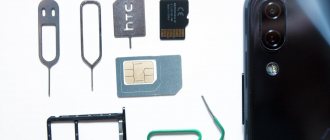
- a special paperclip to remove the tray with cards, or a regular straightened office paperclip;
- miniature flat screwdriver;
- tweezers for removing small “innards”;
- small scissors or a knife with a thin blade;
- suction cup, which will be needed to detach the touchscreen.
As you can see, nothing serious is needed. The main thing is to use the tools correctly and more or less skillfully.
What might you need?
Before the disassembly process, you need to organize your workplace by preparing the necessary tools.
Among them:
- Spatula for smartphones. It should not have sharp edges or other irregularities so as not to damage the mobile device. A metal spatula is better suited than a plastic one, since plastic is not a reliable enough material. Another material option is nylon.
- Tweezers. Not all internal components of the phone (for example, cables) can be handled with your fingers, as they are too small.
- Clip. Needed to remove the SIM card and SD card. Supplied complete with mobile device.
- Film or protective glass to protect against possible scratches during disassembly.
- Flathead (or Phillips) screwdriver. Small enough to fit small screws in the device.
- A thin knife, scissors or a discount card (harder).
- Replacement components: battery, camera module, touchscreen.
- Suction cup, glue (for replacing the touchscreen).
- Double-sided tape (for replacing the battery).
How to disassemble Redmi Note 3 Pro?
Let's start with one of the most popular Xiaomi phones in the entire history of the brand.
Changing the camera
Replacing the camera sensor on the 3 Pro is easier than many parts, since you don’t have to unscrew a huge number of elements blocking the path to the module. Note that often errors when shooting with a camera are not even related to its damage, but to the displacement of the cable, which just needs to be corrected, and the phone will take photographs again.
Attention! Before getting under the hood of your mobile phone, reinstall the firmware, return to the official MIUI and update it to the latest version to rule out a software cause for a non-working photosensor.
Instructions for replacing the photo module
- Turn off your smartphone.
- Remove SIM cards.
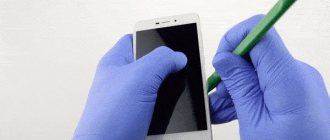
- Take a spatula in your hand (you can use a plastic card) and try to carefully pry off the housing cover. Since the assembly of the gadget is good, it may be difficult to penetrate the slot. Do not rush in any way, so as not to scratch the device.
- Once the tool is in the cut, carefully and firmly move the tip of the spatula around the perimeter, lifting the lid until it snaps open. Do not try to rip off the panel right away when only one corner or side has come off - you risk leaving a crack on the cover or “breaking” the grooves.
- Before removing the panel, disconnect the fingerprint scanner, represented by the cable connecting both sides of the smartphone.
- Pry up the seal with a screwdriver and remove the back part, which will not be needed in the near future.
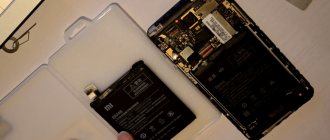
- Now you need to de-energize the board. To do this, remove the mount to the battery with a spatula.
- Look at the top of the device. Take a thin pair of tweezers and use it to disconnect Bluetooth and Wi-Fi.
- Remove the seal from the front panel. Do this as carefully as possible, as the element is extremely sensitive to damage.
- In front of you is the front camera cable. If it is melted, this indicates a manufacturing defect or breakdown. We recommend contacting a service center to request repairs. This is a warranty issue and they will fix your phone for free or give you a new one. If you buy a mobile phone abroad, for example, on AliExpress, you will have to replace it yourself. This is an annoying problem; it can occur in any smartphone, but more often this kind of problem occurs in unscrupulous sellers who have played tricks with the device. The hypothesis can be confirmed by examining the insides for the presence of foreign stickers, which, moreover, may be stuck crookedly and unreliably.
- Again, discard the battery and remove the broken photosensor with tweezers.
- Install a new one in its place and snap it into place, as it was before your intervention.
- Connecting the module to the battery.
All that remains is to assemble the phone to its original state, return the touchscreen, all the cables, the fingerprint sensor wire and snap the lid, smoothing it around the perimeter.
Changing the battery
Replacing the battery is also one of the simplest manipulations. The risk of damaging something is minimal if you carefully follow each step and handle your smartphone and tools carefully.
- Follow steps 1-5 from the previous instructions and then follow them.
- Carefully pry and pull out the main unit with microcircuits.
- Remove the main and front cameras, as well as the flash.
- Using a screwdriver, remove the five bolts under the battery.
- The green panel, which will be in front of your eyes, also needs to be uninstalled by unscrewing it from the case.
- Next, remove the black holder and the remaining panel that blocks the path to the battery.
- Remove the battery and replace it with a new one.
- Put all the components in place, tighten them well, and then snap the smartphone cover.
All that remains is to launch it and check how the system works.
Replacing the touchscreen
The difference between a screen and a touchscreen is that broken glass simply interferes with the use of the phone, while a broken touchscreen interferes with the operation of the sensor.
Replacing a touchscreen is very similar to replacing a display.
Instructions:
- After removing the battery and system board, clean this area to remove any remaining adhesive or dust.
- Next, warm up the phone again with a special hairdryer.
- If the screen is broken, use tape to prevent shards from flying or getting into your fingers.
- Using tweezers or another sharp object, pry up the touchscreen and remove it.
- Wipe down and degrease the display mold. It is also recommended to use isopropyl alcohol, but never a rag soaked in plain water.
- Apply glue around the perimeter of the frame.
- After threading all the cables, place the new module on the case. Do not press too hard, the display will grip well.
- Wait a while for the attachment process to complete.
- Reattach all components inside the phone in reverse order.
Ready.
How to disassemble Xiaomi Redmi Note 3?
Follow this guide, be careful, and you will be able to dismantle your mobile device.
- Using a needle, pull out the tray with SIM cards.
- Remove the cover as indicated in point No. 3 of the first instructions.
- Carefully remove the connector from the device board, then from the battery.
- Remove the battery.
- The lower block is secured with five bolts, which you must unscrew with a small Phillips screwdriver.
- Raise the platform with the speakers and vibration motor.
- Disconnect the contacts of the cable and coaxial cord from the bottom board, then completely remove it from the case.
- Move to the top and unscrew the four bolts holding the frame.
- Lift it up to pull out the wiring for the base and front cameras.
- Remove the five connectors that are attached to the main board from their sockets.
- Unscrew the four bolts from it and remove the clamps holding the vibration motor.
There is nothing holding the main board. All that remains is to easily remove it from the case.
How to disassemble Redmi 3S?
Let's now talk about how to extract all the parts from another popular model - Redmi 3S.
- Remove the SIM card holder using the needle that comes with the kit, or use a regular paperclip.
- Open the case slightly and disconnect the fingerprint scanner wire.
- Remove the phone cover completely.
- Using a Phillips screwdriver, unscrew the eight bolts on the top of the device.
- Disconnect the antenna unit.
- Remove the smartphone battery connector.
- Move to the lower sector of the device, take the same screwdriver and unscrew five more bolts.
- Now you can pull out the panel with the speakers.
- Remove another screw on the bottom PCB.
- Take it away.
- Next, you can disconnect the contacts on the battery and remove it.
- Unscrew one bolt at the top, then pull out the rear camera connector.
- Now it can be removed from the case.
- Disconnect the pins on the PCB.
- Turn the main board over, disconnect all the connectors attached to the inside, and lift it out.
- Find the front camera module in the locking groove and remove it.
- Remove the speaker in the same way.
That's it, the last removable part has been removed.
How to disassemble Redmi 4X?
Now we will tell you in what order you should remove the “internals” from the Redmi 4X model and replace the main components.
Opening the lid
Essentially, you will have to do the same thing as in the instructions described earlier.
- Turn off the gadget and remove the memory card and SIM card tray from it.
- Take a spatula and pry up the back panel, trying to get the tool under it.
- Once it's in, move it around the perimeter to lift the lid on all sides. You can help yourself with other items, for example, a plastic card.
- Do not attempt to rip off the bumper until every corner and side has come loose. With such a thoughtless movement, you can easily leave a crack in the coating.
- Remove the cover very carefully, do not pull it away, since a thin fingerprint sensor wire is attached to it, which can easily be torn, even with a slight tug.
Next we will talk about replacing components.
Changing the display
The fragile front part is often broken from falls and other physical impacts. If the screen of your device is broken and does not respond to anything, you will definitely have to install a new display module. Do everything exactly as we recommend and fix everything quickly without harming the gadget.
- Remove the cover as described above and then remove the seals, if present.
- Unscrew the bolts holding the protective panel.
- Remove the battery in the same way, carefully watching the screws so as not to lose them or mix them up.
- Unscrew the bottom panel as well, it will also interfere with replacement.
- Pull out the cables without damaging the main camera wiring.
- Now you can get rid of the panel at the bottom and the battery. To do this, you will have to use tweezers to clean the glue that holds it in place. Do this carefully because the battery coating is extremely sensitive.
- Using the same principle, remove the top board from the phone.
- All that remains is to pull out the green socket.
- Please note that you will need to remove the vibration motor, speaker, and front camera from the previous display and install them in the new one.
- Remember about the side keys too. Carefully disconnect them and then attach them to the display you are inserting.
- Once all the small elements have been transferred, move on to the trains. They also need to be connected to the updated screen.
- Remove the special blue protective film.
You now need to reassemble the phone. To do this, simply follow all the steps in reverse order.
Changing the touchscreen
Replacing a touchscreen is less troublesome, but still requires concentration.
- Remove the cover as we wrote earlier.
- You won’t be able to simply remove the touchscreen using a plastic card or a spatula, since it is glued on. To get rid of it, wrap your phone in a towel and place it on the battery, or blow hot air from a hair dryer on it.
- When the glue is hot enough, take the suction cup, attach it to the screen and gently but firmly pull it towards you.
- You are unlikely to be able to rip the piece off without breaking the glass, so be careful not to cut yourself.
- When the old screen is removed, wipe the area in the case well with a cloth, napkin or spatula. Never use a wet cloth.
- After cleaning the case, apply glue evenly to the new touchscreen, press the glass to the case, just make sure that a crack does not form. Try to connect the elements as evenly as possible, do not forget to clean off excess glue.
Wait approximately 20 minutes and then assemble the device.
Changing the battery
This is the simplest tutorial in the article. All you have to do is purchase a new battery for your phone and replace it.
- Remove the cover and battery (how to do this is described above).
- Cut thin strips of double-sided tape and attach them to both sides of the battery.
- Install it into the device, fixing it just as well as the “native” battery.
Check if the gadget works. If yes, then complete the assembly.
Attention! In the same way, you can change the battery on almost any Xiaomi mobile phone.
Subtleties of replacing the Xiaomi REDMI 4A battery
Subtleties of replacing the Xiaomi REDMI 4A battery
The Chinese smartphone brand Xiaomi has gained wide popularity in Russia thanks to the optimal balance between quality and affordable price. It is capable of working with normal load for up to two days without recharging. However, over time, the Xiaomi battery will need to be replaced, and you can find out about the need for such repairs by some signs that appear during operation.
How do you know when it’s time to change your Xiomi battery?
After purchasing a gadget for a year and a half, the owner does not have to worry. The mobile phone battery is designed by the manufacturer for a strictly established number of charge/discharge cycles. As the resource is exhausted, the autonomy of the device decreases significantly. This causes a lot of problems for the owner when using it. The company provides cells with a capacity of at least 4 thousand mAh. Many settings of modern devices allow you to select an energy-saving mode and control. If you look at the consumption on your device, you can find out which applications are draining it, consuming a lot of charge, and select a convenient mode. You won't need to look for a recharge option in the middle of the day.
You should think about repairing your Xiaomi battery:
- when spots appear on the screen that indicate swelling;
- if the smartphone quickly dies down, turns off spontaneously, and does not reach 100% charge;
- If it slows down, it gets very hot.
These symptoms indicate a defect. You can often fix it yourself, using available tools and having a general understanding of the structure of your device. If there are still doubts about the cause of the malfunction, it is better to entrust the work to the service center specialists.
Actions when replacing a source
Modern smartphones require a lot of power. More recently, the user simply performed this procedure on his own (you just need to open it, remove the faulty element and put in a working one), but with the non-removable option you will have to tinker a little.
You will need:
- new source;
- tweezers and screwdriver;
- flat spatula, guitar pick, other improvised means convenient for opening;
- scotch.
Next, you will see that replacing the battery in a Xiaomi REDMI 4A phone includes several steps; they should be performed very carefully and precisely. If you have the slightest doubt about your skills or knowledge of the intricacies, it is better to entrust the work to service specialists.
Step 1
To ensure safe disassembly, first of all, you need to almost completely discharge the gadget’s battery (to about 20%-30%). Disable by pressing the power button for a long time while confirming the actions on the screen. Then you should remove the SIM card tray. It prevents the lid from coming off.
Step 2
Remove the lid using a spatula.
For this:
- Carefully place the sharp corner of a special tool (spatula or guitar pick) between the screen and the body. The best place is at the bottom of the device, in the corner. Then you need to pry the back cover with a flat object at the top or bottom, at the junction with the front panel;
- perform a “sliding” movement around the perimeter. This way you will separate the entire lower part of the front panel with the screen and the base of the gadget cover;
- Carefully separate the cover from the screen panel and remove it.
These actions do not require much effort and are performed with light pressure on the tool. Then use a screwdriver to unscrew the bolts from the metal backing (they hold the connectors for connecting the cables to the motherboard), and remove the bracket with tweezers. Actions must be precise and careful; you must not touch the contacts so as not to short them.
Remember that replacing the battery in a Xiaomi REDMI 4A phone involves disconnecting the cable. Pick it up and remove power from the board. To remove the module from the frame, carefully unscrew the screws that secure it.
Step 3
Access is free, and you can proceed directly to extraction. To do this you will need:
- peel off the black flaps at the bottom of the element and bend them;
- slowly pull each one in turn to remove the adhesive tape from under the battery;
- remove the defective part from the seat. To do this, you can use a thin tool, it is convenient for them to pry the element and remove it;
- install a new battery.
Check the part before installing it. Connect, activate your smartphone and make sure that all functions work, discharge/charge correctly, does not turn off, does not reboot spontaneously when shooting videos, making calls, or while playing. When the test is completed successfully, you need to prepare the installation site. Remove dirt and dust, remnants of old tape and degrease the surface. Glue double-sided tape - two strips on both sides, only after that you can install a new battery.
A little time, the presence of a basic tool, three steps correctly performed - and replacing the Xiaomi battery is completed. After the new part takes its place, do the same steps, only in reverse order. When the whole procedure is completed, make sure that you haven’t forgotten anything and that all the screws have been tightened.
In a special service, the technician will quickly fix the device and carry out diagnostics. Without large financial investments, you can significantly extend its operation; it is accessible to people even with low incomes.
How to keep working longer
The service life depends not only on the resource provided by the manufacturer, but also on correct operation.
Use the original charger for the gadget. Don't forget that the optimal temperature for it is 0°-35°C, so choose the right cases and do not store your phone near sources of cold or heat. If you do not use the device for a long time, keep it charged. Once or twice a month, completely discharge your phone to fully charge it to 100%.
How to disassemble Redmi 4 Pro?
This is an excellent device, the best among the entire Redmi 4 line, which, moreover, is distinguished by its reliable design and components. However, there are problems with it too. For example, over time, the built-in battery loses capacity and will need to be replaced. There is nothing particularly difficult about this if you do everything in accordance with our instructions.
Let's look at the disassembly of this particular device step by step.
- Pull out the card tray using a regular paper clip or a “original” needle to remove the holder.
- Unscrew the two screws at the bottom end. They are located near the charging socket.
- Using a spatula or a card, lift the lid and uncork it around the entire perimeter. Don't start tearing it off on just one side. Try to remove using even force. Take your time, you may bend the body or make a crack.
- Remove the bumper carefully, remember that underneath there is a wire that connects the board to the fingerprint scanner.
- Disconnect this cable and set the cover aside.
- At the bottom of the battery there will be sticky strips that need to be pulled out with tweezers so as not to tear. Proceed with caution and simply pull them out from under the battery.
- Now we remove the protective elements covering the key structural loops. To do this, unscrew the three screws secured above the battery, and then pull off the panels.
- Disconnect the wires, especially the one that holds the battery (pay attention to the picture below, there is a cable marked in blue, this antenna cord, do not break it under any circumstances).
- Finally you can remove the battery. Just be prepared for the fact that you will have to apply moderate, directed force to tear it away from the glue, but not to “rip apart” the adjacent components of the device’s board.
- All that remains is to remove the motherboard. Using a Phillips screwdriver, remove the remaining screws holding it and the bolts that secure the protective covers to the cables.
As always, to reassemble the device to its original state, you need to do all the steps in reverse order. We hope that you did not encounter any difficulties and were able to avoid damaging the contacts.
How to close the lid back
It's even simpler here - you don't even need your nails. Take your smartphone and place it in a plastic case. Make sure that all elements, such as buttons and the camera, line up with the slots on the cover. Lightly press the phone against the body and walk around its entire perimeter in this way. You will hear characteristic clicks. Ready! Now you know how to open the cover of a BQ smartphone without damaging the case and screen. If something is not clear, watch the special training video.
The modern mobile phone was created to simplify our lives. In practice, however, difficulties may arise.
Thus, some device users note that not all phones are comfortable to use or are not as advanced as their predecessors.
Therefore, you will need this summary if you do not understand how to open the cover on the Samsung Galaxy A3.
It becomes so unpleasant when you don’t understand how to open the back cover, and as luck would have it, there is no one nearby who can give you a hint or help.
But everything is not so sad, and at the moment you will learn how, in this case, you need to properly handle the Samsung Galaxy A3.
Not an easy task for many
If you ask most users the question: “How to remove the cover on a Samsung A3?”, they will not be able to answer anything.
It seems that the development company decided that in order to perform such an act, we must contact phone service centers.
At the centers, specialists will do this simply and quickly. After all, for this they have a set of special tools: a “spatula” (a device that disconnects fasteners) and a Phillips screwdriver.
But what if you don’t have the ability to contact specialists or simply don’t have enough time to visit a service center? There is only one way out - to remove the back cover from the Galaxy A3 yourself.
How to disassemble Redmi Note 4?
Next up is the company's bestseller - Redmi Note 4. There are no particular difficulties in disassembling it when compared with other solutions from Xiaomi Corporation. You will need the same tools.
- Take a 0.8mm precision torx screwdriver and remove the two screws near the charging port.
- Pull out the SIM card tray. Do not press too hard to avoid breaking the mechanism.
- Again, open the lid with a spatula or card from all sides and only then carefully remove it. Do not break the fingerprint scanner wire.
- Pull out the fingerprint sensor cable and set the back panel aside.
- Pull out the battery connector. Be sure to do this to avoid a possible short circuit while working with the “filling”.
- There are seven bolts on the bottom that you must remove with a thin Phillips-type screwdriver.
- Now disconnect the unit from the speaker.
- Disconnect the battery and remove it from the connector.
- Disconnect the connectors on the board located below and pull it out.
- To remove the main (upper) board, you need to unscrew eight bolts and remove the vibration motor unit.
- Release the printed circuit board from the connectors and remove it.
- Disconnect the board-to-board cable, which is located on the right side.
- Remove the hardware button cable, coaxial cable, vibration motor and speaker from the fixing clips.
Thus, we completely disassembled the phone.
How does the phone case work?
In order not to damage the device, it’s good to know how it works mechanically, what parts are located where, etc.
The entire body on the back panel is made of aluminum with plastic inserts. The Xiaomi Remi 4x and Xiaomi Redmi Note 4x also have a fingerprint on the back.
Inside the phone is the motherboard. On one side, the display is attached - that is, the screen, and on the other side, the processor, cameras, battery, mini-cards and other elements are attached. The display is attached to the back panel with special latching parts. They are easy to unfasten.
How to disassemble Redmi 5 Plus?
Here we come to the analysis of the last device. It’s nice that working with its parts is no more difficult than with other gadgets of the Chinese brand.
- As always, remove the SIM cards and flash drive from the slot using the tool that came with the kit. You can also use a paper clip by straightening it.
- To remove the cover, insert a special spudger or an unnecessary plastic card into the connector. Uncork the device around the entire perimeter, and when a fairly large space is created on each side, finally open it, but not too much, because there is a wiring immediately underneath it.
- Unplug the fingerprint cord and set the back of the device aside.
- Disconnect the battery by pulling out the connector to prevent a short circuit during operation.
- Pull out the finger scanner cable.
- Using a miniature screwdriver, unscrew the six bolts holding the lower block.
- Disconnect the vibration motor and the speaker.
- Find a single bolt on the bottom board, unscrew it and disconnect the contact cables.
- Remove the PCB connectors.
- Uninstall the board itself from the gadget.
- Pull out the coaxial cord.
- Disconnect the connectors from the rear photomodule and remove it from the socket.
- Unscrew the three screws and take out the platform with the antennas.
- Remove five more bolts on the main board.
- Disconnect the connectors on it.
- Now just take it out, and the analysis is complete.
We hope that you were able to disassemble Xiaomi using our guide and did not encounter any unexpected difficulties. Don't forget to look at the illustrations of the process and be careful. Please note that if you are afraid to do this, if you are not sure or if something does not work out, contact knowledgeable people. In any case, it will be cheaper than repairing the phone from some additional damage.
How to remove the cover on a Samsung J5 phone
Recently, developers of mobile phones from different brands have begun to create cases in which the back cover is simply missing. In fact, it exists, but it is not possible for ordinary users to open it without special tools. For example, the two components of the Samsung J5 case are glued together. And in order to unstick them, the body must be subject to heating at a temperature of 100 degrees. This requires a hot air gun
.
Warming up the case with a hot air gun
Before opening the case, be sure to remove the slots for the SIM card and flash drive.
The barrel of the hot air gun should be aimed at the back of the Samsung and its seams. Then you need to arm yourself with a plastic card or a plastic scalpel to pry off the front screen module.
Use a plastic card to line the seams of the case
The cover is not a thin plastic sheet, as in classic smartphones, but rather a recess in the form of a bath. You should be very careful when working along the seam of the phone with a card. Don't run it too deep. 0.5 cm is quite enough. Be careful not to disrupt important phone modules.
Use a plastic card to open the Samsung case
When the lid gives way, do not rush to open the case completely; do it with caution. After all, both parts exchange information using a wide cable that connects the screen module and the Samsung motherboard.
Screen module cable in Samsung
To disconnect the cable, you need to open the fastening cover and remove the cable from the socket. It's quite simple. The main thing is not to rush and be careful.
This may be useful: how to move photos, applications, data to a memory card on Samsung.