Inexperienced users of Android devices quite often have difficulties with touch screen: It does not respond to the action or the response is delayed. Or when you select one of the functions, it reveals a completely different option. Well, also after replacing the broken one, since the screen will not work properly without proper calibration.
What is touch screen calibration?
Calibration refers to the correct adjustment of responses from the sensor when touching the screen.
How to find out if screen calibration is necessary?
- If you want to make sure that you need to calibrate the screen , then first you need to remove the film protecting the screen, and if it is missing, then wipe the screen well.
- It is also important to find out the level of response to touching it: and if the sign on the screen is not the one that should appear, but another one, then you need to calibrate the screen .
It happens that even when purchasing a new device, the emu needs to calibrate the touch screen , or if it does not work correctly.
Sensor calibration instructions
Setting up a correct and accurate response on an Android device is easy: it has a built-in quite useful ts_calibrate , and it will undoubtedly help you configure the screen for correct operation.
- Go to settings (Settings) , find the option phone settings (Phone settings) , and there select the item Screen calibration (Calibration) .
- After calling this command, a small cross should appear on the screen with a reddish dot in the center.
- To calibrate your phone or tablet, you need to click on the center of the reddish dot, this way you will configure the correct and accurate screen response. This operation is repeated three times, after which the correct touch screen response will be loaded into the device memory and should be confirmed.
- To check the adjustment of click feedback on the screen, click on any sign on the screen, and if when clicked it is reflected correctly, then you have correctly configured the screen.
How can you calibrate your Android screen?
h2 3,0,0,0,0—>
Calibration is a touch screen adjustment that is made by the device based on the user’s actions with the sensor. The standard calibration process consists of displaying dots, circles, and crosses in random order on the screen, and requiring the user to click on them.
p, blockquote 12,0,0,0,0—>
Based on this process, the system will build a certain scheme of areas and points on the screen, determining which of them are more responsive and which are less, which have higher accuracy and which have lower accuracy.
p, blockquote 13,0,0,0,0—>
After this diagnosis, the system performs troubleshooting and adjustments. If you use a stylus on your phone more often, then it is with it that you need to calibrate the screen, and if you use the gadget manually, then calibrate it with your finger.
p, blockquote 14,0,0,0,0—>
p, blockquote 15,0,0,0,0—>
Sensor calibration
As for the sensor, it is easiest to calibrate it on devices with a resistive screen. A special utility is installed on them, launched from “Settings”. It allows you to quickly calibrate the sensor so that it presses exactly the icon or button to which you put your finger. You can find a similar “Settings” item even on old MP3 players equipped with a fairly large display (it’s pointless to calibrate the sensor of a small screen).
What about modern smartphones that have a capacitive touch screen? Is it really impossible to calibrate them? Fortunately, in some cases this is still possible. Moreover, sometimes you can even slightly adjust the color rendering, and not just the sensor. But in reality, it all depends on the specific device model. It is possible that the manufacturer of your device has blocked access to certain parts of the operating system, and therefore you will be able to download the calibration program, but it will not work properly.
To calibrate the touchscreen, we recommend downloading an application called Touchscreen Calibration. It is free and has a simplified interface. To perform calibration, perform the following steps:
Step 1 : Launch Touchscreen Calibration.
Step 2. Click on the blue button that prompts you to start calibration.
Step 3. Next, follow the suggested instructions. The program will ask you to touch a certain area of the screen once, twice, and then for a specified amount of time, swipe, etc.
Step 4. At the end of the procedure, you need to click on the “OK” button in the pop-up window.
Step 5 : Reboot your device.
If you need to check the operation of multi-touch, we suggest you download the following applications:
- Tooch Multitest - has a simplified appearance, but easily diagnoses the operation of multi-touch. If the sensor does not work in some area of the screen, you will certainly notice it.
- MultiTouch Visualizer 2 - This program shows how many touches the screen has detected. This application is done using large multi-colored rings, each of which is signed with a corresponding number. Additionally, the utility tests the operation of the “pinch” function.
- MultiTouch Tester is another simple application that records the points of contact between the screen and your fingers. There may be problems with detecting touches on one axis!
What types of sensors are there in a smartphone and why are they needed?
Modern mobile devices have a large range of sensors, and occasionally among them there are unusual options such as measuring ambient temperature and humidity, ultraviolet radiation and pulse, as happened with the Blackview BV9900 smartphone.
But the standard set includes completely different, more familiar sensors.
The most popular of them can be safely called the accelerometer. Designed to measure acceleration along three coordinate axes (X - transverse, Y - longitudinal and Z - vertical) taking into account gravity. Thanks to the data received, the smartphone seems to begin to understand its position in space, and functions such as auto-rotating the screen or launching applications by shaking the smartphone appear.
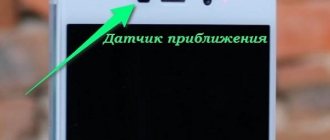
The second most popular is the proximity (or proximity) sensor, which turns off the screen during phone calls if the smartphone is near the ear (or any other part of the body). And it can, on the contrary, prevent the display from turning on when the device is in your pocket.
An ambient light (light) sensor is also almost always used, with the exception of rare budget models. It measures the level of ambient light in lux, and is responsible for automatically adjusting the brightness depending on external conditions. Moreover, in some smartphones, auto-brightness cannot be turned off, and along with the backlight, the saturation of color shades can also change.
Through a magnetometer (compass), the external magnetic field is measured, or rather its strength along three axes. As you might guess, a compass is needed to determine the cardinal directions, and it also simplifies the work with navigator applications - on maps it is much faster to determine the direction of movement. Unfortunately, not all smartphones have a magnetometer anymore, but it may well be found in a budget device.
A gyroscope, which is sometimes confused with an accelerometer, actually works in tandem with it and is useful for measuring speed around the X, Y and Z axes. Without a gyroscope, it is impossible to watch 360-degree videos and use VR technology, since the smartphone will not be able to track and capture movement in three-dimensional space.
Without a gyroscope you cannot play some games comfortably. The most popular example is Pokemon Go, in which users with devices that do not have a gyroscope cannot enable augmented reality mode and catch Pokemon through the camera.
A sensor called a pedometer, which measures the number of steps taken by the user, has become a frequent guest in smartphones. Without it, some applications designed to display the user’s physical activity will either not work at all, or only part of their functionality will become available. At the same time, there is software that measures steps only using an accelerometer, but this method of counting will be less accurate.
The list of popular sensors ends with a barometer - it is usually found in expensive smartphones, or in some secure devices in the mid-price segment. The barometer measures air pressure and altitude, and in general, the sensor, like a magnetometer, can be a useful addition to navigation.
More about Huawei: How to install EMUI 10 / Magic UI 3 right now without waiting in line | Huawei Devices
The full list of sensors available in a smartphone can be viewed by installing one or more free applications on the smartphone, among which Device Info, Sensor and Senson Kinetics stand out, but the list of worthy options does not end there.
How can you calibrate your Android screen?
h23,0,0,0,0—>
- Screen resolution 1920×1080. Screen Settings
Calibration is a touch screen adjustment that is made by the device based on the user’s actions with the sensor. The standard calibration process consists of displaying dots, circles, and crosses in random order on the screen, and requiring the user to click on them.
p, blockquote14,0,0,0,0—>
Based on this process, the system will build a certain scheme of areas and points on the screen, determining which of them are more responsive and which are less, which have higher accuracy and which have lower accuracy.
p, blockquote15,0,0,0,0—>
After this diagnosis, the system performs troubleshooting and adjustments. If you use a stylus on your phone more often, then it is with it that you need to calibrate the screen, and if you use the gadget manually, then calibrate it with your finger.
p, blockquote16,0,0,0,0—>
p, blockquote17,1,0,0,0—>
What to do if the engineering menu does not open?
If the standard options fail to get into the engineering menu, then the user needs to use the software - MTK Engineering or MobileUncle Tools. The first one is fast and convenient. Download the app and click MTK Engineer Mode. The second one is more powerful. Install the program, go to “Engineering mode” / “Engineering menu (MTK)”. Please note that the application was developed by a Chinese programmer, so it is only available in English and Chinese. It also cannot be found on the Play Market, but on the Internet this task will not cause difficulties.
Available features
Entering the engineering menu will please the user who operates various gadgets at a high level. But adjust in this way only those functions that you know well.
Huawei/Honor phone does not see Microsd/SD memory card - reasons and what to do?
Telephony
This is the first feature shown at the beginning of testing. There are many settings available at this point, which include the following:
- Adjusting the answering machine functions.
- Manual selection of GSM frequencies.
- Setting up conditional forwarding.
- A utility that was created for developers to support the AT command.
- Setting up compatibility between different devices.
- Selecting optimal performance and quality of mobile communications.
- Mobile Internet connection settings.
- 3G connection if the phone supports the function.
- Priority of the Internet, compared to voice traffic.
- Setting the energy saving mode in third generation networks.
- Selecting a commonly used communication standard.
- Testing communication with a specific channel.
- Configuring the GSM module manually.
Logging into IM solves these problems if you choose the right category.
Connectivity
A section with functions whose actions are aimed at transmitting information. Most often, Wi-Fi or Bluetooth is used for implementation:
- starts debug mode;
- FM analysis;
- Wi-Fi checks for data reception.
Entering the menu is similar.
If you have any questions or complaints, please let us know
Ask a Question
Hardware Testing
Engineering Mode provides module testing.
- Setting the optimal parameters for the correct sound.
- Adjust settings for high-quality photos.
- Checking the processes that occur inside.
- Deactivating and adjusting sleep mode during standby mode.
- Displays battery and charge data.
- Sensor calibration.
- Checking and adjusting the number of points if the owner of the gadget simultaneously presses several zones.
- GPS check.
Instructions for use below.