Why you should try replacing the battery
Xiaomi smartphones are distinguished by their versatility and budget price. But repairing such a phone at a service center can be expensive.
It is unlikely that anyone will want to pay a fourth or fifth of the cost of a smartphone to replace the battery.
Yes, and you will have to wait a while until the master gets his hands on it.
It is much faster and cheaper to replace it at home. If you follow all the instructions, the process will be simple.
Tips for replacing the battery
Mi phone, battery replacement and repair often turn out to be interconnected things if mistakes were made during the disassembly of the device.
Let's take a look at the problems that users often encounter.
- The cover of the smartphone is held very tightly. Removing it from Redmi can be quite difficult. Therefore, if problems arise, it is better to take the device to a service center.
- If the battery itself is difficult to handle, you need to pry it off with a plastic card or a pick. After all, the battery is held on with double-sided tape, which is securely fastened. If a crunching sound appears after trying to pry off the battery, stop the process and give the smartphone to specialists.
- If you have problems turning on the phone, you need to check that the cable is securely fastened. It is he who connects the battery to the motherboard. The same goes for the fingerprint scanner.
- If the cover does not snap completely into place or is loose after replacing the battery, you need to press it as hard as possible until all the latches are secured.
Replacing the battery on Xiaomi –
Disassembling the phone
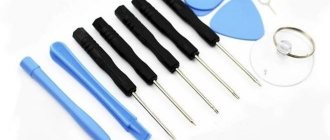
For repairs you need to prepare:
- small Phillips screwdriver (1.5 mm);
- plastic card;
- double sided tape;
- tweezers;
- new battery.
When the tools are at hand, you can start replacing.
First, use the supplied paperclip to remove the SIM card slot. Next, using a plastic card, begin to pry the cover around the entire perimeter of the phone to disconnect it from the latches. Be careful and do not make sudden movements.
When the cover is released from the latches, slowly remove it. You will see the protection that needs to be removed by unscrewing the bolts with a screwdriver.
There are several seals under the stickers. It is worth noting that after removing them, the phone will lose its warranty, if any.
Having gained access inside, carefully disconnect the battery cable with tweezers. To remove the battery, you need to peel off the double-sided tape that holds it in place.
Xiaomi Redmi 3 (BM47) battery replacement. Attempt No. 2
A few months ago, I wrote about an unsuccessful attempt to replace the battery on a Xiaomi Redmi 3. The failure was that the battery capacity was far from the declared one and the subsequent months of operation only confirmed this.
Actually, after writing the previous review, I realized that the battery would have to be changed again. I didn’t put it back to “native”. Firstly, I was too lazy to take the phone apart again. Secondly, it was interesting how the “new” one would work. There was hope that maybe it would “sway.” But hopes were not destined to come true. Not only did the battery not sway, but recently I began to notice that the charge was not enough even for a day. And after disconnecting from charging and listening to an audiobook, after about 45 minutes the charge dropped to 57%. One day, I decided to check the capacity, it turned out to be about 700 mAh. This is instead of 4100!!!. For those who are too lazy to read the previous review, I’ll say that I managed to get my money back for this “battery”. So, a few months ago, I added several battery options to my cart. “100% original” was written everywhere. Since the phone still worked, I did not buy it right away. I was waiting for an interesting coupon. And then one day I found one that reduced the cost from $7 to $2. Due to the pandemic, the battery lasted a little over a month. The kit included the battery itself, plus a standard kit for disassembling the phone, which was not bad in principle, and adhesive tape for attaching the battery.
Externally, the battery is very similar to the original. Moreover, it has exactly the same dimensions and weight.
The manufacturing date is also quite recent.
This time, before installing the battery in the phone, I decided to test it for capacity using LiitoKala 500. You can see how to connect such a battery in the photo.
The result disappointed me a little. The tester showed about 3100 mAh. But in any case, it was better than the previous version.
The replacement was quite successful. Even the screwdriver included in the kit turned out to be not very plasticine. At least I managed to disassemble and reassemble the smartphone using it. I will not describe the replacement process. Videos of this action are full on the Internet.
After replacement and several charges of discharges, I measured the capacity using a USB tester.
That one showed a capacity of 3433 mAh. If I understand correctly, then 3433 mAh at a voltage of 5 V is 4086 mAh at 4.2 V. That is. The capacity is really close to the declared one. It’s strange that the battery itself says 4000 mAh, but the description of the phone and how it recognizes it says 4100 mAh.
I did not install the AccuBattery program right away. And to what extent it correctly determines the capacity, I cannot say. But the result is below
As a result, the smartphone feels the same as it did after purchase. So far I'm happy with the replacement.
What problems may arise
The covers on Xiaomi smartphones are quite rigid and are firmly secured with latches. Sometimes it takes some effort to remove them. If you are afraid of damaging something, it is better to contact a specialist.
The battery is firmly attached to the smartphone with adhesive tape, which is difficult to peel off. A plastic card will help with this.
If you managed to change the battery, but the phone does not turn on, double-check whether the cable is connected.
There may also be problems with the lid. If it does not close, you need to press harder on all sides until all the latches are locked.
Algorithm of actions
Set of special mounting blades
In addition to the Redmi 3S phone itself, for disassembly you will need to prepare a set of special mounting blades that allow you to remove structural elements without damage.
You also need a set of tool screwdrivers and tweezers. To facilitate the removal of printed circuit boards, a flat dental spatula made of stainless steel is used. Additionally, you will need a hair dryer (to heat the adhesive layer between the battery and the phone body).
Equipment disassembly sequence:
- Turn off the phone's power using the standard algorithm, and then remove the tray with the cellular operator card from the niche in the case. To remove the tray, use a standard key (supplied with the smartphone).
- Separate the back cover of the equipment using a flat tool with a thin tip. When performing work, you should be careful, since the cover material is damaged by metal devices. It is recommended to use a plastic mounting spatula, which is inserted into the gap between the body and the cover in the corner of the smartphone. Then the latches around the perimeter of the cover are disconnected; force must be applied when performing the operation.
- Disconnect the switching flat cable going from the fingerprint sensor on the cover to the control boards. The connector is located near the end edge of the battery. The cable contacts are removed from the plug in a smooth motion; it is prohibited to jerk the cable sharply. After removing the seal on the patch cord retainer, access to the internal components of the smartphone opens.
- On the side of the cover there are plastic keys designed to control the equipment. To replace the elements, it is necessary to separate the rubber backing from the body. The button block consists of 2 plastic elements and a rubber connecting plate; the parts are replaced as a set.
- To access the microprocessor unit, you need to remove the protective metal screen located above the battery. The cover is secured with screws located around the perimeter. To unscrew the clamps, you will need a tool screwdriver with a Phillips blade.
.- On the top of the power supply there is a cable with a block, which must be unfastened using tweezers or a spatula from the upper boards with electronic components.
- Using a flathead screwdriver, remove the 5 screws located under the battery. Then you need to pry up and remove the cover covering the antenna unit.
- Under the cover there are boards with installed electronic components, which are secured with a screw.
- Disconnect the connectors located at the junction of the battery and the printed circuit board. After removing the wiring, the electronic module is removed from the smartphone body.
- Remove the battery from the niche, heating the adhesive layer with a stream of hot air.
- The owner can then disassemble the top processing unit of the smartphone, which is secured with an additional Phillips-head screw.
- Remove the head camera and LED flash, which are equipped with a separate connecting cable, from the mounting socket. There is an o-ring around the lens, which is lost during dismantling.
- Disconnect the connectors of the cables connected to the processor module. Dismantling is carried out using tweezers and mounting blades, observing safety precautions.
- To disconnect the pads on the opposite side of the printed circuit board, you must carefully turn the assembly 180°.
- On the front of the case there is a front camera, which is held in the socket with a latch. Nearby is a polyphonic speaker with a similar fixation scheme.
- After completing all the work, a touch display with connecting cables will remain on the front part of the case; removing the nodes at home is not recommended.
- To assemble the equipment, you must perform the steps in reverse order. The screws are tightened with little force; it is forbidden to distort the threaded part due to the risk of destroying the smartphone case.
What do we need
First, let’s prepare the necessary tools so that during the process they are always at hand:
- Special blade for mobile devices. It should not have sharp edges or deep scratches on its surface. Choose mainly metal from materials; plastic is too fragile.
- A clip for removing the SIM card tray and memory card. Most often it is included in the kit when purchasing a device.
- A sharp flathead screwdriver suitable for loosening bolts. Small size, compact.
- Tweezers. Used to work with the “internals” of the device.
- Scissors or a thin knife needed to pry out small parts.
- New camera module or battery , depending on what exactly you want to change.
- Thick protective film or glass. It is recommended to glue it to the screen to avoid scratching it in the process.