How to fix BlueStacks error “Unable to contact Google servers”
Checking the time on a computer
If you encounter such an error, the first thing you need to do is check the time and date set on your computer. This can be done at the bottom of the screen. After this, BlueStacks must be closed and logged in again.
By the way, due to incorrect date and time settings, errors can occur in many programs.
Setting up an antivirus
Quite often, an antivirus installed on a computer, for security purposes, can block some applications or access to the Internet. Therefore, we go into our protection, I use Eset Smart Security, and add BlueStacks to the list of exceptions. In my antivirus I go to “Settings-Change exceptions” .
In the additional window, click the “Add” . Now in Explorer we look for the desired program. After this, BlueStacks restarts.
Setting up a location
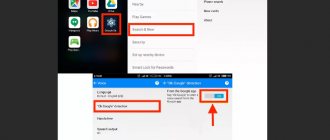
Sometimes BlueStacks cannot connect to Google servers due to a disabled location. You can enable it by going to “Settings” .
Here we find the "Location" .
Now all we have to do is turn it on using a special slider. Let's check if the error has disappeared.
Synchronization
Another similar problem can occur if there is no synchronization or an error. Go to “Settings-Accounts” and select your owl account there. Next, using the special icon, click “Synchronize” . We restart the application.
Login via browser
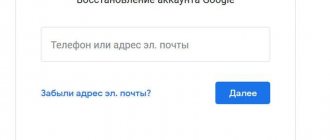
While logging into your account, you may see the following message: “Login to account failed .
Click "Next" .
To solve the problem of logging into Google services, you need to recover your password. When you log in through your browser, a special window will appear to confirm your data. Here you need to enter your phone number, receive an SMS and enter it in a special field. After successfully logging into your account, close BlueStax and log in again. In most cases the problem goes away.
Clearing cache
Another way to solve the problem is to clear the cache. Go to “Settings-Applications-Play Market” . Click "Clear cache" . Uncheck synchronization and restart BlueStacks.
After all the manipulations performed, the problem should disappear. When I had a similar situation, changing my password and then clearing the Play Market cache helped me.
Thank the author and share the article on social networks.
Server error in Play Market: causes of the problem
A server connection problem may occur due to an incorrectly installed system update or Google Play. This is the most common problem. Also one of the possible reasons is problems due to a full application cache.
It is possible that there are no problems with Google Play, but there is simply no connection to the Internet. Check whether mobile Internet or Wi-Fi is turned on.
Also, there may be no connection to the server if the date and time on the device is incorrect, for example, after the user removes the battery or completely discharges the device, this data is automatically reset.
It affects the operation of the Play Market and synchronization with the Google account that all Android users have. The problem may have arisen due to the installation or removal of an application downloaded from the store.
The connection problem may occur if you have installed a hacked application or are using cracks for games.
And one last thing. Oddly enough, not all Android devices support the application and web version of the store. This is because some smartphones and tablets simply do not meet the compatibility requirements. You can view the list of models on the Google Play website in the help section.
Bluestacks was unable to contact Google servers
One of the most necessary programs for fixing problems with Android applications is Bluestacks. Its powerful arsenal of tools allows it to rank among its peers, as well as solve many problems, one of which is “Unable to contact Google servers.” In this article, we will look at how to use BlueStacks software to solve this problem with logging into your Google account.
How to fix BlueStacks error “Unable to contact Google servers”
1.Checking the time on your computer
Like most others, this problem can be solved by simply setting the time and date on your PC. To do this, go to the appropriate menu by clicking on the time section in the lower right corner of the screen. After that, restart BlueStacks.
Due to the fact that the antivirus program has the ability to block data transfer on the Internet, there is a high probability that our application is included in one of such lists. To fix this, go to the working window of the antivirus program (in our case it is Eset Smart Security), find the line “Change exceptions. “
, after which we add BlueStacks there.
In order to add an application to exceptions, in the window that appears, find the program we need and click on “OK”
. Now you need to restart BlueStacks.
In some cases, the reason why BlueStacks does not connect to Google is due to incorrect location settings. Often it is its disabling. Therefore, go to “Settings”
We are looking for the line responsible for the location.
Click on the operating mode switch and check if the problem goes away.
Clearing cache
A connection to the server cannot be established, although the Internet on the device is stable and the date is set correctly. The first thing you need to do is clear the cache of Play Store and Google Play Services applications.
To do this, go to the system settings in the “Device” item and select “Applications”. Find the Play Market and click sequentially:
- stop;
- erase data;
- clear cache;
- remove updates.
How to clear cache
We carry out the same actions for the Google Play Services application.
Just like in the Market application, click stop, delete data and clear cache
We reboot the device and try to go to the Play Market. If the connection to the server still cannot be established, try the next step.
Root of Evil
Often, users are unable to try out the emulator's features because they were unable to contact Google's BlueStacks servers. There are several methods on the Internet that neutralize destructiveness. For ease of understanding, we will divide the further narration into several logical blocks.
Time zone mismatch
Check the date and time on your personal computer. To do this, just move the cursor to the lower right corner of the interface and change the above parameters.
Antiviruses and other security programs
The second option is to block Bluestack's capabilities with an antivirus. To solve the problem, open the security software and add the emulator to the exclusion list .
Clearing the cache
This guy is always ready to disrupt applications. and this applies not only to our emulator.
Step-by-step instructions for resolving the issue are presented below:
- Open Android settings, then "Applications" .
- Next, select Play Store in the “All” section.
- Now click on the button "Clear cache" .
- We wait for the procedure to complete and close the settings window.
Features of the BlueStacks player
Before moving on to a detailed discussion of the problem, it is worth briefly talking about the main features of the BlueStacks application. This emulator is designed to run Android applications on computers running Windows. Separately, I would like to note that the user does not have to understand all the intricacies of the program; all that is necessary is to install it on the computer, log into your Google account and make the initial settings. After this, the usage is identical to regular Android.
BlueStacks asks for a Google account
As noted above, for comfortable work you need to authorize your Google account, but this does not always work. And if this is the case, then right while the program is running, a message appears: “You need to sign in to your Google account.” This can lead to the fact that launching the Play Store application becomes unavailable and, accordingly, installing new games as well.
Changing Google Pay settings
If a person is convinced that he does not have Root configured, but NFC is indeed present on the phone, it is recommended to reinstall the Google Play application:
- Remove the program.
- Open Google Play.
- Through the search, find and install the Google Pay application.
- Open the program.
- Add a card to Google Pay, indicating its number, expiration date and CVC code.
- Confirm the action by entering the code from the response message.
After completing all the specified settings, you need to once again make sure that NFC is activated on your phone. The corresponding icon is usually displayed in the notification shade or in the “Contactless payment” settings item.
Reasons for the error
Before moving on to solving the problem, you still need to figure out why it appears. Here we can immediately say that incorrect operation of Google services is a rare occurrence, and is almost always caused by problems with the program or operating system.
- incorrectly set time on the computer;
- the impact of the antivirus on the operation of the program;
- the emulator incorrectly recognizes the location of the device;
- restart device synchronization;
- cache error.
All of the above reasons lead to one thing - the error “Could not contact Google services.” Knowing the root of evil, you can begin to eliminate it.
“Unable to contact Google servers” - how to fix it
We will step by step analyze each of the above-described causes of the problem and offer guidance on how to eliminate it.
Incorrect time setting on the computer
When an error appears, the first thing to do is check the time on your computer. To do this, click on the date on the right side of the taskbar and if a temporary discrepancy is detected, correct the situation through the system settings.
Effect of antivirus on program operation
An antivirus can recognize an emulator as a program that is dangerous to the system and block it. In this case, you need to add BlueStacks to the exceptions. Let's look at how to do this using ESET Smart Security as an example.
- Open an antivirus window.
- Find the "Settings" section and go to it.
- Among the proposed options, click on “Edit exceptions”.
- In the window that appears, click “Add”.
- Select BlueStacks from the list, highlight it, and click OK.
- Accept all changes and restart the emulator.
These steps should help resolve the problem, however, if this does not happen, move on to the next method.
The emulator incorrectly recognizes the device location
The error may be caused by an incorrectly specified location in the emulator itself. Accordingly, to fix the problem it is necessary to perform some manipulations in the program.
- On the main screen of the emulator, go to the “Settings” section.
- Open the Location option.
- In the upper right part, set the switch to the active position.
After this, the program will automatically establish your location and the error should disappear.
Restart device synchronization
After the initial synchronization of the application with your Google account, a failure may have occurred, so it would be a good idea to re-pair.
- Go to the program settings.
- From the list, select “Accounts”.
- Identify your account.
- Click the “Synchronize” button.
- Restart the program.
Cache error
Sometimes errors can also occur in the device cache, so clearing it can help. To do this you need to follow a number of simple steps:
- Go to the program settings.
- Select "Applications" from the list.
- Select from the list of Play Store applications.
- In the new menu, click on the “Clear cache” button.
- Restart the program.
One of the above methods should help solve the problem. It is recommended to try them one by one, in the order presented in the article.
Registration on a computer
Registration in the play store via a computer differs from registration via a smartphone. To register for Google Play, you need to register a Google account. To do this, in any browser you need to open the official Google page and find the “Login” button. By clicking on it, an authorization window will appear. Select the “Other options” link under it and click “Create an account.”
A form will appear in which you need to indicate your first and last name, come up with a unique email address, enter your password twice, indicate your date of birth and gender, phone number and country.
For backup you need to provide an additional email address. If it doesn't exist, create it. After filling out all the fields, click the “next” button. A window with the privacy policy will open. We review the terms and click the “I Accept” button. After that, congratulations on creating a new account will appear on the screen, where you need to click the “continue” button. At this point, registration is considered complete.
Features of the BlueStacks player
Before moving on to a detailed discussion of the problem, it is worth briefly talking about the main features of the BlueStacks application. This emulator is designed to run Android applications on computers running Windows. Separately, I would like to note that the user does not have to understand all the intricacies of the program; all that is necessary is to install it on the computer, log into your Google account and make the initial settings. After this, the usage is identical to regular Android.
Reasons for the error
Before moving on to solving the problem, you still need to figure out why it appears. Here we can immediately say that incorrect operation of Google services is a rare occurrence, and is almost always caused by problems with the program or operating system.
- incorrectly set time on the computer;
- the impact of the antivirus on the operation of the program;
- the emulator incorrectly recognizes the location of the device;
- restart device synchronization;
- cache error.
All of the above reasons lead to one thing - the error “Could not contact Google services.” Knowing the root of evil, you can begin to eliminate it.
“Unable to contact Google servers” - how to fix it
We will step by step analyze each of the above-described causes of the problem and offer guidance on how to eliminate it.
Incorrect time setting on the computer
When an error appears, the first thing to do is check the time on your computer. To do this, click on the date on the right side of the taskbar and if a temporary discrepancy is detected, correct the situation through the system settings.
Effect of antivirus on program operation
An antivirus can recognize an emulator as a program that is dangerous to the system and block it. In this case, you need to add BlueStacks to the exceptions. Let's look at how to do this using ESET Smart Security as an example.
- Open an antivirus window.
- Find the "Settings" section and go to it.
- Among the proposed options, click on “Edit exceptions”.
- In the window that appears, click “Add”.
- Select BlueStacks from the list, highlight it, and click OK.
- Accept all changes and restart the emulator.
These steps should help resolve the problem, however, if this does not happen, move on to the next method.
The emulator incorrectly recognizes the device location
The error may be caused by an incorrectly specified location in the emulator itself. Accordingly, to fix the problem it is necessary to perform some manipulations in the program.
- On the main screen of the emulator, go to the “Settings” section.
- Open the Location option.
- In the upper right part, set the switch to the active position.
After this, the program will automatically establish your location and the error should disappear.
Restart device synchronization
After the initial synchronization of the application with your Google account, a failure may have occurred, so it would be a good idea to re-pair.
- Go to the program settings.
- From the list, select “Accounts”.
- Identify your account.
- Click the “Synchronize” button.
- Restart the program.
Cache error
Sometimes errors can also occur in the device cache, so clearing it can help. To do this you need to follow a number of simple steps:
- Go to the program settings.
- Select "Applications" from the list.
- Select from the list of Play Store applications.
- In the new menu, click on the “Clear cache” button.
- Restart the program.
One of the above methods should help solve the problem. It is recommended to try them one by one, in the order presented in the article.
How to solve a problem?
So, if root access has been activated on your smartphone, the bootloader is unlocked, or the device is based on unlicensed firmware, you will not be able to pay for purchases in a store contactless. But, if you are not sure that Root access is open or there are problems with the operating system, it is recommended to first double-check the settings:
- Activate the NFC icon in the notification shade.
- Open your phone settings and go to the “More” section.
- Change wallet type from HCE to SIM.
- In the application section, enter all permissions for the program that is used as payment for purchases.
- In the “One touch payment” item, set the value to GP or AP.
If after “playing” with the settings nothing has changed, and contactless payment is still not available, it means that Root, the bootloader is activated on the phone, or there are problems with the firmware.
First you need to lock the bootloader. This situation usually happens on Android smartphones. The user needs to turn off the device and open the developer menu (hold down the top volume rocker and power button). Next you should pay attention to the “Look State” item. There you need to set the value “locked”, which will indicate that the bootloader is blocked.
When it becomes clear that the bootloader is not active, but at the same time NFC does not work, you need to move on to other ways to solve the problem. For example, to disable root rights. If the user is sure that he really has Root activated, deactivation can be performed as follows:
- Download the SuperSU application.
- Open the program and go to its settings.
- Confirm complete removal of root rights.
- Agree to the terms of use.
- Reboot your smartphone.
After completing this simple operation, Root will be disabled and, most likely, contactless payments will work on your smartphone again. But if you fail, don't despair. You need to make sure that the smartphone runs on the latest licensed firmware. For this:
- Open phone settings.
- Go to the “About device” section.
- Click on the item with the software version.
- Click on "System Update" if available.
If it becomes clear that, for example, Xiaomi is running the Chinese version of MIUI, you will have to download the firmware from the official website and install it. In other cases, after completing the updates, NFC should work.