Deleting an account
If all the methods given above do not help, and the Google Android account synchronization error appears again, you will have to take extreme measures - deleting the existing “account”.
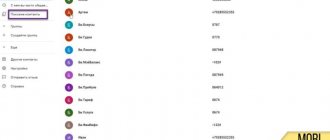
To do this, use the settings menu, where you select the accounts section. Here we are interested in the Google account. We enter it, enter the Gmail address and confirm the deletion with the button below or the menu command.
Now, as is probably already clear, you should restart the device, after which, if you have an Internet connection and try to log into Google services, the system will prompt you to either create a new entry or use existing registration data. Enter your username and password and confirm your choice. If this does not help (for example, on devices with installed firmware), you will have to create a new “account”, but in this case there can be no talk of any restoration of the contact list or previously installed applications.
Fixing Google account synchronization error
Most often, the Google account synchronization error on Android turns out to be a short-term phenomenon - it disappears itself a few minutes after it occurs. If this does not happen, and you still see a message like “Problems with synchronization. “Everything will work soon” and/or icon (in the synchronization settings, and sometimes in the status bar), you need to look for the cause of the problem and, of course, resort to eliminating it. However, before taking active steps, you should check the obvious, but important nuances, which we will discuss below.
Video
I'll start in order. After this suspicious guy in Dolcabar picked up my phone, my whole life went awry.
The guy asked if I could live without my phone for 10 minutes and started updating the system. After some time, I noticed that my gmail stopped updating. I deleted my gmail account in settings and logged in again. But the launch of the Gmail application is forever stuck in this phase:
In Settings-Accounts-Gmail you can see that synchronization is not working. Messages appear periodically: An error has occurred in the com.google.process.location application. An error occurred in the Google Calendar Sync app. An error occurred in the Google Play Services application. And a few more.
God bless him, with gmail, in a pinch I can run it in the browser, but without it Google Play does not seem to work, which prevents me from downloading and updating applications. Even though I'm logged into Google, I get the following message:
Does anyone have any ideas on how to solve the problem without going through a factory reset?
I’m not banned from Google, I’ve read about 10 instructions. I’ve turned the checkboxes on and off in the settings, stopped applications, cleared the memory and cache, rebooted 10 times. Nothing helped, I’m taking help from the audience.
The Android mobile operating system, like almost any modern platform, provides functionality that ensures the safety of the user’s personal data. One of these tools is synchronization of contacts, passwords, applications, calendar entries, etc. But what if such an important element of the OS stops working properly?
One of the common problems in this case is the lack of synchronization of the user's contact list. Such a failure may be short-term, in which case after a certain time the exchange of data with the Google cloud is restored.
It's another matter when the termination of contact synchronization is permanent. We will talk further about how to correct such an error in the system.
Before performing the steps described below, you should double-check whether the device is connected to the Internet. Just open any page in a mobile web browser or launch an application that requires mandatory network access.
You should also be sure that you are logged into your Google account and there are no problems with its operation. To do this, open any application from the “Good Corporation” mobile application package, such as Gmail, Inbox, etc. Better yet, try installing any program from the Play Store.
And the last point - auto-sync must be turned on. If this function is activated, the necessary data is synchronized with the cloud automatically without your direct participation.
To find out if this option is enabled, you need to go to “Settings”
—
“Accounts”
—
“Google”
.
Here in the additional menu (vertical ellipsis at the top right) there should be o .
If all of the above points are in perfect order, feel free to move on to ways to fix the contact synchronization error.
Method 1: Manually synchronize your Google account
The simplest solution, which in some cases can be effective.
If after performing these steps, synchronization begins and completes successfully, the problem is solved. Otherwise, we try other ways to resolve the error.
Method 2: Removing and Re-Adding Google Account
This option is even more likely to fix the problem with syncing contacts on your Android device. You just need to delete your authorized Google account and log in again.
Our next step is to add the newly deleted Google account to the device again.
By adding a Google account again, we start the data synchronization process from scratch.
Method 3: Force Synchronization
If the previous troubleshooting methods do not work, you will have to “cheat,” so to speak, and force the device to synchronize all data. There are two ways to do this.
The first method is to change the date and time settings.
As a result, your contacts and other data will be forcibly synchronized with the Google cloud.
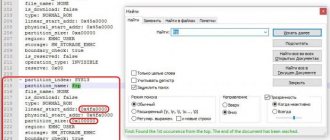
Another option for forcing synchronization is using a dialer. Accordingly, it is suitable only for Android smartphones.
In this case, you need to open the Phone application or any other “dialer” and enter the following combination:
As a result, you should see the following message in the notification bar indicating a successful connection.
Method 4: Clear cache and delete data
A very effective method of dealing with contact synchronization errors is to completely delete them and clear the associated data.
Now let's start clearing the cache and contact list.
Method 5: Third Party App
It may happen that none of the methods described above will fix the problem with contact synchronization. In this case, we recommend using it from a third-party developer.
The “Fix for contact synchronization” program is able to identify and correct a number of errors that lead to the inability to synchronize contacts.
All you need to do to fix the problem is click the “Fix”
and follow further instructions of the application.
What is synchronization and how does it work
To use this function, you must first create and log in to a Google account on your phone.
To activate the function, you need to go to your phone settings and select the appropriate section. When you turn on synchronization, you can make additional settings. The setting allows you to choose what exactly will be synchronized and how often the synchronization procedure will occur.
After activation, synchronization will occur automatically regularly as long as there is an Internet connection. You can change settings or disable a feature at any time by simply going to Settings.
You can also save application and game data by creating backup copies. You can synchronize both game progress and application data. Having a copy of the information will allow you to restore it on any device in order to continue using the application with saves or play the game from the right place.
How to recover data on a new device
To import contacts and other information from your old device to your new one, you need to log into your Google account and then click on the synchronization button. After completing these simple steps, contacts and other information will be downloaded from the Internet. You can log in using one account on several devices, including those running other operating systems (for example, bookmarks in the browser can be synchronized between a laptop, PC, tablet and phone).
It is recommended to leave the auto-sync feature turned on so that up-to-date information about contacts or other personal data is always available across multiple devices.
How to set up data synchronization on Android
To synchronize yourself on a mobile device via a Google account, you need to follow these instructions:
- Check if your phone is connected to the Internet or Wi-Fi.
- Go to the standard settings menu, shown as a gear.
- In the list that opens, find the “Accounts and Synchronization” subsection.
Attention! Depending on the Android OS version and the type of graphical interface, the section may have a different name, for example, “Backup and reset”.
- Find the required account type.
- Find the required account and click on “Synchronization Settings” or on the account itself. Once in the vault, you can see the date it was last saved and the information available for archiving.
- Depending on the firmware version, click “Synchronization” or in the list of data and applications, mark the items that need to be synchronized.
Important! The amount of free cloud storage may not be enough when synchronizing large amounts of information. In this case, you may need to expand the memory for a fee.
To start the auto-synchronization process, you should go to the corresponding section in the settings, move the slider, and the action will begin to run in the background.
Auto-sync allows you to simplify the task and save time when transferring data from one phone to another. However, for the function to work correctly, you will need to set up an account for storing content, specifying the interval, location and file type. You can disable data sharing to avoid wasting traffic and saving battery power.
What is Google Account Sync on Android
Device synchronization is convenient for working with files on different devices
Data synchronization on Android is a mechanism that, using a Google account, combines all actions and materials on different devices into one holistic stream, i.e., ensures continuous exchange of data between the profile and the device. This allows you to receive the most up-to-date information on each of them.
Note! If the synchronization setting is activated, then user information from each gadget is automatically uploaded to Google Drive and then copied to other devices running under the same account.
The following elements are synchronized:
- contacts;
- application and mail data;
- browser bookmarks;
- documentation;
- calendar.
You can also enable synchronization of the Photos, Documents, Notes and other installed Google services.