Many owners of modern Androids complain about problems with account activation after a “hard reset” or flashing. So, the phone writes that “The device has been restored to its default settings.” And if you try to enter your password, you will receive a notification “We were unable to log into your account due to an unknown error. Please try again in 24 hours." In most cases, this applies to models with Android Lollipop and higher operating systems installed. Today we will tell you what to do in this case and how to quickly bypass the blocking.
Cause of unknown error
The reason for the message is the “Google FRP Lock” function used in the latest versions of Android. This is a protection mechanism designed to protect the owner’s data and the phone itself from theft. Thus, the smartphone remains protected even if all settings are completely reset. After a reset or firmware update, you must specify the previously linked account and enter the password for it. According to the developers, this mechanism prevents attackers from obtaining the owner’s data after returning to its original state.
Since a hard reset is often done before and after selling a used phone, the problem remains relevant. Google representatives say that FRP-Lock is valid for up to three days from the moment it is turned on, but, alas, the protection is not always turned off after the period has expired.
Despite the improvement of the security system, the blocker is already obsolete and experienced users can bypass it without problems. As practice shows, it is the owners of the device who have the greatest difficulties in bypassing the protection.
Login
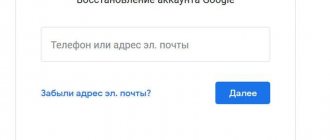
If the system requires you to log in to your Google Play account, then that’s what you need to do. During the account creation process, you created a username and password. They need to be introduced. The problem is that few people remember this data, so it needs to be restored.
Restoring access if the password is unknown:
- Click “Forgot your password?”;
- Enter the last password you entered. If you don't remember anything, select "Another method." It involves recovery by specifying additional information: time of account creation, contact email address, etc.;
- Enter the required information and click “Next”. Receive a verification code or an email, depending on what you chose;
- Reset your old password and set a new one. Write it down in a notepad.
Restoring access if the username (login) is unknown:
- Please provide a phone number or additional email address;
- Indicate the last name and first name that were in the account;
- Enter the code received by phone or email;
- Select the desired username from the list. If it is not there, check the correctness of the entered data and repeat the procedure again.
How to prevent future blocking
As a rule, the first time they learn about a problem is when a block has already occurred. However, you need to know how to avoid blocking so you don't step on the rake twice.
- Firstly, if you have made a hard reset on your phone, it is not recommended to change the password for your account. Many, after entering incorrectly, immediately rush to the browser, where they change the password for their account. This will lead to the blocking being activated with almost 100% probability.
- Secondly, to avoid blocking, you must always unlink your Google account, which is located in the settings menu, before performing a reset.
Checking the antivirus
Antiviruses protect the average user from numerous threats on the Internet. But there are times when the antivirus blocks something important, for example, logging into your Google profile. In order to make sure that the antivirus does not interfere with logging into your account, you should temporarily remove it. The antivirus is removed like any other application. To remove it, you need to go to “Settings” - “Applications” - “Antivirus name” - “Delete”, or drag it from the desktop to the trash.
Ways to fix error 0x00000019 “bad pool header”
Bypass FRP-Lock
If you don’t have time to wait three days or you don’t want to pay decent money for unlocking at a service center, then you can try to disable the phone binding yourself, that is, delete your Google account from Android.
What you will need to do:
- First of all, we need to access the Settings menu.
- In the "Security" menu, disable all activated functions.
- In the “Restore and reset” menu, reset the DRM licenses.
- In the same menu, perform “Reset settings”.
- Wait for completion.
So, now we know what needs to be done and where, but how to get to the “Settings” menu on a locked phone? The use of custom firmware, launchers, as well as shells supplied with the main operating system greatly change the functionality of the device. Standard options will be discussed next, but they do not work on all models.
Sign in to one of the device owner's accounts
Sign in to one of the device owner's accounts . After any hard reset to factory settings, the user may catch an error on Android related to the Google account - “ The device has been restored to its default settings .” Any attempt to enter a known correct login password for a previous account ends with the warning “ Log in to one of the accounts of the owner of this device .” For many, the task is complicated by the fact that the account has never been linked to this phone, and entering data from another account is impossible from the very beginning. We will tell you how to quickly fix this bug.
Why can't I log into my Google account after a reset?
The latest versions of Android have introduced too many security options. In particular, the “Login to one of your accounts...” notification is the first step in protecting your device from theft. That is, a thief will not be able to steal, perform a Hard Reset and use it quietly; even the usual flashing of the device will not help him. This warning appears especially often in the line of devices from Samsung, Alcatel, Lenovo, ZTE, BQ, Huawei, Fly, etc. Another aspect of the requirement to enter a previous account is the synchronization of all data (phone book, call log, browser, etc.).
Removing Google account (FRP) from the phone
So, to solve this situation, you will need to completely remove your Google account from Android. This can be done by simply resetting settings, DRM licenses, or using a third-party Dev.Settings utility. Resetting and erasing licenses is carried out in the standard option of System Settings, so first you need to bypass activation and get to the settings.
Via Google search
- Turn on the device and follow the language selection option.
- Select your language, and then hold the Home .
- This click should activate Google search at the top.
- Enter “ Settings ” there and click on the drop-down list below. If everything is done as it should, you will open this option.
- By the way, you can launch the panel at the beginning, where there is an “ Emergency Call ” button: click on it and go to the dialing menu, then press “ Home ”.
Via keyboard
- Get to the point where you are prompted for mail, click in the input field, which will bring up the keyboard (this will be a standard application).
- On it, long press and click on the dog symbol “ @ ” - this should cause the “ Gear ” to appear.
- Go to it and click on “ Android Keyboard ” in the menu.
- We go a step back, where the “ Task Manager ” option appears - click on it.
- This action will launch the Google Search at the top - then we do everything as in the previous method.
Via MicroSD flash drive
- While the phone is running in the “ Account Confirmation ” state, insert the USB flash drive into the phone.
- Important (!) This method is suitable for those who do not need to remove the battery. Otherwise, you will need an OTG cable through which you can connect the flash drive to the device.
- Afterwards the message “ Change default recording memory ” should appear and click OK. Sometimes recognition can take up to an hour - wait!
- Afterwards, the storage view will open, select “ Application and multimedia data ” there.
- We look for the same “ Settings ” in the list, open them and select “ Run ” at the bottom.
How to delete your account yourself
After you go to the “ Settings ” menu, try two options there that should erase your account data:
- Go to the “ Backup and Reset ” option. In each model, the path may be slightly different, for example there will be the item “ Backup and reset ”.
- First of all, check if there is an option “ Reset DRM licenses ”. If there is one, we erase all licenses. There is nothing wrong with this situation, and you can restore the DRM option.
- Go back and perform the “ Factory Reset ” itself directly. If you have the opportunity to specifically select erasable options, then select only “ Delete accounts ”.
Afterwards, the phone will restart, and the request to synchronize with your account should disappear, or it will be confirmed without problems.
Using the Dev.Settings program
If none of the above helps you, then you can try the Development Settings application. This program performs direct entry into the settings at startup. All you need to do is download its apk file to your phone and install it on your phone. An OTG cable or MicroSD is useful for this. Here are detailed instructions on this matter.
Download the archive, unpack Dev Settings.apk onto a regular USB flash drive. We boot the phone (wait for at least the language selection to load), connect the flash drive via OTG (it is advisable to use a minimum length wire, with a long one you may not be able to see the flash drive) with the Dev Settings.apk file on it. We wait. The file manager will automatically launch in a few seconds. In it we see our Dev Settings.apk, install it (most quickly after a Hard Reset, when you try to install the apk, you will see the message “ Installation blocked ”, Click on configure and check the box next to “ Unknown sources ”). Install the APK and launch it immediately. Select the Backup and reset menu at the bottom and click Reset data . After which the phone will go into reboot (reboot), erase everything, and after reboot the Google account WILL NOT BE REQUIRED.
UPD!!!: If OTG detection does not work for you and the file manager does not open, do not be upset, as this solution is considered a firmware bug. There is an option that the manufacturers have already released a patch for it and you already have it installed. After some update. You need: find the earliest Android 5.1 firmware on your device and install it. Do a reset, and after resetting, try connecting the USB flash drive again, maybe it will work.
Conclusion
All of these solutions are the simplest and help solve the “Log in to one of the accounts of the owner of this device” error in most cases.
In particularly severe cases, many forums advise flashing the device’s firmware via a computer, using special utilities and drivers. There is some logic in this, but there is also some risk - when installing a custom assembly, you may lose the warranty on the device. Therefore, it is better to contact a specialist if you have never encountered this process yourself, because you don’t really want to turn your phone into a brick. DOWNLOAD:
| [File size - 17.3 Kb] | 2018-02-12 01:32 |
No. 1 Using a flash drive or SD card
For these purposes, you can use memory cards standard for phones, but if the device does not have a slot for them, then an OTG cable and a traditional flash drive of any size can help.
Procedure:
- Turn on the phone.
- Connect the drive. Remember that the phone can take up to 1 hour to recognize a flash drive.
- In the window that appears, select “OK”, after which you will go to the storage settings.
- Select "Application Data", select "All" and find "Settings".
- At the bottom of the window that opens, select “Launch”.
- Well, then everything is according to the standard.
If you have the ability to insert a regular micro SD without disconnecting, then you can connect it. You can find out what it looks like in practice here:
Deleting an account
If all the methods given above do not help, and the Google Android account synchronization error appears again, you will have to take extreme measures - deleting the existing “account”.
To do this, use the settings menu, where you select the accounts section. Here we are interested in the Google account. We enter it, enter the Gmail address and confirm the deletion with the button below or the menu command.
Now, as is probably already clear, you should restart the device, after which, if you have an Internet connection and try to log into Google services, the system will prompt you to either create a new entry or use existing registration data. Enter your username and password and confirm your choice. If this does not help (for example, on devices with installed firmware), you will have to create a new “account”, but in this case there can be no talk of any restoration of the contact list or previously installed applications.
No. 2 Using a SIM card
This method assumes that the device can be reached.
Procedure.
- Insert the SIM card into the switched off device and turn it on. Wait for the network to appear.
- Call this SIM card.
- During a call, select to add a call and interrupt the call. We are left with a menu with a numeric keypad.
- Dial the combination *#*#4636#*#*.
- In the advanced settings window, click the “Back” arrow, which will take you to the desired menu.
This solution is relevant only in rare cases.
No. 3 Through the virtual keyboard
In this case, a lot depends on the keyboard used. In this regard, the input to its configuration is quite diverse.
Procedure.
- When selecting available Wi-Fi networks, click on the password field so that the keyboard appears.
- Call up the keyboard settings menu.
- In the additional menu, which is hidden under the three dots icon in the upper right corner, select “Help/Feedback”.
- Press the “Recent applications” key (square).
- Find the search line, and if it is not there, then in the third step go to any other window.
- In the search bar, type the word: Settings. Select the appropriate menu from the drop-down menu.
The methods described above are universal, but they do not always help in case of blocking “We were unable to log into our account due to an unknown error.” If they did not help, then you will have to look for a solution suitable for a specific device. Experienced users can use various tools to remove the lock. One of these methods is described in the video tutorial below. Let me note right away that the described option is only suitable for MTK processors.
If the Play Market does not work on your phone or tablet, then the reason for this may be a number of errors, ranging from a crash to a conflict with other applications. To prevent Play Market from breaking, you have to look through a large number of settings and try different ways to fix the problem.
Checking the Internet connection
If the user cannot access the Play Store, then you should also check the stability of the Internet connection. You will not be able to log into your Google account if your Internet connection is too slow. To check this, open a standard browser and go to any site; if it loads quickly and without any problems, then the connection is stable and you can proceed to the next step.
Bug fix
If Google Play Market does not start on your tablet or phone, first restart the device. Restarting the system eliminates simple software glitches that prevent the Play Market from working.
If rebooting does not help, and the Play Market on Android still does not open, check the availability and speed of the Internet. If you connect to the network via WiFi, there may be channel congestion, which causes the speed to drop significantly. The cause of the failure may also lie in a missing communication signal when using mobile traffic. If there is no connection, the Play Market will take a long time to launch and open.
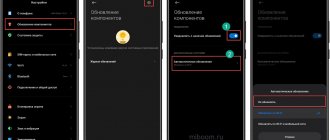
Another possible cause of the problem is an incorrectly set date. To change date and time settings:
- Open settings.
- Go to the “System” section. Find the "Date and Time" submenu.
- Set the correct value.
If these simple methods did not help eliminate the errors of the working Play Market, and it still writes that launch is impossible, then you will have to use other methods.
Reset to factory settings
This method is the most extreme measure. Perform it at your own peril and risk and only if all of the above methods did not help. A hard reset completely deletes all accounts, applications, and contacts.
To perform a complete reset of the phone, you need to go to “Settings” - “Backup and reset” - “Reset settings”, click “Ok”. The phone will begin to reboot and perform a factory reset.
Working with built-in applications on Android
If there are no problems with the date or Internet connection using WiFi or mobile traffic, and the Play Market does not start, then work with the temporary data of the built-in programs. You should start with the Play Market:
- Open the "Applications" section in settings, go to the "All" tab to display the built-in programs.
- Go to Play Market settings.
- Erase data and clear cache.
Check if the app store is working. If not, go back to its settings and uninstall the updates. Check the program status again.
If uninstalling updates and clearing the Play Store cache did not help, follow similar steps with other programs - Google Play Services and Google Services Framework.
Also, make sure that the Download Manager application is enabled on your system. You can also find it on the “All” tab in the “Applications” section.
Uninstalling a Play Store update
Don't be afraid to uninstall an installed update. After some time, the system will again offer to download it or do it automatically if permissions for this are set in the settings (example - automatic download when connected to a Wi-Fi network).
Sequencing:
- Go to “Settings” > Applications, select Google Play Store;
- Click "Turn Off". A message appears that reads: "Disabling a built-in service may interfere with other applications." Select "Disable Application" despite the warning;
- Wait until the installed update is removed. After this, the size of the application will be significantly reduced.
Account deleting
Deleting and re-adding your Google profile can help resolve the problem.
- Find the Accounts section in Settings.
- Open the sync options for the Google profile you are using.
- Call up the additional menu and select “Synchronize” to create an up-to-date backup.
- Call up the additional menu again and select “Delete”.
After deleting the profile, reboot your device. The next time you start, go back to the settings and add your account again by entering your email and password.
Another important note regarding your account is that the Google Accounts app must be enabled in your settings. You can check the status and, if necessary, launch the built-in program for working with profiles in the “Applications” section on the “All” tab.
Checking the correctness of the entered data
Due attention should be paid to the correctness of the entered data , i.e.
Check that your login and password are entered correctly; this can be done by logging in to the Google website itself from your computer. Be careful when entering your password, because... it is case sensitive. Fixing error 0x80300024 when installing Windows 7
The passwords Nastya and nastya are different passwords, keep in mind.
Troubleshooting application incompatibilities
One of the reasons for Play Market blocking is the operation of third-party applications. First of all, we are talking about the Freedom program, which allows you to make in-game purchases from a fictitious card. If the Play Market does not connect or is not updated after Freedom, then you need to clean the hosts file. The reason that the Play Market on Android does not work may be incorrect entries added by the Freedom program. To remove them you will need root rights.
If the problem disappears after a reboot, then you have correctly diagnosed why the Play Market application is not working.
When might this be needed?
Your Google account contains a variety of information. These include contacts, SMS messages, a list of applications downloaded to Google Play, and much more. If you do not want all this information to fall into the wrong hands, then delete your account before transferring your smartphone to another person. In particular, you need to delete your Google account on Android before selling the device. Also, this action will not hurt if you decide to give the phone to a member of your family.
Some people, before selling a device, try to remove the Play Store so that the buyer does not find out the payment information and does not know which applications were downloaded. But in reality this action is not required. Simply log out of your account, and the Android operating system will be cleared of almost all of your personal information. Only photos, music and other media files will remain.
Reset
What to do if the Play Market store does not work, and all of the above methods have been tried and found to be useless? In this situation, there is only one way out - deleting all information from the device.
- Back up your important data: contacts, messages, photos, videos, etc.
- Open settings, go to the “Backup and reset” submenu.
- Select Reset Settings. Click Reset Settings.
- Confirm the operation and wait for it to complete.
Resetting the settings completely clears the internal memory, but the information on the external drive remains untouched. Therefore, the same photos and videos can be saved by simply moving them to a memory card. Contacts can be synchronized with your Google account. Resetting settings is a drastic way to solve the problem, so you have to resort to it extremely rarely. Usually the answer to the question why the Play Market application does not work on Android is much faster and safer for personal data.
Deleting data and clearing cache
- Go to your phone's settings and go to the "Applications and Notifications" section.
- In the new window, select Applications. Scroll down the list until you find “Google Play Store” (not to be confused with “Google Play Services”).
- Tap on the program, select “Memory” or “Storage” (the item may differ depending on the phone model).
- Click Clear Cache. Here, select “Erase data” or “Reset”.
- If you are unable to clear the cache, carefully read the instructions on how to do it correctly.
Problems on Meizu smartphones
If Google Play Market does not work on your Meizu phone, then you do not need to use the methods listed above. Chinese developers (we are talking about official Meizu products) are making Google Play Services available as an installer. This is done so that when you first start the device, Google service updates are immediately installed.
Many users of Android devices are faced with the problem that PlayMarket does not work on Android, both via the mobile Internet and via Wi-Fi. Because of this, they cannot download any normal application, and installing programs from third-party sources is known to threaten the security of the smartphone. Usually, when the Play Market does not work on Android, it says “no connection”, “server error”, “an error has occurred” or “check the connection”. It’s worth noting right away that the Play Market may not work for many reasons. In this article we will look at all these reasons and methods to eliminate them.
Uninstalling Play Market updates
If none of the above helped get rid of the error, and your smartphone still says “You need to sign in to your Google Play Market account,” then you should try uninstalling the latest Market updates , thereby rolling it back to the initial version. Often, applications in initial versions work stably, but not very fast. In any case, after logging into your profile, the Play Market will update itself to the latest version.
What is Mirrorlink and how to use it
In order to remove updates, find the Play Market in applications and click the “ Delete updates ” line. After that, try logging into your account.