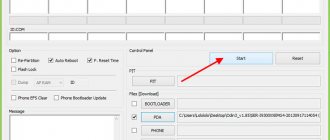
After the device manufacturer stops supporting it, you can only get an update by flashing it. If the pleasure is overshadowed by incessant glitches and slowdowns of the gadget, when some of its system files are lost, if viruses are not removed even by the best programs, you want to get rid of some of the annoying applications and “make life easier” for a weak processor - this procedure will help out. There are a lot of methods, but among them there are those that are used more often and are suitable for most devices: we’ll tell you how to flash Android through recovery.
What does Android firmware mean?
Firmware is the name given to replacing an operating system or even software. There are many options and tools for carrying out such an operation.
It is impossible to point out one universal and best device for all devices without exception. Compatibility with hardware plays a role.
Of course, it is possible to flash Android without recovery using:
- FOTA updates (“over the air” via Wi-Fi);
- computer with special software.
But one of the most effective and simplest options is using recovery.
Restoring stock firmware
If you didn’t like the custom firmware or didn’t take root, there is always the opportunity to return everything to its place. Many people ask the question: “How to restore Android through Recovery, namely the stock version?” The answer lies in the point above. Roughly speaking, returning everything to normal occurs in the same way as making the initial changes.
All you need to do is download the firmware from the manufacturer to a flash card or internal memory, then select the appropriate “Recovery” menu item and do a complete reset of settings/content. In principle, nothing complicated.
Recovery concept
Recovery is a special mode, which means “recovery” in English, and is available on almost every mobile device running Android OS. The developers specifically provided for the possibility of restoring the functionality of gadgets with its help.
In this mode, the user himself has the opportunity to:
- reset the system to factory settings;
- reboot the device;
- make a system backup;
- clear the device memory from the cache;
- format individual partitions.
It is also possible to install firmware on Android via Recovery (in this case, “firmware” means the operating system)
Why do you need custom recovery?
Its installation is necessary to expand the functionality of the smartphone. After all, the “native” recovery menu does not allow you to use all the functions of the phone - in particular, uploading third-party firmware is not possible. In addition, they have limited or no backup functionality at all, which results in the risk of losing all information from the phone.
And therefore, the best solution for Android owners would be to install an alternative TWRP (in the picture above) or CWM . This allows you to solve many problems:
- install unofficial firmware;
- install unofficial updates and patches to the OS;
- connect the device to a PC as a storage device;
- fully manage backups: backup all or part of the firmware, save and delete backups, perform recovery;
- connect your smartphone to your PC in developer mode using ADB;
- check the status of the device and the functionality of all modules;
- reset battery operation statistics;
- format and repartition a memory card or the built-in memory of a smartphone and much more.
The full list of functions of the custom version is simply huge, and depends directly on the software version and the type of smartphone.
Login to recovery
A special feature of this mode is entry and navigation, which are carried out using mechanical control buttons on the previously turned on device. Two or three keys are pressed simultaneously and held until the mode is entered.
Which keys exactly depend on the manufacturer, and sometimes the model, which can be found in the instructions supplied with it. Typically, the following variations are used:
- volume button (to decrease, increase or both at once);
- power button;
- Home button.
The device responds with vibration, and the “green man” characteristic of Android appears on the screen. You can navigate through the menu using the volume keys and confirm your selection with the power button. The list of mode capabilities depends on its type.
How to flash a device through a modified recovery
Modified (custom) recovery environments have a much wider range of capabilities for working with Android devices. One of the first to appear, and today a very common solution, is the recovery from the ClockworkMod team - CWM Recovery.
Installing CWM Recovery
Since CWM recovery is an unofficial solution, you will need to install a custom recovery environment on your device before use.
- The official way to install recovery from the ClockworkMod developers is the ROM Manager Android application. Using the program requires root rights on the device.
Download, install, launch ROM Manager.
On the main screen, tap the “Recovery Setup” item, then under the “Install or update recovery” inscription, tap the “ClockworkMod Recovery” item. Scroll through the list of device models that opens and find your device.
The next screen after selecting the model is the screen with the “Install ClockworkMod” button. Make sure that the device model is selected correctly and press this button. The recovery environment begins downloading from the ClockworkMod servers.
After a short time, the required file will be downloaded completely and the installation process of CWM Recovery will begin. Before you start copying data to the device’s memory section, the program will ask you to grant it root rights. After permission is received, the process of recording the recovery will continue, and upon completion, the message “Successfully flashed ClockworkMod recovery” will appear confirming the success of the procedure.
For devices built on the MTK hardware platform, the SP Flash Tool application is used.
Lesson: Flashing MTK-based Android devices via SP FlashTool The most universal method, but at the same time the most dangerous and complex, is flashing recovery via Fastboot. The steps taken to install recovery using this method are described in detail at the link:
Firmware via CWM
Using a modified recovery environment, you can flash not only official updates, but also custom firmware, as well as various system components represented by cracks, add-ons, improvements, kernels, radios, etc.
It is worth noting that there are a large number of versions of CWM Recovery, so after logging in on different devices you can see a slightly different interface - background, design, touch controls may be present, etc. In addition, some menu items may or may not be present.
The examples below use the most standard version of the modified CWM recovery. At the same time, in other modifications of the environment, when flashing the firmware, items are selected that have the same names as in the instructions below, i.e. A slightly different design should not cause concern to the user.
In addition to design, the management of CWM actions differs in different devices. Most devices use the following scheme:
- Hardware key “Volume+” – move one item up;
- Hardware key “Volume-” – move one item down;
- Hardware key “Power” and/or “Home”—confirms the selection.
- We prepare the zip packages necessary for installation into the device. We download them from the Global Network and copy them to a memory card. Some versions of CWM can also use the device's internal memory. Ideally, the files are placed in the root of the memory card and renamed using short, clear names.
Enter CWM Recovery. In most cases, the same scheme is used as for entering the factory recovery - pressing a combination of hardware buttons on a switched off device. You can also reboot into the recovery environment from ROM Manager.
Before us is the main recovery screen. Before you start installing packages, in most cases, you need to “wipe” the “Cache” and “Data” sections - this allows you to avoid many errors and problems in the future.
- If you plan to clear only the “Cache” partition, select the “wipe cache partition” item, confirm the deletion of data - select “Yes – Wipe Cache”. We wait for the process to complete - the following message will appear at the bottom of the screen: “Cache wipe complete”.
Let's move on to the firmware. To install the zip package, select “install zip from sdcard” and confirm your choice by pressing the corresponding hardware key. Then select the item “choose zip from sdcard”.
A list of folders and files available on the memory card opens. We find the package we need and select it. If the installation files were copied to the root of the memory card, you will have to scroll to the bottom of the list to display them.
Before starting the firmware procedure, recovery again requires confirmation of awareness of your own actions and understanding of the irreversibility of the procedure. Select “Yes – Install ***.zip”, where *** is the name of the package to be flashed.
The firmware procedure will begin, accompanied by the appearance of log lines at the bottom of the screen and the filling of the progress bar.
Firmware via TWRP Recovery
In addition to the solution from the ClockworkMod developers, there are other modified recovery environments. One of the most functional solutions of this kind is TeamWin Recovery (TWRP). How to flash devices using TWRP is described in the article:
This is how Android devices are flashed through recovery environments. It is necessary to take a balanced approach to the choice of recovery and the method of installing them, and also flash only the appropriate packages obtained from reliable sources into the device. In this case, the process proceeds very quickly and does not cause any problems later.
Thank the author and share the article on social networks.
What should you do if your Android smartphone suddenly starts to freeze and behave as if it wanted to live its own life? How to reflash Android? This question is asked by many users of modern gadgets of various brands - from top-end Samsung and Sony to the increasingly popular Chinese Xiaomi (more often colloquially - Xiaomi) and Meizu.
Custom Recovery – CWM and TWRP
The “native” mode, or, as it is also called, stock mode, does not have a large list of features provided. Some Chinese gadgets are not equipped with it. Therefore, enthusiasts created versions with an increased set of functionality: first CWM, and then TWRP.
What is custom recovery
They were called custom by analogy with the English word custom, which in one of the translations means “convenient”. That is, at the software level adapted to the needs of the user.
While both do their jobs equally well, TWRP has a few more features, including navigating menus using the touch screen, choosing a location to save a copy of the system, batch installing patches, a built-in file manager, keyboard and terminal emulator, allowing you to work without having to force a reboot.
The sixth version of CWM also received a touch option, but is still inferior in ease of use due to the interface being too simple.
Why use custom recovery
Stock mode allows you to install only stock firmware into the device, that is, provided by the gadget manufacturer. Custom makes it possible to install any “homemade” firmware with different capabilities, which can vary greatly, and of which a huge number have been created. Flashing the kernel on Android via Recovery or getting root access is not very difficult.
Installation
Both types of custom Recovery are installed into internal memory instead of factory memory using:
- a special utility on the device itself;
- connected computer and special software.
Typically, different types show better compatibility with different utilities.
Installing CWM using ROM Manager
The easiest way to install CWM is using the ROM Manager utility, available for free in the official Google Play store. The program for flashing recovery on Android requires root. It is also recommended to visit the official page of the program developer and make sure that the mobile device is in the list of supported ones.
If everything is in order, you need to download the program to the gadget, open it, find the Recovery Setup item in the menu, then Install or Update Recovery and select ClockworkMod Recovery.
The program will detect the device, after which all that remains is to confirm the installation, and after completion, provide ROM Manager with root rights, if necessary.
Installing TWRP using GooManager
The GooManager utility is well suited for TWRP. It is also available for free on Google Play, and also requires root access to operate.
After installing the program, you need to open it and select Install OpenRecovery Script from the menu. After installation, you can switch the gadget to mode directly from the menu of this program.
Flashing custom recovery using Fastboot
The methods described above are simple, but do not always cope with the task due to possible incompatibility. In this case, there is nothing left to do but flash the recovery on Android via a computer.
A computer with the Fastboot program allows you to get rid of them and install any Custom Recovery on your gadget. Fastboot is part of the Android SDK used for OS development.
The work requires some extensive computer knowledge, a computer with Windows OS, a distribution kit and drivers for a mobile device, and a USB cable.
Fastboot can be installed separately or download the entire SDK from the official website of the developer. A suitable recovery can be obtained from the project website or specialized forums.
Before you start, you need to enable USB debugging mode on your gadget. The device must be well charged. Drivers should be found on the manufacturer's official website. It is also recommended to make a backup.
Step by step instructions
When everything is ready, you need to do the following:
- Rename the downloaded file from Recovery to update.img (can be anything else, but without Cyrillic and spaces and always with the same extension), move it to the platform-tool folder in the Android SDK directory.
- Connect the gadget to the computer via a USB cable.
- Open the computer command line: select the Win+R key combination, enter the cmd command in the field and confirm with the Enter key.
- Specify the path to the recovery folder.
- When the computer detects the device, enter adb devices into the command line, and then adb reboot devices.
- Wait until Android reboots and enters bootloader mode. When the robot appears on the screen, enter the fastboot devices command to check if there is a connection.
- If everything goes well, enter fastboot flash recovery update.img.
If everything is done correctly, the message “finished. total time..."
You can flash other memory sections in the same way.
Blog of Evgeniy Kryzhanovsky
What should you do if your Android smartphone suddenly starts freezing and acting as if it has a life of its own? How to reflash a device based on the Android operating system?
Many users of modern gadgets from well-known brands are tormented by this issue: from top-end Samsung or Sony devices to the increasingly popular Xiaomi and Meiza.
Possible solutions to problems
One of the simplest recommendations is to reset to factory settings. In this case, no third-party intervention will be required. All resets are carried out at the software level. However, this trick will only work if the smartphone malfunctions are caused by clogged memory or software. After frequent cases of resetting settings and erasing content, the device can turn on like new. But there are also cases when viruses or, in other words, malicious programs penetrate the device’s file system. These “parasites” are capable of interfering with key files that are responsible for restoring and resetting the Android OS. In some cases, they are even capable of removing or changing them. This is where some problems can start. The only correct solution in this case would be to reflash the smartphone. Next, we will describe the main method by which you can flash a device from some popular manufacturers. We will also try to figure out how to reflash Android using Recovery.
“Recovery”: what is it and what is it eaten with?
Many users immediately give up and rush to contact service centers. However, any experienced user knows that this is not necessary. After all, you can save a decent amount of money and nerves by following just some simple steps given in this instruction. “Recovery” is special software that is available in smartphones based on the Android operating system. It is something like the BIOS on a regular personal computer. That is, using “Recovery” you can completely reset your smartphone to factory settings. Here you can also flash the device's firmware or install operating system updates. Upon purchase, the user most often receives a device with . It is slightly limited in functionality and does not allow you to successfully flash the operating system. If we talk about “custom” “Recovery”, then it allows you to more fully interact with the phone system. Thus, you can make backup copies of firmware and restore them, as well as perform a deeper and more complete reset of the device.
"Recovery": how to enter
To flash the device through the “Recovery” menu, you need to get into this very menu. This can be done quite simply, especially since many devices use the same input combination. So, if your smartphone has a “Home” button or a physical central button, then with the gadget turned on, you need to simultaneously press the “Volume +” and “Home” buttons. After that, without releasing these buttons, you need to press the power button. The device should turn on in the desired mode. If the user has a more modern device without a physical Home button, it will be necessary to repeat the process described above, but only when using the Volume+ and Power buttons. If the desired result is not achieved, it is recommended to refer to the extended list of methods for entering the “Recovery” menu for devices from various manufacturers.
What else is needed?
To understand how you can reflash an Android-based device, you must initially download the firmware for your device. Firmware files are most often hidden from public view in order to protect the manufacturer’s data and security. It is for this reason that ordinary users create backup copies of their OS and form them into databases of stock firmware, links to which can be found on special sites. It is the firmware file itself, which is located in the archive with the *.zip extension, that will be needed in order to learn about restoring “Android” through “Recovery”. Sometimes there are times when users get tired of the old firmware and want something new. It is for this reason that there are always craftsmen who develop custom firmware, adding something new from them or, on the contrary, “cutting out” unnecessary things. In this case, you won’t be able to use standard Recovery. This is where custom CWM Recovery or TWRP comes to the rescue.
How to install CWM Recovery or TWRP
It is not necessary to install Recovery on Android using a personal computer. Most often it is easier to use stock. All you need to do for this is download the necessary file, which is located in the archive with the *zip extension, and move it to the external flash card of your smartphone. After that, you need to go to the stock “Recovery” and select the “Apply update external storage” item there. In the list that opens, you need to select the same file with custom “Recovery”. Once the selection is confirmed, the installation process will begin. After this, the device will prompt you to reboot. The process will be completed.
How to flash Android via Recovery
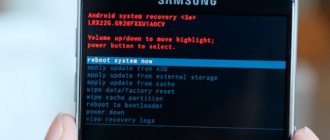
Let's move on directly to the process of installing the firmware. I would like to note that all unofficial Android OS files created directly by users are installed only at their own peril and risk. If the decision to install non-native software is nevertheless made, you need to make sure that the firmware was written specifically for the smartphone model that you plan to reflash. If we are talking about stock firmware, then it is better not to bother installing CWM Recovery or TWRP. All manipulations that should be done are limited only to downloading the factory file and moving it to an external memory card. The process after this will be similar to installing a custom Recovery. You need to go to the “Recovery” stock menu and select “Apply update from external storage” in it. Then you need to specify the firmware file and confirm the action. When the process is completed, you will need to complete one more step, which will avoid glitches and freezes when turning on and operating the smartphone. Immediately after the firmware is installed, you must select the “Wipe data/factory reset” item in the menu and confirm the operation. This way you can clear information about the previous software, as well as about those files that were on the device before the firmware process. When all these actions are completed, you will need to select the “Reboot system now” menu item. The device will reboot and the smartphone setup process will begin from scratch. If the switching process takes a long time and the device logo freezes, you will need to remember whether the settings reset item was performed after flashing.
Custom Android versions
How to flash Android via Recovery? All that remains is to figure out what to do with versions of operating systems that were written directly by device users. The answer to this question is quite simple: you need to repeat the entire process, performing the same manipulations in custom “Recovery”. The only difference is that the firmware file itself can now be placed not only on an external memory card, but also in the internal memory of the gadget. This will add convenience to the user if there is no flash card. Then you will have to select the “Apply update internal storage” item. It is also worth noting that in TWRP and CWM Recovery, the “Wipe data/factory reset” item was replaced with two separate items “Wipe cache” and “Wipe data”. After you manage to install Android through “Recovery”, you will need to select “Wipe Dalvik cache” in the modified TeamWin or ClockWorkMod menu. This will significantly increase the chances of successfully shutting down a device running a new OS.
How to restore stock firmware?
If the user does not like the new custom firmware, there is always the opportunity to return everything to its place. Many people today are interested in the question: how to restore Android through Recovery, namely through the stock version? The answer is hidden in the paragraph discussed above. Returning everything to its place occurs in the same way as making the initial changes. All you need to do is download the firmware from the manufacturer to the internal memory or flash card, and then select the appropriate item in the “Recovery” menu and perform a full reset. In principle, there is nothing complicated about this.
Recommendations
There is actually nothing complicated about flashing a smartphone based on the Android operating system. But if you are not confident in your own abilities, then it is better not to get involved with these processes. If something still doesn’t work out, you can always restore the device’s firmware using the corresponding menu item. The main thing is to make a backup copy before flashing Android using Recovery. To do this you will need a custom “Recovery” and a little patience. The firmware recovery process takes quite a long time. If something doesn’t work out, you can always turn to specialists for help.
Similar articles
- The best programs for recording video from a webcam
- Choosing the optimal player for your computer
Firmware via standard recovery
Standard or “factory” recovery allows you to install only stock firmware, but you can do this without additional software and a computer.
To flash Android via System Recovery 3e, you will have to download the official firmware or copy it to an external memory card, and after entering the mode, erase the old one and specify the path to the new one. This operation is not fraught with any pitfalls, since all the tools used are official.
How to download firmware
The firmware must be downloaded from the official website of the gadget manufacturer. There is no need to unpack it, but it is worth changing the name to update.zip. For devices based on the MTK processor, there is a convenient program called MobileuncleTools, with which you can easily and simply install the distribution kit on a memory card and update the operating system from it. Only to work with it you will need root.
Installation of MobileuncleTools
You can download the utility on the developer’s official website or specialized resources. The program is distributed free of charge and has a Russian-language interface. Installation is performed in the usual way - downloading and unpacking the ARK file.
Launching the utility and flashing the firmware
The program is launched in the same way as any other - by tapping on the icon. After logging in, you need to find the “Firmware Update” button in the menu, after activating which the utility itself will detect and install the firmware.
How to flash an Android device using factory recovery
Almost every device running the Android OS is equipped by the manufacturer with a special recovery environment, which provides, to some extent, including ordinary users, the ability to manipulate the internal memory of the device, or more precisely, its partitions.
It should be noted that the list of operations that are available through the “native” recovery installed in devices by the manufacturer is very limited. As for the firmware, only official firmware and/or updates are available for installation.
In some cases, through factory recovery, you can install a modified recovery environment (custom recovery), which in turn will expand the ability to work with firmware.
At the same time, it is quite possible to carry out the main actions for restoring functionality and updating the software through factory recovery. To install the official firmware or update, distributed in *.zip , follow the following steps.
- To install the firmware you will need an installation zip package. Download the required file and copy it to the device’s memory card, preferably to the root. You may also need to rename the file before manipulation. In almost all cases, the appropriate name is update.zip
- Boot into the factory recovery environment. Methods to access recovery vary for different device models, but they all involve using combinations of hardware keys on the device. In most cases, the desired combination is “Volume -” + “Power”.
With the device turned off, hold down the “Volume-” button and, while holding it, press the “Power” key. After the device screen turns on, you need to release the “Power” button and continue to hold down “Volume-Volume” until the recovery environment screen appears. To install the software or its individual components into memory partitions, you will need the main recovery menu item – “apply update from external SD card”, select it.
update.zip package previously copied to the memory card and press the confirmation key. The installation will begin automatically.
- Once the files are copied, reboot into Android by selecting “reboot system now” in recovery.
Android firmware via CWM Recovery and TWRP
These operations have approximately the same algorithm. A PC can be used, or you can do without it. In the first case, you can flash the phone through the recovery menu from a flash drive to which the distribution package has been previously copied in .zip format.
In the second, the archive is transferred to an external memory card and installed directly from it. It is recommended to search for the archive with the firmware on trusted sites.
Detailed instructions
Procedure:
- Put your mobile device into Recovery mode.
- Clear the internal memory and cache - do a so-called wipe. To do this, in the mode menu you need to select the Wipe data/Factory reset and Wipe cache partition items.
- Select the Install section and specify the path to the file.
- After flashing the firmware, reboot your mobile device by clicking on Reboot system now.
Installing CWM Recovery or TWRP
It is not necessary to install Recovery on Android via a computer; most often, on the contrary, it is easier to use the stock one. All you need to do is download the necessary file, again located in an archive with the *.zip extension, and place it on the external flash card of your smartphone.
After that, going to the stock “Recovery”, you need to select the “Apply update from external storage” item and in the list that opens, select the same file with the custom “Recovery”. After confirming your choice, the installation process will begin, after which the device will prompt you to reboot. The process is complete.
How to make an Android backup
Before flashing the firmware, it is recommended to create a backup copy of the system. If the result is not satisfactory, you can always quickly roll back. There are a huge number of tools for this. You can use special software on a connected computer, or you can get by with the same custom recovery. This requires root.
If you choose the latter option, you must:
- Enter the mode.
- In the Backup and Restore section, check the boxes for the data to be backed up.
- Confirm the archiving task, and then reboot the gadget by selecting the appropriate item (reboot).
It is recommended to store the created archive on removable media or another device or in the cloud.
The same can be done using third-party programs that are freely available. For example, Nandroid Backup, available on Google Play, allows you to make a backup in a couple of clicks. Titanium and many others work the same way. You need root everywhere.
Before flashing
Before installing the firmware via Recovery:
- Create a backup copy of user data and transfer it to another medium. When downloading Firmware, all personal information can be deleted: contacts, sms, bookmarks, saved passwords, photos, installed applications.
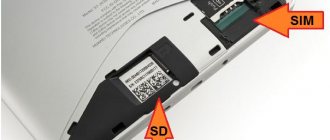
- Insert an SD card into the gadget. It should have enough memory for flashing the firmware.
- Find out your smartphone model.
- Charge it fully. If the battery dies while booting up, the device will no longer turn on. It will be difficult to restore.
- Find and download the archive with Firmware.
How to restore factory firmware
To reset the firmware to Android via Recovery, you need a full reset, which is done as follows:
- You need to get into mode.
- Select and confirm “Wwipe data/Factory reset” (full reset to factory settings) and “Wwipe cache partition” (erase cache partition).
- Restore a previously saved copy of the OS by selecting Sinstall zip from sdcard and specifying the path to the archive on the memory card.
To return to factory settings, you need to:
- Enter "Settings".
- Go to the "Restore and reset" section.
- Select "Reset settings" and follow the instructions.
As a rule, this is enough.
How to flash Android via Recovery
Moving directly to the process of installing the firmware itself, I would like to say that all unofficial files of the Android operating system, created directly by users of certain devices, should be installed at your own peril and risk. If, however, the decision is made to install a non-native version of the software, you should make sure that the firmware is “written” specifically for the phone that you plan to reflash.
If we are talking about stock firmware, then you should not bother installing CWM Recovery or TWRP. All manipulations that need to be done are limited to downloading the factory firmware file and placing it on an external memory card. After this, the process is similar to installing custom “Recovery”. That is, you need to go to the stock “Recovery” menu, select “Apply update from external storage”, then specify the firmware file directly and confirm the action. After the process is completed, you need to take one more step that will help avoid freezes and glitches when turning on and operating the device. Immediately after the firmware is completed, you need to select the “Wipe data/factory reset” menu item and confirm the action. This will clear information about previous software and files that were present on the device before the firmware process.
After completing these steps, you must select the “Reboot system now” menu item. The device will reboot and the process of setting up the smartphone from scratch will begin. If the switching process takes a long time and the device logo “hangs”, it’s worth remembering whether the settings reset item was performed after flashing.
Firmware selection
The selection of software should be taken responsibly, because the stability of the Android device will depend on how the Android firmware is installed from the SD card. First you need to find out the exact model of the device and OS version. This requires:
- Turn on your smartphone or tablet.
- Go to the menu.
- Go to “Settings”, find the “About device” tab. Here you can find complete information about the device: kernel and security version, serial numbers of the CPU (central processing unit), number of cores, amount of RAM.
- You should pay attention to the “Build number” and “Gadget model”. Using this information, you should search for the necessary security.
Now you need to decide on the type of firmware. The undeniable advantages of unofficial firmware are full control over the device, personal configuration of the device and unlocking previously inaccessible functions.
Official firmware guarantees stable operation of the device, protection against interference with system files, and prompt receipt of OS updates if the device is new.
The factory firmware is available on the official website of the device manufacturer, where you can download the archive with the software. Let's look at the step-by-step process using the example of the Evromedia Play Pad Pro tablet:
- Go to the website: https://www.evromedia.eu/android-tablet-pay-pad-pro.html.
- Select your device from the list.
- Download installation instructions and the firmware itself.
- Upload the file with the firmware to an external card, from where you can flash the Android tablet via the memory card.
Next, you need to prepare the device. You should carefully follow all the instructions below, and then the device is guaranteed to be updated without problems.
Before proceeding with the software installation, be sure to prepare the device for the update, otherwise during boot the device will crash and will not start again. This is due to the interruption of the firmware download. To avoid such problems, you need to:
- charge the gadget. Reinstalling the firmware will require a lot of energy, so it is better to charge the device to 100%;
- download from Google Play the ROM Manager, TWRP or CWM Recovery, Root Checker and any rooting program, for example, Kingoo Android Root.
The first utility is needed to replace the standard CRM boot menu and allows for advanced device management, but requires root rights - superuser (administrator) rights. Other applications allow you to download third-party firmware, check your smartphone for administrator rights, and grant superuser rights.
You should definitely check the device for administrator rights, since without them you won’t be able to install custom firmware.
To do this you need:
- Launch Root Checker on your device.
- In the application, click on the “Check Root” function.
- When the test for superuser rights is completed, a message indicating the presence or absence of superuser rights will appear in the upper field where the above-mentioned function is located.
If you do not have root rights, you need to get them, otherwise you will not be able to flash your Android smartphone via a memory card. The process consists of two stages: allowing the installation of third-party applications and working with Kingo Android Root.
Access to unofficial utilities is needed to update custom firmware. To allow installation of third-party applications, you must:
- Go to "Settings".
- Select the "Security" menu.
- Click on “Unknown sources” and allow installations from them by moving the slider to the right.
The next stage is working with the Root Kingo Android root access program. To start unlocking your device, follow these steps:
- Run the Kingo Android Root.apk file. You can download it on the official website of the application: https://www.kingoapp.com/.
- Agree with the warning. After this, the installation of the program will begin.
- Open the installed utility.
- Click on the “No root” button, after which the process of obtaining rights will begin.
There is a possibility that the program on the device will not work, but there is a way out - use a computer. Once you have received administrator rights through your PC, you can flash Android from the SD card.
To unlock root using an external device, you need to enable USB debugging and connect the device to the computer. Step-by-step instruction:
- Go to the "Settings" menu.
- Click on the “For Developers” section. If it is blocked, you need to return to the menu and select “About device”. Then click on “Build Number” several times. After this, the section will become available.
- Select the “USB Debugging” mode.
- Connect your tablet or smartphone to your PC via a USB cable.
- Launch the Root Kingo Android utility. The necessary drivers will begin automatically downloading.
- Press the “ROOT” button.
- After rooting is completed (obtaining rights), the “Finish” button will be highlighted.
Custom firmware
Loading …
The second type of firmware is custom versions. The essence of this software is reflected in the name - these are official versions of operating systems modified by users.
It is important to know
Android is distributed under the open source system, so anyone who knows how to do this can change the source code.
The advantages of this type are:
- most custom assemblies are characterized by increased performance;
- complete absence of unnecessary programs;
- superuser rights are initially present;
- Multiple bugs present in the stock version have already been fixed.
The disadvantages of custom firmware are:
- lack of guarantee of complete security of information located on the device;
- not every device supports the installation of modified assemblies;
- disappearance of the official warranty when installing such software;
- Many firmware compiled by inexperienced users can slow down the system.
What is "Recovery"?
To understand how you can flash Android via recovery from an SD card, you need to know exactly what is meant by this concept. itself comes from the English verb “recover” or “to restore.”
Will be useful
Recovery is a special software that is present in the Android system. If we draw analogies with a computer, then Revovery for a smartphone replicates the BIOS on a computer in its functions.
The function is a means of accessing the hardware before the operating system files are loaded, which allows you to manipulate the device at a low level and bypass system failures.
note
Entering the engineering menu or recovery is done by simultaneously pressing the home button and the volume key while rebooting the device. This is a general scheme; in reality, each manufacturer comes up with their own combinations.
The concept of firmware
Any devices will not be able to work without a basic set of system files and codes. Firmware is software that is developed by the manufacturer directly to control the device, but some engineering functions of the OS remain blocked by default.
There are several types of firmware:
- custom – created by enthusiasts to gain full control over the device;
- official - stock.
The advantage of the first is that the device can be completely manually configured, but its performance may deteriorate noticeably, and the second (factory) is fast and completely safe, but, as mentioned above, some functions will be blocked.
Recovery menu modes
Recovery Mode has several main modes, which we will list.
Once again, please note that depending on the type of recovery menu, the list of modes may differ significantly.
Friends! If our site helped you or just liked it, you can help us develop and move on. To do this you can:
- Leave a comment on the article.
- Subscribe to our YouTube channel .
- Subscribe to our VKontakte group .
In the end, if you want to recover deleted photos, deleted videos, contacts in your phone. We recommend that you use UltData for Android in Russian. It has a simple interface and data recovery is more efficient. Here is the download link, please try it.
- Method 1. UltData for Android to recover deleted data
- Method 2. Get files back on Android via 7-Data Android Recovery
- Method 3. Recover data using EaseUS MobiSaver
- Method 4. Recover android files via iMobie PhoneRescue
- Method 5. iSkySoft Android Data Recovery is a tool for data recovery on Android
Method 1. UltData for Android to recover deleted data
If you want a simple and effective solution, try with Tenorshare UltData for Android. This tool is capable of recovering data from Android phones and tablets running Android 8.0, Android 7.0, Android 6.0 etc. after factory resetting them, fixing them or deleting files by mistake.
UltData for Android can significantly recover any lost contacts, photos, text messages, call history, videos and other files. The following guide explains how to recover data after an Android factory reset .
1. Attach your Android device to your computer via a USB cable. Launch the software and follow the on-screen commands to enable USB debugging and enable USB storage on your Android phone or tablet.
If your USB cable is lost or the USB port is damaged and you are unable to connect your Android phone to PC, you can try Tenorshare UltData for Android Pro which allows you to connect via Wi-Fi.
2. Wait until the program completes the scanning process. The software will then display all recoverable files.
3. Before retrieving data from Android after a hard reset, review the recoverable files and select the ones you need to recover. Then you will need to find the destination for saving the saved data and click on the "Recover" button.
Method 2. Get files back on Android via 7-Data Android Recovery
It is important that 7-Data can recover most deleted files both in internal memory and on an external card without much difficulty. This program is not completely free. Follow the instructions step by step.
Likewise, before restoring, you need to enable USB storage of the device and connect the smartphone to the computer using a USB cable.
1. Download and install the software on your personal computer or laptop. After that, open 7-Data Android Recovery. In the window, click “Next” and select the required files.
2. The full scan begins; you just need to wait a few minutes. When the program scans the device and a list of files is displayed.
3. After scanning the device file folders will appear. You can recover the data you need.
The found data is saved in a separate folder on the computer. In addition, you need to clear junk data on your phone over time to get rid of the full space of your device.
Method 3. Recover data using EaseUS MobiSaver
Step 1 . Connect your Android device to your computer
Launch EaseUS MobiSaver for Android and connect your Android device to your computer using a USB cable. Next, click the Start button and then the software will quickly try to recognize and connect your device.
Step 2 . Scan your Android device to find lost data.
EaseUS MobiSaver for Android automatically scans your device and analyzes the data. During the scanning process, the software will display all found files in real time.
Step 3 . Preview of recoverable data on Android device.
The scanning will take you some time and after that, all the files found are classified into well-organized categories according to different file types. You can select any file type to preview them on the right side of the window one by one.
Step 4 : Recover Lost Data from Your Android Device
You can easily select the files you want to return. Then mark these selected files and click the "Recover" button to retrieve them from your Android device. Finally, you need to specify a folder on your computer to save all the recovered data.
Method 4. Recover android files via iMobie PhoneRescue
This program can not only recover files from the device, but extract Android device data, root Android phone, and remove Android lock screen.
It displays all file types supported by PhoneRescue for Android. For categories that you do not want to scan or recover, uncheck the boxes in front of them.
If you have rooted your Android device, the Deep Scan feature will be available immediately. If not, first, PhoneRescue for Android will launch your device. Once the rooting process starts, the below interface will be displayed. At the same time, rooting your Android device may take a few minutes. Please hold the patient.
Once the rooting process is completed, the Deep Scan operation will begin automatically. The scanning process may take several minutes depending on the amount of data on your device.
Method 5. iSkySoft Android Data Recovery is a tool for data recovery on Android
Android Data Recovery is designed to recover deleted files on Android devices, regardless of the reasons for data loss. This means that if people accidentally deleted files or suffered from virus attacks, regardless of whether the software was faulty or the files were damaged, you will always have the ability to recover the files. But most data recovery is recovered from the cache, which is stored on the phone and cannot be deleted.
Here you are offered two different scanning modes: Standard Mode and Advanced Mode. Standard mode does a basic scan of deleted files on your device. On the other hand, the advanced mode performs a -depth scan of your device, taking longer.
In the end, if you want to recover deleted photos, deleted videos, contacts in your phone. We recommend that you use UltData for Android in Russian. It has a simple interface and data recovery is more efficient. Here is the download link, please try it.
Update 2020-02-12 / Update for Android data recovery
However, this method can delete all the data on your phone and I highly recommend a useful software for you - Broken Android Data Extraction
When your phone gets stuck in Android System Recovery, this software can not only help you get out of it but also keep your data safe.
However, you may find that you don't know how to exit Android System Recovery. Take it easy. Here are the tips.
Tip 1 Reboot
Turn off your phone by pressing power
key for a few seconds or by removing the battery from the phone and then inserting it into the phone. And then turn it on to see if your phone can work normally or not.
Tip 2: Hard Restart
Step 1 Check if the key combination is Power
The Home
and
Volume Up
buttons work fine or not.
Step 2 Press the power
as well as
Volume Up
at the same time until the screen goes black.
Then press the Power
button to turn on your phone.
Tip 3 Hard Reset
Step 1 Press the power
,
Home
and
Volume Up
button simultaneously until your phone vibrates.
Step 2 Release power
button, but still holds
the Home
and
Volume Up
button until the screen appears.
Step 3 Click Volume Down
button to select
data erase/reset
".
However, this method can delete all the data on your phone and I highly recommend a useful software for you - Broken Android Data Extraction
When your phone gets stuck in Android System Recovery, this software can not only help you get out of it but also keep your data safe.
During operation, a number of errors may accumulate in the system, and its performance will drop, and various software “glitches” may also appear. The easiest way out of this situation is to restore Android to factory settings. To do this, you need to go to “Backup and reset” (located in the “Settings” menu item), where you select “Reset settings” and activate it by selecting “Erase everything”. After this, the system will return to its original parameters.
Problems and solutions
Inability to transfer files
Some cables used to charge the device are incompatible in terms of working with files, so you need to use methods that do not require interaction with a computer, or simply purchase the required cable.
Lack of necessary drivers
If your USB cables support data, but you can't use them when flashing the firmware, the problem is either incompatible software or, more likely, driver issues. They need to be downloaded from the official website of the brand or processor manufacturer. Most of them have digital signatures, but if they don't, you'll need to disable authentication as follows:
- Use the Win+R key combination and enter in the window that appears bcdedit /set {default} safeboot network and press Enter, restart your PC;
- In the “Select action” tab, click on “Diagnostics”, then “Advanced options” and “Boot options”;
- Select the seventh option, then return to the operating system.
Returning to stock firmware is carried out in the same way as installing a new one, so when turning a smartphone into a “brick”, you should not panic - it is better to use any method described here, depending on your skills and the availability of certain device functionality.
Share link:
Flashing an Android device via SD card
The whole process of flashing a device via memory cards comes down to the fact that you need to get root rights, install the Recovery menu if it is not there by default, and upload the firmware file in zip archive format to the root folder of the device, usually to the Android directory. Actually, the rooting process is required in order to gain access to the root of the device.
During the update, various problems may arise, including installation interruption or firmware failure, which will result in the loss of important data.
Therefore, before starting the process, it is worth making a backup copy. This will help restore files and the functionality of the device.
Creating a firmware backup
An integral part of updating a device is backing up system files. A backup can be made using various utilities, for example, stock or custom Recovery.
Basic recommendations before backup:
- gadget charge up to 70, or better yet, up to 100%;
- free space on a removable memory card from 600 MB (depending on the size of the backup file).
The process of installing a modified recovery
Stock Recovery will not allow you to install custom firmware, so it can only be used to install official software.
To install “homemade” software, you will need a modified recovery that will allow you to initialize unofficial firmware. To do this you need:
- Get root rights.
- Launch the previously downloaded TWRP or ROM Manager if the ClockWorkMod (CWM) recovery is selected.
- Give the program superuser rights.
- Install recovery through the application.
The stage of copying firmware and patches to a memory card
It is not recommended to rush into installing the software; first, it is better to familiarize yourself with the errors and other comments on the firmware.
After creating a backup of all files, which can be transferred to a computer or cloud storage, for example, Google Drive, you need to create a folder on the SD card for the archive with firmware and patches.
Then transfer the zip file with software and patches to the created directory.
How to wipe
“Wipe” translated from English means to wipe, format. If you wipe, the folders selected in Recovery will be completely cleared of the files, settings, and other things located there. As a tool for Wipe, use the TWRP application. Follow these instructions:
- Turn off the device and go to the Recovery menu by simultaneously pressing the power and volume buttons + or -. The methods differ for devices from different manufacturers, so it is better to check this step on the manufacturer’s website or on the Internet.
- In the TWRP recovery menu, select “Wipe”, and then “Advanced Wipe”.
- In the list, select all sections except “Android Secure”.
- Move the “Swipe to Wipe” slider to the right.
It should be remembered that it is not recommended to interrupt the wipe, as this will negatively affect the stability of the system.
Performing the firmware process
This process involves unpacking the archive with the firmware and further installing the root files, so for custom firmware you need to use the downloaded archive with the software. To start the firmware process, you need to perform a number of actions:
- Enter the Recovery menu.
- In the Recovery menu, select the “Install” or “Install from SD card” section, as well as other similar section names that are similar in meaning to “Apply ZIP archive”.
- Using the file manager, select the archive with the firmware.
- Click “Swipe to Confirm Flash”.
After this, the firmware process will begin. Upon completion, you may have to additionally install Google services and system services of the device, if they are not built into the custom ROM. To do this, you need to download the archive with the specified components.
How does the firmware of a Google application package work?
It happens that the standard Google utilities package (GAPPS) is missing in the new firmware (usually Cyanogen Mod or AOKP firmware) or the Google license does not allow the installation of services by default on a specific smartphone.
The process of changing the OS version does not automatically download Google applications - mail, browser, Google Play, and so on. These programs are installed manually. Follow these steps:
- Download the archive from GAPPS.
- Repeat the same steps as in the “Firmware process” section.
- Install Gapps from the downloaded Open Gapps Manager app from Google Play.
The patch installation process
Patches are modified versions of official applications. The regular installer cannot run them, so again it is recommended to open the TWRP application. The process of installing patches is no different from installing firmware and GAPPS.
How to prepare for flashing alternative recovery TWRP
Before installing this option on your device, you must unlock the Bootloader and enable the USB debugging service.
After completing the operations from the TWRP project offsite, you should download the image for your type of smartphone. Then you need to download the Android SDK Platform Tools, and move the custom system image file to the Platform tools directory. After that, put the phone into fastboot, connect it to the PC and proceed to the TWRP firmware process in the same order as CWM.
Firmware Clockworkmod Recovery via Fastboot mode
This option is more reliable and can safely be called classic. But it requires a direct connection of the smartphone to the PC via USB, installation of a specialized Android SDK Platform Tools and “firmware” drivers.
The way to update the recovery is to replace the Recovery.img located in a special section of the device’s memory. Fastboot mode , into which you must put the device before connecting it to the PC.
It is important to note that this option is not available for all types of smartphones, as it requires unlocking the bootloader . It cannot be unlocked on all devices, and some devices are missing some sections.
But if you were able to unlock the bootloader, and your phone meets all other requirements, then the sequence of actions is as follows:
- Download Andro >
Important! While flashing the firmware, do not disconnect the device from the cable - otherwise the recording may fail and subsequently turn it into a “brick”.