Most manufacturers of smartphones and tablets now block the bootloader of the device, this is done in order to avoid installing custom firmware and strengthening security.
Xiaomi has also been no exception in recent years and also blocks the bootloader on its smartphones, as a result of which users painfully unlock it in order to install the latest firmware or install root rights.
Xiaomi devices have a special EDL mode with which you can flash even with a locked bootloader.
How to put Xiaomi into EDL mode, read further in this article!
Putting Xiaomi into EDL mode
At the moment, there are two options for transferring Xiaomi to special. firmware mode. Let's look at each of them.
Option 1
- All Xiaomi drivers must be installed on your computer
- Fastboot utility or ADB RUN program
- Put Xiaomi into Fastboot/Bootloader mode
- Connect your smartphone to your computer
- In Fastboot enter the following command: fastboot oem edl
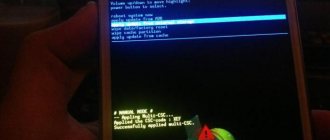
- The screen on your device will turn black
- Xiaomi in EDL mode
Option 2
- Turn off your Xiaomi device
- Press and hold the “ON/OFF” and “Volume +” buttons at the same time
- After vibration, release the “ON/OFF” button, but continue to hold the “Volume +” button
- Hold the button until the menu appears
- Click the download button
- The device is switched to EDL mode
Now you can install Xiaomi firmware using MiFlash!
That's all! Read more articles and instructions in the section Articles and Android Hacks and Android Firmware . Stay with the Android +1 , it will be even more interesting!
Flashing your phones yourself allows you to choose a convenient version, be it official or individual (custom). You can save money by changing the smartphone software yourself. The article tells you how to enter Xiaomi EDL mode and flash your device.
Content
Firmware
Before proceeding to this stage, make sure that the phone is charged at least 60% and there will be no surprise with its sudden shutdown. Also make sure that you do not have the Samsung Kies application installed, and if you have it, uninstall it.
You must have a smartphone connected to your computer in “Download” mode and run the Odin program with administrator rights. To do this, right-click on the program icon and select “Run as administrator” from the menu.
The new firmware must also have already been downloaded and its files must be in a folder that does not have a Russian-language path. The firmware can be in the form of several files or one. Depending on this, the procedure for flashing Samsung firmware via Odin will differ. Let's look at both options.
Installing single-file firmware
If the program normally detects the connected phone, the name of the port to which it is connected should appear in the “ID:COM” field, and below you will see the inscription “Added”. If everything is fine, then you can proceed with the actual firmware.
- Press the "AP" or "PDA" button depending on your Odin version.
- Select the folder in which the firmware is located, and then its actual file.
- Go to the “Options” tab in the left panel of the program and uncheck all the boxes there, except for “F.Reset Time” and “Auto Reboot” - you need to leave them.
- Click the "Start" button at the bottom of the Odin window. The firmware installation process will begin. In this case, different logs are displayed, and progress can be tracked using the indicator strip.
- When the process is completed successfully, “PASS!” will appear in the upper left corner.
Now you can disconnect your smartphone from the computer, exit Odin Mode, and turn it on again. Read more about this.
Installing multi-file firmware
Such firmware usually contains some changes and improvements. It is also used when restoring a phone after serious failures.
The process is, in principle, very similar to installing a single-file firmware, only here on the right side of the Odin program you need to click all the buttons and select the appropriate file for them. This is necessary because each file corresponds to its own firmware section, and you need to select them separately.
The labels on the buttons and the names of the files are similar, so it won’t be difficult to figure out which file corresponds to which button.
After selecting the files in the right panel on the “Option” tab, also uncheck all the boxes except “F.Reset Time” and “Auto Reboot” and click the “Start” button. All you have to do is wait until the process is completed and the phone can be turned off.
As you can see, it’s not much more difficult to reflash your gadget this way.
EDL - what is it? Required programs and tools
You can flash Xiaomi in a simple way by waiting for official updates. After being notified of the availability of new software, just click on the button with three dots in the phone menu and the upgrade process will begin.
If you need to flash Xiaomi with a custom or developer version, you may encounter an obstacle in the form of a blocked bootloader. Xiaomi, fighting unofficial firmware versions that often reduce the phone to a “brick” state, has closed access to the bootloader.
You can register an account and ask for permission to unlock. However, you will have to wait several months and it is not a fact that the answer will be positive. If the answer is negative, you can unlink your account and try again.
This is where EDL mode comes to the rescue. Answer to the question: “What is Xiaomi EDL mode?” lies in the name itself.
EDL - Emergency Download Mode, which translates as “Emergency Download Mode”.
Thanks to this option, you can change the phone software without opening the bootloader. You can log into EDL in different ways, and it all depends on the firmware version of your smartphone.
Before switching Xiaomi smartphones to EDL mode, you need to check the status of the bootloader - whether it is locked or not. To do this, you need to find the “MIUI Version” menu item in the device settings and click on it 7-8 times until a message appears stating that the owner has become a developer.
After that, in the main settings menu, go to the “For Developers” submenu and find the “Mi unlock status” item in it. The status of the bootloader will be indicated here. If the answer is positive, you can use the standard bootloader. Otherwise, only Xiaomi firmware via EDL will be possible.
To enter EDL mode, the following programs, drivers and devices are required.
- QDLoaderHS-USB Driver program.
- Utilities ADB Run, Mi pc suite and Mi Flash Tool.
- Tweezers or other equipment to connect two contacts.
- EDL cable for Xiaomi or Mi Deep Flash Cable (DFC). You can buy a ready-made one or use a Xiaomi USB cable with a little modification. If you make it yourself, you need to expose the black and green wires in the USB cable. In the future, they will need to be bridged, so you can install a button or do it manually.
- The computer on which you need to install all the software, having previously disabled digital signature verification.
Starting with MIUI 8.1, some EDL login methods stopped working. Possible methods will be discussed next.
Odin and Samsung firmware - rules
To avoid any problems during the work process, you need to immediately understand some rules and strictly follow them. Very often, their violation leads to the fact that the phone turns into a “brick”.
So, what should you do when flashing a Samsung smartphone with the Odin program so that everything goes well:
- Before flashing the firmware, you need to fully charge the phone and provide the computer with uninterrupted power. If there is no uninterruptible power supply, you can also use a fully charged laptop. After all, if the phone or computer turns off during the firmware process, there will be many problems, so this situation must be excluded.
- To flash the firmware, you need to use the original USB cable that came with the phone. If you take any other one, the process may not go according to plan and end in an unknown way.
- During the firmware installation, you should never disconnect the USB cable from your computer or phone. Interrupting the process can be fatal. Therefore, make sure that no one accidentally surprises you like this. Children especially love to do this, and instantly and unnoticeably.
- The path to the folder in which the firmware files will be located on the computer must be completely in English, without Russian letters. That is, create it, for example, on drive C or D, but not in the “My Documents” folder or on the desktop. And name it also in Latin letters.
In general, these simple rules apply to the procedure for flashing any phones with any programs. Just remember that the process should not be interrupted under any circumstances. Until it ends, it is better not to touch the computer at all and not launch new programs.
Methods for entering EDL mode
Simple and unreliable
A few years ago this method worked 100%. But after tightening security rules, Xiaomi does not function on new firmware. To switch to EDL mode you need to:
- When turned off, hold down two keys on your smartphone: power and volume up.
- After a characteristic vibration, release the power button. A yellow sign with hieroglyphs will appear, and at the very bottom there will be a line with the inscription “Download”.
- Click on it and if successful, the phone screen will turn black. This will mean switching to EDL mode. If the phone just reboots, then this method will not work.
- You cannot click on the blue bar on the screen.
DFC cable
The method works on old software. Starting from Android 7 and higher, switching to EDL mode using a cable is problematic. As mentioned above, you need to take the DFS cable and strip the green and black wires.
If the colors are different, then you need to find the DATA plus and Ground wires.
After installing all the drivers and utilities mentioned above, you need to do the following:
- Turn off the phone.
- Insert one end of the cable into the phone.
- Press the button on the wire, if there is one, or press the bare wires together.
- Insert the other end of the DFC into the computer.
- Wait 4-5 seconds and disconnect the wires.
If everything went well, the computer will detect the new device and begin installing drivers for it.
After the process is completed, you need to open the device manager and “Qualcom HS-USB QDLoader 9008” should appear in the “Ports” line. After this, you can start flashing your smartphone using Mi Flash.
Enter Download Mode on Samsung Galaxy Devices
There are 3 easy ways through which you can enter download mode on Samsung devices, they are as follows:
- Using hardware keyboard shortcuts
- Use the volume up and down buttons
- Samsung 300k Tool or Samsung Download Mode Tool
- Using ADB commands
The last two methods can help you boot into download mode without even pressing your phone's keys or buttons. So if your volume buttons are not working or for some reason, you cannot press them to use other methods.
When is EDL mode useful and what is it?
EDL mode on Xiaomi smartphones is an advanced software project that allows you to install various firmware without an unlocked bootloader. This is a real salvation for owners of smartphones that refuse to start after the next crooked update, etc.
Please note that flashing is possible if the phone is at least partially operational . If the damage is mechanical and the device does not respond at all to being turned on, EDL is completely useless here.
pros
- The first and main advantage is, of course, firmware with a locked bootloader.
- There is no need to wait for approval from the developers to install it yourself. The procedure is not simple , but experienced users will be able to carry it out quickly and safely.
- The “stuffing” of the device is not affected, and root rights are also not required.
Disadvantages of Recovery Mode
- Access to a computer is required.
- You need to download special programs and drivers yourself; The operation is multi-stage.
- A beginner may make a mistake in the sequence of actions, thereby further damaging the device.
Remember that the site editors are not responsible for the actions you take ! This instruction is provided for informational purposes. If your mobile device refuses to start, be sure to contact a specialist.
What is Download Mode on Samsung?
As mentioned above, most OEMs use recovery and fast boot to root or manually flash the firmware, instead Samsung has a boot mode through which you can flash the firmware. Although it's not as easy as with other OEMs. For example, OnePlus provides compressed flash firmware files on its website, all you have to do is download them, go into recovery mode and use ADB commands to download the zip file to your phone. But with Samsung, you have to use the download mode and Odin software on your PC as Samsung phones do not support fastboot commands. Boot mode is basically a custom OEM fastboot mode that needs a special tool with which it can communicate and execute commands, for example Samsung needs Odin, LG needs Flash Tool and Nokia uses OST tool.
The download mode on Samsung Galaxy devices is also known as Odin mode. Once you have entered the download mode on your Samsung Galaxy phones or tabs, you will be able to install firmware binaries such as BL, AP, CP and CSC using the Odin tool. This comes in handy if your device gets stuck in boot loops, or if you can't turn on your phone, or if there are any other problems with the OS. In fact, before a certain update, if the bootloader version doesn't change, you can even downgrade to an older OS version.
Step-by-step process of flashing Xiaomi phone via EDL
So, we begin the lengthy flashing procedure. The first steps must be carried out directly on the computer , so take care of free space on your local disk and a stable Internet connection.
Step 1: Download MiFlashTool and ADB Drivers
The new shell will be installed by a special program called MiFlashTool . This is a proprietary utility from Xiaomi, so you don’t have to worry about malicious actions on its part. However, we strongly recommend downloading the tool only from the official website , avoiding unreliable sources.
- We visit the XiaomiFlash website . com and immediately get to the main page. Here we pay attention to the large “Download” . Official MiFlash website
- Next, click “Download Xiaomi Flash” . A new page appears where we select the version of the utility to download. It is better to download the newest and most current assembly at the moment. Version selection
- The download of the archive begins, which we monitor in real time. Typically the download is completed within one to two minutes. Downloading the archive
- We will begin the installation a little later, but for now we will additionally download ADB drivers , which will be needed for Fastboot mode. They are stored in an archive called "minimal_adb_fastboot" in zip format.
Installing the program and drivers
After downloading the archives, you need to install the materials stored in them. First, open the folder with MiFlash and double-click on the installation file “MiFlash.msi” . The system asks you to enter an encrypted code. You can find it on the website Xiaomiflash.com, and, in fact, the password is a link to this site .
Utility installation file
We wait for the program to install and move on to the drivers. Click on the “adb-setup” and also observe the installation.
Driver installation file
Step 2: download the archive with firmware for FastBoot
Next in line is the firmware itself. This is what we will install on the phone. You can choose the version for your model on the website c.mi.com. For example, let's take the popular smartphone Redmi 5 Plus .
We visit the site, scroll down the page and find the name of the mobile device . We click on it. You can choose either the developer version or the global version. The firmware download starts automatically. The archive size usually reaches 2 GB , so prepare free disk space in advance.
Model selection
Unpacking the archive and moving it to the root of the disk
Unpack the downloaded archive in any convenient way and place the materials on the system disk . We open the file and see an additional archive there, which also needs to be unzipped.
Now the folder with the firmware itself appears. It is advisable to rename it by adding a short Latin alphabet and numbers. This very folder will contain files called flash_all , as well as images . That's all, this is where the actions with the firmware end for now.
Step 3: download the Fastboot_EDL archive and transfer the phone to Fastboot
And finally, we need one more archive, namely Fastboot_EDL . This is an indispensable part when flashing Xiaomi firmware via edl.
Now, finally, we have practice. We take the smartphone and switch it to Fastboot mode. To do this , hold down the power button and the volume rocker up . We connect the mobile device to the computer using a USB cable.
Step 4: Put Xiaomi into EDL mode
We return to the last downloaded archive and go to the folder “Fastboot_edl-v2” . From there we run the file called “Reboot” . This is the most important point that will allow you to get into recovery mode without any problems.
A black screen with many Latin characters is displayed. There is nothing wrong with this, just press any key . The system asks for confirmation. “Enter” and wait a few seconds.
You can find detailed instructions in our separate article.
Checking the correct connection
To ensure that EDL mode has been successfully activated, you need to pay attention to the smartphone indicator. It should light up red . But this is not the only verification parameter.
On your computer, open “Settings” and go to “Device Manager” . In the list of connected ports, look for the inscription “Qualcomm Snapdragon HS-USB” (or so). If it is missing, we eliminate the cause of the problem. To do this, reinstall the drivers and re-download MiFlash. Is the port defined? Then let's move on.
Step 5: Xiaomi firmware via MiFlashTool
We open the utility and perform very important, final steps. Click “SELECT” and using the built-in explorer, specify the file with the firmware, namely the images .
Click on “REFRESH” so that the program detects the connected port. Below we select “clean_all” . The internal memory of the mobile device will be completely cleared, so do not forget about the need to make a backup in advance. We carefully check all the set parameters and tap on the “FLASH” .
The flashing process usually takes up to ten minutes. When the shell is successfully installed on the phone, you will see a green “ successful ” .
Before this, under no circumstances should we disconnect the smartphone from the computer.
FAQ
In this section we will consider all the questions asked in the comments, as well as small instructions that are not clear to users.
What is firmware
Firmware is essentially an archived operating system. The installation file is almost always posted in *.zip or *.img formats.
The software can represent:
- “Naked” Android, without additional add-ons,
- shell like MIUI (Xiaomi) or EMUI (Huawei),
- custom version - independent development by advanced users or a team of enthusiasts.
The purpose of the new version is to update the system's security or improve it at the software level. Sometimes an update allows you to slightly overclock the “hardware” part of the smartphone, tweaking the characteristics. But adding more RAM or making the processor much more powerful will not work. To do this, you will have to disassemble the case and resolder the chips on the motherboard. In fact, the new device is simpler.
How to find firmware for your model
The most reliable source is the manufacturer’s website, but not everyone will provide the opportunity to download the firmware archive. These resources host stable builds that will not harm your device. For example, Samsung only allows updating, but not installing from scratch. To do this, engineers have released the FOTA utilities (for mobile phones, without using a PC), and Smart Switch - for a Windows computer.
Therefore, to search, we recommend using the 4PDA forum; you can download both a custom version of the operating system and the official one. But be sure to read people’s reviews so as not to run into viruses and rootkits introduced into Android.
Is Google account reset?
Yes. The account will be automatically deleted from the old version of the operating system. After reinstalling the software, you will need to enter a new password and login.
Is it possible to flash it if it doesn’t turn on?
It all depends on the specific model of the gadget and the installed recovery. If the mobile phone is dead or does not turn on, the following outcomes are possible:
- No impossible. If the phone does not turn on due to serious physical damage. For example, due to a problem with the battery or motherboard.
- Maybe. If the phone has a broken display, but the main functionality works and the phone is set to developer mode, and you also have access to root rights. You may need a proprietary programmer to upload the failed bootloader to the non-volatile memory section.
- Yes. If the smartphone is stuck on loading, reboots cyclically, does not behave adequately, and is buggy. Or it automatically went into fastboot mode. The screen and buttons are working. In this case, root rights must be active.
- Partially. If the device died after an update, installation of suspicious “outside” programs, viruses, advertising rootkits, ransomware.
Here are some video instructions on how to “revive a brick”:
Restoring the Android kernel on an emergency MTK USB port
How to install ADB
The latest version of the ADB (Android Debugging Bridge) program included in the Android SDK can be downloaded from the official Google developer website:
- On this page you need to scroll the contents down and download the ZIP archive from the “Command line tools only” section for your operating system.
- Unzip the downloaded folder to the root partition of your PC.
The Android Debug Bridge functions are now available from the command line:
- View system logs.
- Copy files from/to the device.
- Install/Remove applications.
- Delete (clear) the data section.
- Overwrite the data section.
- Implement various control scripts.
- Manage some network settings.
How to enter the Recovery menu
To enter recovery, use mechanical buttons:
- Press the volume down keys and the power button on the case. Key combinations may differ on different smartphone models. See the exact combinations on thematic forums.
- As soon as a dark screen with lines appears, release the buttons.
This is the Recovery system menu. It is controlled via hardware volume keys. Command confirmation – button to turn the gadget on/off.
Recovery can be called via ADB by entering the command: “adb reboot recovery”.
How to open the developer section
The developer section is the removal of some software restrictions. It appears when performing a number of actions in the operating system:
- Open your phone's settings. Go to the “About phone” item.
- Scroll the list down to the “Build number” item; on branded shells, the menu item may be called, for example: “EMUI Version” (Huawei phones), “MIUI Version” (Xiaomi phones).
- Tap on the digital number itself more than 6 times. A message should appear saying “you have become a developer.”
- Return to the main settings menu. The “For Developers” item should appear there.
This item contains more precise system settings, for example, debugging mode, and extended reports on the operation of modules.
In some cases, the item appears in the settings, but you will have to force it through the slider.
Enable USB Debugging
USB debugging is a special mode of operation of a smartphone, which is necessary when flashing the gadget’s firmware via a cable. It is enabled in the “For Developers” item by activating the “USB Debugging” option.
Step-by-step video instructions:
Shows a recumbent Android with an exclamation mark
If, when entering Recovery, you saw a lying robot with an exclamation mark on its belly, do not worry. The system has failed, but it can be fixed.
To restart recovery:
- Press and hold the power button on your smartphone. This must be done as soon as the recumbent robot appears on the display.
- Additionally, press the Volume Down key once.
The system will reset the error and reload the Recovery menu.
How to exit FastBoot
The fastboot mode on a mobile phone is reset by long pressing (for 20 seconds) the power button. As soon as the screen saver with the word “fastboot” disappears, press the key.
How to unlock Bootloader
Not all phones come with an open bootloader. And without unlocking it, it is impossible to work with the fastboot utility. An open bootloader is only available in smartphones from Google: Pixel, Nexus. To remove restrictions from the bootloader, enter the command: “fastboot OEM unlock”.
How to get Root access
Root rights is the activation of a superuser on the phone. This level of access allows you to do almost any manipulation with the gadget at the software level.
To get root rights:
- Install the frame root program on your smartphone. It can be downloaded from the official developer page. Attention, the program is installed from an APK file. You need to set permission in advance to install applications from unknown developers on the Android system.
- After installing the application, open it. Select the root management method in the drop-down box: “SuperSU”.
- Choose one of three methods for obtaining superuser rights (Boromir, Faramir, Barahir). Each individual smartphone model has its own method.
- If a prompt appears that the device has been successfully rooted, restart the gadget.
Sometimes the application crashes, there's nothing wrong with that. Start it again and try to get root rights using another method. You can also get superuser rights from ADB. To do this, enter the command: “adb root”.
How to install ADB and Fastboot drivers under Windows
Installing the ADB and Fastboot driver under Windows is not difficult, the main thing is to follow the instructions:
The most popular ADB/Fastboot commands
How to roll back to old firmware
Detailed video instructions on how to downgrade from Android 10 to 9
Samsung specific
Does it change after flashing the phone?
Depends on the bootloader version. With factory recovery, IMEI does not change, with custom recovery (CWM or TWRP) it is possible. More details here:
Flash Tool Instructions
The SP Flash Tool program is intended exclusively for equipment on MTK processors.
Approximate cost of the service
The cost greatly depends on the region, somewhere you can find a specialist for 1000, and some will not agree for 5000 rubles. A mediocre service center will roll out a price tag of 2000-3000 rubles.
How long does it take to boot Android after flashing the firmware?
Loading Android after updating the software version takes from 3 to 20 minutes, depending on the speed of the processor and the installed amount of RAM.
Answers to popular questions
Carefully check each item and review the downloaded archives. If you downloaded them with antivirus enabled, certain items may have been removed. The battery must also be charged. If the battery level is below 30%, nothing may work. But most often the reason is in the drivers. Reinstall them and try again. Check if your device has different Android emulators. If there are any, delete them. And also reinstall the drivers. And the most common reason may be hidden in a faulty USB cable or connector. Yes, recovery mode works on both brick and working Xiaomi smartphones. Of course, it is not at all necessary to block the bootloader. Moreover, if you have an active bootloader, you can easily undo any incorrect action.
Today we discussed how to flash Xiaomi in EDL mode. Yes, this is a multi-step and difficult procedure, but in many situations it is simply necessary. If you strictly follow the instructions, re-read each command, don’t rush and don’t worry, everything will work out . And in case of additional questions, you can always contact us for help in the comments. Good luck!
Share: Android ProstoTECH Today we’ll talk to you about another way to flash a Xiaomi smartphone. The method for flashing is flashing via EDL mode. Why EDL mode? This method will allow the user, in case of an unsuccessful update or problems with starting the phone, to reflash the device, completely clearing all sections of the phone. Advantages of this method: the ability to enter EDL mode without using physical buttons, this method will eliminate all problems of unsuccessful updates. Disadvantages of the method: bootloader unlocked, access to PC Ours actions depend on one factor - whether the bootloader is unlocked or not. In this instruction we used a phone with an unlocked bootloader. Previously, it was possible to enter EDL mode in a similar way to Fastboot, thanks to the phone’s mechanical keys, or without unlocking the bootloader, but the manufacturer of our devices has already turned off this feature. And therefore our next steps to enter EDL (Download) mode: determine whether the bootloader is unlocked on our phone or not. To do this, you need to go to Settings - go to the “About phone” menu and click on “MIUI Version” about 6-8 times until the message “You have become a developer” appears. After these steps, we return to the main settings menu - find the “Advanced” item and go to it. Then we go down to the very bottom and find “For Developers” and look for the item “Mi Unlock Status”. In it we will see whether the bootloader is unlocked or not. After we have found out the status of the bootloader and it is unlocked, we turn off the phone. We wait 10 seconds and simultaneously hold down “Volume -” and “Phone power” and hold. In a few seconds, the phone goes into Fastboot mode, then you need to install the necessary drivers on your PC (you can download them here) after installing the drivers, we will need an archive with ADB. We must unzip this archive to the root of drive C (example: Local drive C adb), connect the phone to the PC, then go to the folder with ADB drivers (which we unzipped above to the root of drive C) in an empty space, click on the right mouse button and select “run PowerShell / Command Line" then we get to the command line (PowerShell) and enter the following commands: cd C: adb (for Command Line) fastboot devices (here we will see the device) fastboot oem edl (switch to EDL via Fastboot). Fastboot devices (for PowerShell). Fastboot oem edl The phone screen will turn black - don’t worry, it should be that way. Next you need to launch Mi Flash (preferably the latest version) and in the Select column select the path to our firmware (the main condition for specifying the path is that there are no folder names in Cyrillic ) click on Refresh - we will have a COM port (this is what EDL mode is) and then click Flash. The flashing time will be approximately 5-7 minutes. After which we will receive notifications on the screen about the successful completion of the actions and then we disconnect the phone from the PC, press and hold the phone’s power button for 10 seconds. Then release the power and press and hold this button again until the phone boots up.
Comments for the site
Cackl e
Reboot MI 9T Pro to Recovery Fastboot & EDL Mod:
Contents
show 1Reboot MI 9T Pro to Recovery Fastboot & EDL Mod: 1.1Reboot Xiaomi MI 9T Pro to Recovery Mod: 1.1.1Steps: 1.2How to Reboot Xiaomi MI 9T Pro to Fastboot Mod: 1.2.1Steps: 1.3How to Boot Xiaomi MI 9T Pro to EDL 9008 Mod:
Step by Step Guide to Boot Xiaomi MI 9T Pro to Recovery,fastboot & EDL Mod, if you own a Xiaomi MI 9T Pro Smartphone and Want to boot it in Recovery Fastboot & EDL Mod then You Can Do it by Following the Below Instructions.
The Xiaomi MI 9T Pro Run on android 9.0 OS and Powered by a QCOM SD 855 Processor. itis a Dual SIM Smartphone that accept 2 Regular SIM Card, connectivity Option's include 3G 4G, GPS, Wi Fi, Bluetooth etc, Sensor include Goryo Proximity Gravity etc.
Mi 9T Pro Come with 6/8GB of RAM and 64/128GB Storage Can be Expandable via SD Card. in Camera Department the Device Come with 48+8+13MP Rear Camera With 20MP Front Shooter.
Reboot Xiaomi MI 9T Pro to Recovery Mod:
Steps:
- Switch Off Phone.
- Once off together Press the Power and volume up button.
- once the Device Logo appear Release the Button.
- After This Simply Wait for the time till Your device boots into the Recovery Mode.
Reboot to Recovery using adb.
- Enable USB debugging
- Connect Phone to PC with usb
- open CMD on Platform tool Folder
- type this code and hit enter:
adb reboot recovery
How to Reboot Xiaomi MI 9T Pro to Fastboot Mod:
Basic methods
There are several basic ways in which you can update your operating system. Some involve the use of special software and a PC, others allow you to flash the device directly, from the smartphone itself. We recommend using the wired method as it is the safest.
A.D.B.
ADB (Android Debug Bridge Utility) is a PC debugger utility for flashing and changing many Android settings. For correct operation, you will need a USB cable and access to the Windows command line with administrator rights.
Download the archive with the firmware in ZIP format in advance (read below for how to choose the version). It is worth taking only proven options: from the official websites of manufacturers or that have been installed by other users on similar smartphone models.
Instructions for reflashing:
- Download and download the Java Development Kit from the official website. Choose the JDK version that matches the operating system bit depth (x86 for ancient computers or x64 for modern ones) on your PC or laptop.
- Connect your smartphone to a PC with ADB utility installed. Check for ADB drivers on your PC. If they are not there or they are installed incorrectly, reinstall them manually. Drivers are looked for on the official websites of the brand companies that produced the equipment. You can also use an alternative driver installer.
- Enable “USB debugging” by activating developer mode and open root rights. Instructions are a little lower in the article.
- Check the visibility of the utility for your smartphone and allow authorization. In the folder with the installed ADB program, press the right mouse button and the “shift” button at the same time. Select “Open a command window” or “Open a PowerShell window here” (for Win 10 version). Now type “adb” and press enter. The utility will launch via the command line.
- Check the visibility of the gadget, as well as its authorization. Enter the command “adb devices”. The phone will display a window for authorization. Confirm the command with “ok”.
- Upload the ZIP archive to the folder with the utility.
- Enter the command line (Win + R), then enter the command: “cd”. Drag the folder icon (in the directory path input field on the left side) to the path to the specified ADB location directly into the command line.
- Put your phone into recovery mode. This can be done by entering the command: “adb reboot recovery”, or using hardware keys.
- From the recovery menu on your phone, go to the “apply update from ADB” item and confirm the action using the lock button. This way you run the ADB sideload bootloader command.
- Go back to the command line and write in it: “adb sideload”. Hold the ZIP archive with the left mouse button and drag it into the command line field. It will contain the path to the specified archive. Press "enter".
The utility will show the process of downloading data from the network, after which the installation of the operating system will begin automatically. Important: all specified commands must be entered without quotes.
Fastboot
Fastboot is a utility for fine-tuning the Android system. Comes with an SDK and is downloaded in the same way as ADB. Unpack as a single archive along with the debugger.
Simply put, Fastboot is a cellular operating mode in which the gadget is visible to the PC not as a flash drive, but as a working terminal. In this state, you can manipulate the phone at a low software level. That is, this mode is suitable for developers and people who own code.
Usually, through firmware using this method, individual image files of the “img” format are replaced or installed. They are taken for each OS partition separately. We do not recommend using this method if you are not confident in your own abilities!
Instructions:
- Start fastboot mode.
- Enter the command line (Win + R), then write the commands one by one: “cd /” (press enter), followed by “cd adb”.
- Connect your mobile phone to your PC using a USB cable.
- Now put your cell phone into bootloader mode. To do this, enter the command: “adb reboot bootloader”. Sometimes you need to unlock the bootloader. Read about this below in the article.
- Check if the PC sees the smartphone. Enter the command: "fastboot devices". If everything is correct, the gadget model will be displayed in the command line.
After these steps, you can proceed to flashing. Usually the phone is sewn in sections, or one full file is uploaded. Each section is first formatted, after which the image is uploaded in “img” format. Commands for removing/installing an image:
- cache (Cache): “fastboot erase cache/fastboot flash cache name.img”;
- date (Data/UserData): “fastboot erase userdata/fastboot flash userdata name.img”;
- systems (System): “fastboot erase system/fastboot flash system name.img”;
- Recovery: “fastboot erase recovery/ fastboot flash recovery name.img”.
First, the first commands are executed, then the images are uploaded step by step (they go through a slash “/”). Instead of “name”, use the real names of img files.
It is important to respect the letter case when writing the firmware name, otherwise the system will generate an error!
Another command allows you to upload the OS from one zip file: “fastboot update name.zip”. Before flashing the system via fastboot, download all update images (.img or .zip) to the folder with the previously installed utility.
Using RECOVERY
Recovery is a system menu with a set of specific routines that allow you to configure the software at the “hardware” level; it can be compared to the BIOS system on a PC. Typically, Android devices have stock recovery, which is not always convenient to use. To expand functionality, users install custom versions, such as:
- C.W.M.
- TWRP Recovery.
You can flash your phone using these bootloaders. It is assumed that the gadget already has one of the versions of the specified recovery.
CWM Recovery
CWM (ClockWorkMod) is a modified recovery. The interface is similar to many stock Recovery, but with more functionality.
Update algorithm for CWM bootloader:
- Connect your smartphone to your PC or laptop in Data Transfer (MTP) mode.
- Move the .zip file to the root section of the gadget, or to an SD card.
- Put your phone into recovery mode.
- Find the “install zip” item in the main menu.
- Select the firmware file from the list and install the update.
Control in CWM is carried out in the same way as in the stock version of the recovery - through hardware buttons on the case.
TWRP Recovery
TWRP (Team Win Recovery Project), another recovery option. Unlike stock programs and CWM, this version has more convenient navigation through the sensor. All functionality is displayed as a tile on the desktop. The action is confirmed by swiping to the right side of the slider at the bottom.
Firmware algorithm via TWRP:
- Connect your smartphone to your PC or laptop in Data Transfer (MTP) mode.
- Move the zip file to the root partition of the gadget, or to an SD card.
- Switch to Recovery mode.
- In the menu that opens, tap on “Wipe”, then select “Advanced Wipe”. Oh, “Internal Storage”, “Data”, “System”, “Dalvik Cache”. Confirm the action with a swipe. The gadget's memory will be completely cleared.
- Go back one step and click “Reboot recovery”.
- In the main recovery menu, click on the “Install” button.
- Select the zip file of the same name and confirm the action by swiping.
- When the process is finished, click on the “Wipe cache/delvik” button, then “Reboot system”.
The software download procedure is not demonstrated on the screen in any way. The user learns about the result of the procedure only after rebooting the smartphone in normal mode. For some gadgets you need to first unlock the bootloader (instructions below).
From phone
The easiest way is to use a special application for firmware. One of the most popular software at the moment is the ROM Manager program. The application was developed by the creators of CWM Recovery. You can download the program on the official page in the Play Market.
Before you start, you will need to get root rights and install CWM Recovery on your smartphone. Otherwise the program will not start. Also, the phone's SD card should already contain an archive in zip format. You can download it in advance via an adapter or USB cable from your computer.
Work algorithm:
- Install the application, setting all the permissions that it will require.
- In the main program window, tap on “Install ROM from card”.
- Specify the path to the firmware file and confirm the action.
The firmware is installed automatically. If everything is done correctly, the smartphone will reboot and start with the updated OS. In the free version of the application, the user searches for and selects the file himself. In the full edition, you can click on the “Download ROM” button and the program will download a safe and verified version of the updates for your model.
Samsung Download Mode Keyboard Shortcuts
To enter the download mode on Samsung devices, you can enter it in several ways. Moreover, in some cases, it also varies from device to device and the OS running. Like the latest versions of One UI 3.0 and 3.1, there are different methods to enter the download mode, while other devices running older versions of One Ui have different methods to enter the download mode.
On Samsung devices with Home, Power and Volume buttons
Phones like Samsung Galaxy S2, S3, S4 Galaxy S5, Galaxy S6, Galaxy S7/S7 Edge, Galaxy Note, Galaxy Note 2, Galaxy Note 3, Galaxy Note 4, Galaxy Note 5, Galaxy Note 7, etc. ,Have Power, Home, and Volume buttons. So, follow the below method to enter the download mode:
- Turn off your phone or tablet.
- Now press and hold Home + Volume Down + Power keys for just 3 seconds.
- Release the keys and then press the Volume Up key again until you see Download Mode.
On Samsung devices with power and volume keys
While there are several Samsung devices like A8 (2018) and others that do not have a Home button but only Volume and Power keys, use the method mentioned below to enter Download Mode –
- First, turn off your Galaxy device.
- Now hold Volume Up + Volume Down + Power buttons all three at the same time for 3 seconds or so.
- You will see a blue screen with a message about download mode.
On Samsung devices with Power, Bixby, and Volume keys
Samsung's flagship series like Galaxy S8, Galaxy S9, Galaxy S10, Galaxy Note 9, etc. come with power button volume rockers and an additional Bixby button. If you have a device with a Bixby button, use the method below to enter download mode.
- Turn off your Galaxy smartphone.
- Now press and hold Volume Down + Bixby + Power keys just at the same time for 3 seconds.
- Now the next screen will ask you to confirm to enter Download Mode, press the Volume Up button to confirm it. You will now see the download mode screen.
On Samsung devices with Volume and Power/Bixby keys
There are several devices where the power button doubles as the Bixby button and also Note 10, Galaxy A90, Galaxy A80, Galaxy A70, Galaxy A50, Galaxy A40, etc. So, to boot into download mode on such devices, follow the below steps actions. mentioned below.
- Turn off your Samsung Galaxy device.
- Now press and hold Volume Up and Power button simultaneously for 5 seconds.
- Your device will boot into recovery mode . Here you will see things written in orange and blue, you need to use the Volume keys to navigate the menu and the Power button to select the option.
- Go to reboot into bootloader using Volume Down key and then press Power button.
- Your Samsung Galaxy device will boot into Download Mode .
Samsung Galaxy S20/S21 Boot Mode
The latest flagship series of smartphones from Samsung, the Galaxy S20 and s21 series, have a slightly different method of entering the download mode than the rest. For security reasons, you cannot boot into download mode using volume key combinations. Samsung has changed the method to enter Download Mode for devices running One UI 3.1 such as Galaxy S20, S21 Note 20 and older phones. To enter the download mode from devices running One Ui 3.1, follow the method below.
- Turn off your Galaxy phone.
- Connect it to your computer using a USB cable.
- Wait for 5-10 seconds, now hold Volume Up + Power keys simultaneously for 7-10 seconds.
- Keep the buttons pressed until you see Android Recovery Mode .
- Once you enter recovery mode on your Galaxy device, go to Reboot into bootloader using the Volume keys and then select it using the Power button.
- Your phone will boot into Download Mode or Odin Mode .
Using only the volume up and down keys
If by any chance your device's power button is not working, you can boot into Odin mode or download mode using the volume keys.
- Turn off your Samsung phone in quick settings.
- Press and hold the Volume Up and Volume Down keys at the same time.
- While holding the buttons, connect the USB to the type-c port of your device.
- Make sure the USB cable is connected to your PC or charger and turned on.