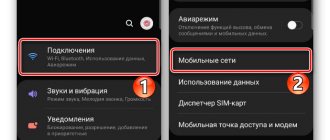
Some simple tips on how to fix the problem with the camera not working on your smartphone. Budget phone models are especially prone to this. Just the other day they brought me a DEXP phone, which when I started the camera only showed a black screen. In my case, unfortunately, it was not possible to solve the problem and the client took it to the service center.
But, with a high degree of probability, you can revive the camera using several simple methods. We will not touch on the complex technical part, but will only touch on those problems that can be solved on our own.
As a rule, if the camera of an Android smartphone fails, the following warning appears on the screen:
The camera cannot be connected. Close other applications that may be using the camera or flash.
But the camera does not start even after rebooting the device.
Below I offer you several methods that can help solve the problem with the camera.
What to do if the camera does not work on Android:
Before you begin, launch the camera app and if you see a black screen on the main camera, switch to the front selfie camera. If the front camera works, then the problem is directly in the main camera module itself and cannot be fixed on your own. But, if the front camera also does not show an image, read below.
Reset camera app cache and data
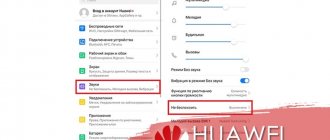
Go to Settings => Applications => Camera
and select the
Memory
Click first “Clear cache”, then
“Clear data”
Try launching the camera and, if it doesn’t work, move on to the next stepInstall a third-party camera app
Perhaps the standard camera application is so stupid that even resetting the cache and data does not help. In this case, you can try installing a third-party camera app. Fortunately, there are a huge number of such programs in the Play Market and you can choose to suit every taste.
You can install anything, but I recommend it as one of the most stable, and it’s completely free.
Perform a hard reset
If the previous methods did not help fix the problem with the camera, you can take drastic measures - reset your phone to factory settings. Go to your smartphone's settings and find "Backup and Reset"
or
"Backup and Restore"
.
The name depends on the device model and Android version, but in any case it will contain the word recovery
or
reset
Select “Data reset” and wait until the phone rebootsPlease note that resetting the data will lead to the loss of all information stored in the internal memory of the phone. You should also keep in mind that when re-activating, you may need to provide the Google account information previously entered on the phone.
Unfortunately, more serious camera failures on Android cannot be fixed on your own. In this case, you should contact a service center for help.
When choosing a new phone, the buyer is always guided by a number of important criteria. One of them is the camera. Using the built-in camera, you can take fun selfies and remember unforgettable vacation moments. Thanks to modern smartphone cameras, many have even forgotten what a regular camera looks like. Therefore, for many it will be a big problem when the camera stops working on the phone for no apparent reason. This is exactly what will be discussed in our article.
There are several ways to fix this problem. But first things first. First of all, it is necessary to determine the nature of the failure. If the phone has been dropped and the camera lens is broken or the device body has fallen into water, then you will not be able to fix the problem yourself. You will have to contact the service center, as some parts will need to be replaced. If the gadget has not been subjected to mechanical impact and the problem is at the software level, you can fix everything yourself.
The front or main camera does not turn on on Android - what to do?
If the camera does not turn on on Android, then the causes of the problem may lie in software errors or problems at the hardware level. The user can cope with errors in the operation of the system on his own, but replacing a failed component will require the intervention of a specialist.
This article is suitable for all brands that produce Android smartphones: Samsung, HTC, Lenovo, LG, Sony, ZTE, Huawei, Meizu, Fly, Alcatel, Xiaomi, Nokia and others.
Possible reasons why the camera does not turn on
If you are interested, my article is a review of which Bluetooth headphones I bought for my smartphone for $13.
If you haven't dropped or hit your Android device, but at some point you find that the camera doesn't work, then most likely the cause is a software error. It could be:
- Incorrect camera setting.
- Application conflict.
- Lack of memory.
- Cache overflow.
- Virus infection.
- Incorrect firmware.
If everything is fine with the system, pay attention to the physical condition of the module. The camera may not turn on due to mechanical damage after an impact or fall, or contamination of the lens.
Nowadays you won’t surprise anyone with the presence of a camera; all laptops, tablets and smartphones are equipped with them. Some are capable of taking photographs that are not inferior in quality to professional cameras. The article provides information about the front camera, which is designed for shooting using the front panel of the gadget.
Possible causes of the malfunction
The Android operating system is characterized by flexible settings and the ability to work with internal files. This is an absolute plus, which allows you to customize your gadget according to the user’s requirements. But sometimes this plus leads to malfunctions. Some of the most common reasons for camera failure include:
- failed system update;
- installing a conflicting application;
- installation of unofficial firmware;
- deleting important files;
- emergence of viruses;
- system failure for a number of other reasons.
Troubleshooting
It is best to start troubleshooting with the simplest steps that will not take much time and effort.
Theoretically, these methods are quite enough to restore the camera to its former performance. But there are difficult situations when, even after a complete reset, the camera on the phone still does not work.
If the problem is of a software nature, then flashing the device’s firmware will help with one hundred percent probability.
But there are several nuances and features:
- If you have a completely new phone that is still under warranty, under no circumstances should you flash the phone yourself. Take it to the service center along with the warranty card.
- If you install the firmware yourself, there is a high risk of damaging the device. This process requires certain skills and knowledge. You definitely need to remember one rule - the firmware can only be downloaded from the official website. Otherwise, not only the camera, but the entire smartphone will fail.
Software errors
- Virus infection. Very, which is growing in proportion to the popularity of Android. To solve it, you need to install an antivirus program, scan the system and remove all threats. More details about the process.
- Lack of memory. While using the smartphone, the internal memory can be filled to capacity. In this case, the camera turns on, but recording video and taking photos will not be possible. Make sure there is enough free space to support the camera's functions. This also applies to microSD cards, which are used to expand memory. We wrote about how to properly free up memory.
- Clearing the cache. Temporary files accumulate on the system and when using the camera. This causes the cache to become full, so there simply aren't enough resources to perform the actions. Cleaning must be done periodically. To do this, go to Settings - Applications - Camera
. At the bottom of the window that opens, the “Clear cache” button is available. - Incorrect setting. The main problem is often choosing where to save your camera footage. If the option was set to a microSD card that was later removed, you will need to adjust the settings.
- Application conflict. If problems with the camera began after installing an application, you need to remove it and check the operation of the device.
- Incorrect firmware. Sometimes you have to do the installation. It is very important to install the appropriate version of the software from the official website. Otherwise, some functions (camera, sound, screen rotation, Wi-Fi) may not work. In the worst case, the device will stop starting altogether, so be careful.
- OS update. Standard settings involve automatically updating the operating system to a new version. Despite the fact that the upgrade is provided by the manufacturer, related problems quite often occur, including with the camera. To fix the problem, you can perform a system rollback, i.e. install an older version of the platform, which ensured the functionality of all modules. It is also recommended to disable subsequent automatic updates.
ATTENTION!
If the gadget is under warranty, then it is recommended to contact a service center or store to fix the problems. Most changes to the operating system or installing firmware yourself will void the warranty.
Diagnostics
You can use various applications to diagnose the status of your phone.
One of them is the Phone Doctor Plus
(Download).
Using it, you can check not only the camera, but also the condition of other important elements of the smartphone.
After launching the application, general information about the device will be displayed. For them to be relevant at the moment, you need to go to the second tab, where more than twenty tests are located, including the camera we need, GPS and much more. Each test is run separately, some asking the user to perform a specific action, such as shaking the phone or inserting headphones. Upon successful completion, a green icon with a checkmark appears - this means that the tested function works correctly. With these simple steps you can assess the actual condition of the camera.
As practice shows, there are no hopeless situations. If the camera on your phone does not work, this is not a reason for frustration. You can solve the problem by pressing a few buttons. It’s enough to use the tips from our article, spend a few minutes of your personal time and continue to enjoy beautiful pictures.
There are several possible causes of failure.
- One of the most common problems is viruses (read), from which the rapidly developing level of the system often suffers. Visiting unfamiliar resources on the Internet and being absent increases the risk of infection of the gadget.
- Updated firmware. One of the common options why the camera does not work on Android
(read). The procedure may lead to failures in important application settings, which means the camera stops working correctly. A good solution to the problem is to perform a system rollback after updating the platform; reset Android to factory settings. - Mechanical damage. For example, falling the device can disrupt the operation of the module responsible for the camera.
- Dust and dirt on the sensor, contamination of the cache module.
Front camera does not work on Android
The work of this application is also very important for a modern person. The range of use of such a camera is very extensive. Sometimes the utility launch fails. The following symptoms may occur if the camera does not work on Android:
- The gadget freezes when the front camera is launched;
- the app only shows a black display;
- throws an error when turning on the camera.
How to configure the photo module correctly
If the camera on Android does not work or occasionally crashes, then you need to follow a few simple steps:
- Reset your smartphone to factory settings. Usually, to do this, you need to go to the gadget menu and find the “Backup” section. After this, you need to select “Reset factory settings”. Before doing this, it is better to save all important data and transfer contacts from your address book to a memory card.
- Download and install an antivirus (do not visit other sites before doing this). After this, you need to clean the system. It is recommended to download antivirus programs only from Google Play, this way you can be guaranteed against malicious files.
- Clear cache. This operation is performed immediately after the antivirus scan has been performed. To clean it, you need to go to “Applications” and find “Camera” there. In the same menu there will be a “Clear cache” button.
- Thoroughly wipe the objective lens using a special lens cloth.
If you still can't take pictures, you can try installing another camera application. There are a huge number of such utilities. There are paid and free programs, more functional ones and those that only allow you to take photographs.
If all else fails, then all that remains is to contact the service center.
Conventional cameras are losing their popularity: the development of mobile gadgets and regular reductions in pricing policy have almost equalized the cost of budget and middle-class camera models.
Moreover, when purchasing a smartphone, the user receives a mini-computer with unlimited capabilities. But it happens that at the most inopportune moment the camera on an Android device does not work. Unlike a regular camera, the list of problems and solutions when the camera on a smartphone does not work is quite extensive.
What to do when the camera on your Android smartphone does not work
You can try to fix this kind of problem yourself. First of all, you need to reboot the device, then check the camera’s operation. Next, you should check the battery charge, since on some devices a resource threshold of less than 30% may contribute to the appearance of this type of error. The next step is to create a backup copy of the information and clear the cache memory. Such manipulations help when a black screen is displayed when the camera starts or when it freezes. If the performed manipulations do not lead to anything, it is better to contact specialists at the service center.
With the question “Why doesn’t the camera work on Android?” any user may encounter. Don’t immediately panic and rush to the nearest service center. Perhaps this is a small hardware failure that you can quite easily solve yourself. Therefore, it is important to know the possible causes of such problems, as well as how to eliminate them.
Causes and solutions to the problem with the camera not working on an Android tablet
How to enable the front camera on iPhone?
So, a guide to working with smartphones and tablets based on iOS:
- Find the gray icon with a camera in the middle in the main menu and activate it. If you are interested in how to quickly turn on the front camera on an iPhone, we recommend using an additional function. In cases where you urgently need to turn on the camera, just swipe left on the lock screen.
- In the screen that appears, there is an icon with two arrows (lower right corner), click on it if you want to take a selfie.
- At the very bottom there is a round white button, and above it is a horizontal list of all available shooting modes. To take a standard photo, set the photo mode and press the round button.
- To shoot video, set the video mode and press the white button again.
Well, that's all, actually. If you wish, you can edit the resulting photos at your discretion in the “Settings” tab.
When choosing a smartphone, each person is guided by the relevant parameters. For some, the battery is important, for others the sound, for others the camera. And some simply choose an ultra-budget phone with low specifications.
Very often, certain problems appear in such smartphones over time. One of these problems is that the camera on an Android smartphone does not work. True, even flagships are not immune from such troubles. Therefore, in this article we will analyze the reasons for this problem, and also figure out what to do if the camera on Android does not work.
Causes
- Firmware
Sometimes it happens that after updating the firmware, the phone does not work better, but quite the opposite. The phone began to glitch, freeze, and some applications began to crash. This also applies to the camera.
- Viruses
A virus is a malicious program that affects not only the operation of the system itself, but also the launch of the applications themselves. Perhaps your camera is not working precisely because a virus has entered your phone.
- Mechanical damage
If you dropped or hit your smartphone, this could be the main problem with a camera not working. Most likely the camera eye itself was damaged, or the cable fell off.
- Clogged cache
When a module's cache becomes clogged, the application begins to malfunction. In this case, cameras. The camera may start every other time, or not start at all.
- Pollution
The camera is dusty or dirty. This is, so to speak, a mistake by the manufacturer, since he did not provide adequate protection for the camera from dust. Because of this, the camera may not work correctly.
- Conflict with another application
In some cases, the camera stops working when you install an application that conflicts with the camera application. That is, you must choose which program you will use: the one that was installed by the manufacturer, or the one that you downloaded. But sometimes both programs may not work.
This often happens when you have downloaded several cameras or photo editors.
- Incorrect firmware
Firmware for a smartphone is not a complicated matter, but it is delicate. When updating the firmware, all parameters, modules, etc. are updated. Therefore, it is very important to choose normal firmware, without bugs, and only for your smartphone. Even if it is a custom ported firmware, carefully read the description for it. Perhaps it is in this firmware that the camera does not work.
- Low memory
As you use your phone, you may not notice how the memory is becoming less and less. And it is precisely because of a lack of memory that the camera may not work. Perhaps the program will launch, but you obviously won’t be able to take a photo or shoot a video.
- Incorrect setting
Perhaps there was a settings failure, or you manually set the settings incorrectly. In any case, this may cause the camera to not work properly.
- Memory card damage
Since most phones work with memory cards, we set the default memory to an SD card. But the card is a short-lived device, so if your camera often displays errors or malfunctions (especially when saving a video or photo), the problem may be hidden in the flash drive.
Remedies
Now let's talk about ways to fix this problem.
The very first thing you need to do is turn off the phone, remove and insert the battery back, and then turn on the smartphone. Perhaps there was just a small system failure that can be easily resolved by rebooting. And if something is more serious, then here are the methods for solving this problem.
- If the issue is with the firmware, then several options can help you:
System rollback - Reset
- Firmware update to a more recent version
If the camera stops working after an over-the-air update, you need to roll back to the old version. Rollback is done differently in each phone.
You can also try resetting to factory settings. True, everything will be deleted from your phone’s memory, but then your camera will work.
If rolling back the system did not help and resetting the settings did not help either, you need to manually flash the phone to a more recent firmware or to an older version. The main thing is that the firmware is stable and without bugs.
- One of the most common problems is viruses.
To clean your phone from viruses, you need to download an antivirus and scan the system. If the cause of the camera malfunction is indeed a virus, then the antivirus program will find it, and you will only have to delete the malicious files found.
The best antivirus today is Dr. Web. It can be downloaded for free from the Play Store.
- Mechanical damage can only be resolved at a service center
Anything can happen when you hit your phone. If the camera does not work after the phone is hit, then all that remains is to take it to the service center. If you decide to disassemble the phone and fix the camera yourself, this may result in damage to the board, cables and other components.
Therefore, if you are not confident in your abilities, then it is better not to engage in amateur activities. You may have to replace the camera module, but you won't be able to do that at home.
- Clear cache
The simplest and most harmless reason is a clogged cache. What is cache?
Consequently, if the cache is clogged, the access speed will be very low, and as a result the application will throw an access error. Therefore, we go to settings, then go to applications, and look for the camera. Click on it and look for the line “Clear cache”. After this, your camera will work again.
- Removing dust
This is unlikely to affect the camera, but the picture will be greatly distorted. Therefore, an inexperienced user will immediately think that something serious has happened to the camera, since he does not get the desired photo quality.
To remove dust, you need to contact a phone repair or service center. The master will carefully remove the glass, clean everything, and you will again admire the clear image.
- Remove the conflicting application
Finding the culprit in this situation is difficult. If you installed a specific application, after which you noticed problems with the camera, then you need to remove it. If such a problem did not appear immediately, then you need to search at random.
Or just do a factory reset. The system is formatted and the camera comes back to life.
- Bug in the firmware
You need to install another firmware. If you installed the official firmware and the camera stops working, then this is a manufacturer’s error, which will be fixed soon. But this happens extremely rarely. Mainly in ultra-budget Chinese smartphones.
If we are talking about custom firmware, then you need to contact the creator of the firmware. Perhaps the creator will make a fix or patch that will fix this problem, or maybe not. You alone are responsible for installing the firmware! Therefore, carefully study the firmware description and consider all possible bugs in order to avoid such problems in the future.
- Change default memory
Lack of memory is one of the reasons. Therefore, you need to switch the default memory to the SD card in the memory settings. If you don't have an SD card, then you need to delete unnecessary files so that there is free space for saving new pictures.
If there is no default memory selection option in your camera settings, then look for this feature in your phone settings.
- Restore camera settings to default
If you like to tinker with the camera settings to achieve the best picture quality, then in the future the camera may stop working precisely because of such actions. To restore the default settings, go to your phone's settings, go to applications and find the camera. In the list of operations that appears, select “Restore default settings.”
- Check your memory card
Sooner or later, your memory card will start to fail. To restore it, you need to format it and test it with special programs. It is advisable to do this on a computer. The program will clean the flash drive, fix errors, etc. Then insert the flash drive into the phone again.
This method will only help if your photos from the camera are saved on an SD card.
Conclusion
If the problem - the camera on Android does not work - is related to the software, then it can be easily solved at home. If this is a hardware failure or mechanical damage, then you cannot do without a specialist.
Today, with the help of the Internet and a specially installed program, you can not only talk with a person, but also look at each other during a conversation. This opportunity is even available on some social networks. To prevent your friend from admiring the black screen instead of your face, you need to connect the front (front) camera. This camera is found on almost all modern laptops, some tablets and phones.
Causes
The most common reasons for the breakdown or malfunction of the Android camera may be the following:
- Due to this, which is installed automatically in most cases, problems may occur in the operation of the device as a whole. Problems may also affect the operating mode of the camera, as a result of which it may stop working.
- An important reason may be on a tablet or smartphone. This has become particularly relevant especially recently. It never hurts to be careful.
- Mechanical damage to the device can also negatively affect the operation of the device’s camera. If you drop your tablet on asphalt or in water, you may damage the special module responsible for the camera.
- Manufacturers of devices with camera modules located on the outside are especially prone to problems associated with the ingress of dust and other contaminants.
- Another influencing factor may be a clogged module cache.
Reasons for the camera not working
- Mechanical is the most unpleasant reason why your camera does not work. For example, if the camera stopped working as a result of the phone falling. A similar reason for a camera not working can only be corrected at a service center; I do not recommend dealing with this problem yourself, because... you can only make it worse;
- System error - in this case, the reason for the camera not working is an error in the Android operating system. For example, an outdated error. Below I will tell you how you can check and update the Android version;
- Viruses - some viruses, once they get into your mobile device, disrupt and block the operation of the camera - both the front camera and the external camera. This problem can be solved by simply installing antivirus software and scanning the operating system. Below I will provide a list of antiviruses that you can use.
Troubleshooting solutions
Naturally, it is necessary to familiarize yourself with existing ways to eliminate these problems.
After the completed manipulations, everything should work again.
If your front camera on Android stops working and you can only see a black screen, you should contact the service center or store where you purchased the device. You can take advantage of warranty repairs if the cause of the camera breakdown was not your intervention inside
In the modern world, the camera on your phone has become a thing, life without which is almost impossible to imagine. Capture a particularly important moment, scan a text, make a video call to loved ones. This is not a complete list of ways to use the camera on mobile devices. In many modern gadgets, manufacturers install two (or even three) cameras at once - front and rear. The first one is mainly used for communication or taking selfies. The second is for photographing the surrounding world.
Although today's technologies make it possible to create high-quality, reliable hardware for smartphones that should serve stably and for a long time, users may still encounter certain problems. When an average user discovers that the camera of his device has stopped working, he usually does not know what to do. Honestly, there can be many possible faults. With the help of this article we will try to analyze each one.
Rebooting the equipment is the first thing to do if you encounter problems with your camera. The gadget could simply have crashed or the application might have frozen. Sometimes such errors can be cured by simply turning the device on and off. After holding down the lock button, a context menu should appear where you need to select “reboot”. If a regular reboot does not produce any positive results, you should be patient and try other methods, which will be discussed below.
How to enable the front camera on your phone?
When it comes to video calling, usually the front camera turns on automatically. This is especially true for laptops. But sometimes on tablets and smartphones you still have to do it manually.
Let's say you are communicating with a friend via WhatsApp or Skype, but the interlocutor does not see you or sees a completely different image instead of your face, that is, the main camera is turned on. How to turn on the front camera in this case? You need to find the icon indicating the camera and click on it. Usually after this there is a camera change.
If you intend to take a photo of yourself and are wondering how to turn on the front camera on an Android smartphone, the approximate procedure is as follows:
- activate (unlock) the smartphone screen;
- find the camera icon on the desktop or in the main menu;
- By default, on all Android gadgets the main camera is turned on first. In shooting mode, there should be a camera icon on the screen with two arrows that go around it, click on it.
That's all, now you know how to turn on the front camera. The interface of Android smartphones and tablets is approximately the same, so this guide is valid for all gadgets.
Memory card
If the photography application does not launch, there is a chance that the problem is not even hidden in the phone itself. Check the integrity of the memory card on which photos and videos are automatically saved. Be sure to try inserting another memory card and starting the camera again.
The second stage is to make sure there is enough free space for recording in the internal or external storage, because modern smartphones create very high-resolution images, and this negatively affects the weight of media files.
The main reasons why the front camera may not work
The front or front camera is a feature that people need to take pictures of themselves and communicate via video calls. The lens of this device is located on the front panel of the smartphone, and therefore it can be accidentally damaged. If for some reason the front camera does not start, you must first make sure that its lens is not damaged, that is, carefully examine it for scratches, chips and other defects.
If there are no obvious defects on the front camera lens, then a failure in its normal operation may be caused by reasons such as: Updating the smartphone software. If your phone settings are set to firmware update by default, then downloading more recent software may cause some smartphone functions to malfunction, including the front camera.
Mechanical damage
There is always a possibility that the camera module itself has suffered mechanical damage (that is, a hardware problem). Lenses are the most vulnerable and fragile component of mobile devices. A mobile device may stop taking pictures after falling - under such circumstances, the module usually breaks or the cable cracks, the lenses break, or the light sensors are damaged.
But other mechanical damage is also possible: the cable connecting the lens module to the motherboard could burn out, moisture or dust could get into the lens, significant physical damage was caused to the gadget, after which failures and errors begin one after another.
In such a situation, attempts to deal with the breakdown on your own can lead to new negative consequences for the device, so the only thing left to do is contact a specialist or company that carries out certified repairs of mobile equipment. Fortunately, there are many of these today - in any large shopping centers you can find several “workshop islands” where the health of your smartphone can be diagnosed in a matter of minutes.
Special programs
Of course, you shouldn’t rush into mechanical repairs right away, because the reason could still be software. First, you should try installing an alternative utility for the camera instead of the standard one in order to test the functionality of the old module on it. If everything works as it should in the new application, then the start of the malfunction is most likely the clogged cache memory of your device; to fix this, you just need to delete the old cache from the settings of your favorite application. To delete the cache you need
- go to “Settings”;
- select “Memory”;
- open “Application Data” and find the same utility for the camera among many others;
- Now all that remains is to click on “Erase data”;
- confirming your choice.
How to delete desktop on Android
The process of eliminating excess home display from Android devices is very simple. How to remove an extra desktop on Android:
- Open any usable space.
- Perform the pinch gesture (put two fingers on the smartphone display and bring them together, as when zooming out on an image). Next, all used device windows will be displayed on the screen at once.
- Identify the extra screen tab and click on it.
- Without releasing your finger from the icon, move it to the top of the display to the image of the basket.
Done, unnecessary home display removed!
LG and Samsung devices
How to remove desktop on Android LG and Samsung:
- Tap the Home button to go to the main page.
- Swipe with two fingers as you would to enlarge text or an image. After this action, all pages will be displayed on one screen.
- Identify the unnecessary screen tab and click it.
- Without releasing your finger from the icon, move it to the top of the window into the trash icon.
HTC devices
In order to get rid of an extra desktop from an HTC Android device, you need to do the following:
- Find empty space anywhere on the main page (the space between application icons will also work).
- Press and hold an empty space. As a result, a context menu will be displayed.
- In the window that appears, select “Manage Home Screen”.
- Find the unused screen tab and select it.
- At the bottom of the window, click on the “Delete” button.
Nova Launcher
How to remove screen on Android using Nova Launcher:
- Tap the Home button to go to the home page.
- Tap the Home button again to display thumbnail images of all used desktops. This is done in preview mode.
- Identify the extra screen tab, click on it and hold.
- Drag the selected page to the top of the window into the trash icon.
Google Launcher
In order to eliminate a useless desktop from an Android device, you need to perform the following actions:
Determine whether Google Experience Launcher is installed on your smartphone. To do this, you first need to go to the home page and swipe your finger across it from right to left. If the Google Now display appears as a result of these actions, then the Google Experience Launcher is present.
- Find an unused screen tab.
- Get rid of all software development icons. To do this, click on the application icon and, holding it, drag it to the top of the window onto the trash can image.
- Repeat this process for all program icons in the selected space.
- Eliminate all widgets. This process is carried out in exactly the same way as for application icons. Therefore, you need to select and drag the widget onto the cart image.
- After clearing the used space from software development icons and widgets, it is automatically eliminated.
Hola Launcher
How to remove a blank desktop on Android using Hola Launcher.
A modern mobile device based on the Android operating system cannot do without third-party applications. Over time, there may be so many applications that they all cannot fit on one desktop. Therefore, Android has the ability to create multiple desktops. But what if you don't need them? What if you organized your workspace in such a way that all installed applications fit on one screen? Then there is no need for additional tables. Android desktops using examples of popular shells.
.
Reset to factory settings
The second most common software malfunction is an automatically installed update containing certain bugs that prevent the user from starting the camera for various reasons. In this case, we return to factory settings.
- open “Settings”;
- We are looking for the item “Restore and reset”;
- Scroll through the menu to the very bottom, then go to “Reset settings”;
- select “Erase everything”.
Please note that after resetting to factory settings, all files, passwords, contacts will be permanently deleted from your device, so first make a backup copy of stored important information.
How to solve a problem
Reset to factory settings
This method will allow you to fix problems with system and module settings that have arisen for one reason or another. But you need to do this correctly, for which:
- first make a backup copy of the necessary files and data, as well as the system itself (this item is optional, but it is better not to neglect it);
- then go to the device settings, General tab;
- find the item “Backup and reset” (the name may differ in different versions of Android and models);
- in a new window, select “Reset settings”;
- review information about what data will be deleted;
- make sure that the battery charge level is at least 30%;
- start reset;
- After finishing, you can check the operation of the camera and configure the device.
Virus check
If, after returning to factory settings, the gadget still displays an error message, you should check it for viruses. This can be done in two ways:
- connect your phone or tablet to your PC and scan with a computer program;
- install the utility directly on the gadget.
In any case, it is necessary to do a deep check.
External and internal cleaning
It will be useful to clean the device from various debris, both internal and external. In the first case, it is enough to wipe the lens with a special cloth or a clean one, but with the application of a special product. You can also disassemble the phone and clean it, but for this it is better to seek help from a specialist.
Internal cleaning involves deleting the module cache, for which:
- go to settings, General tab;
- select the “Applications” item;
- swipe your finger from right to left several times to get to the All tab;
- we find the camera and go into it;
- in the window that appears, we need a “Clear cache” button.
Viruses
Sometimes a faulty gadget should be checked for viruses. Perhaps they were the cause of all the troubles: the open source Android OS has its own vulnerabilities that can be exploited by attackers, for example, blocking the operation of a mobile camera. There is a lot of proven antivirus software on Google Play (by the way, there is plenty of free one too). Download the applications you like, run the test, and wait for the result.
It is necessary to take into account that malicious files on the gadget itself can interfere with the correct operation of security software, so it will be useful to connect the smartphone to a desktop or laptop in order to perform a more thorough virus scan using computer programs.
Flashing
The next method is flashing the device, which should absolutely help with hardware failure of the smartphone. You can do it yourself, but you should be careful: a failure in data transfer or failure by the user to comply with all points of this operation can completely disable the phone. You can only download the firmware from official websites; only this guarantees a real signature of the new software license. Please note that after flashing, your smartphone (even if purchased just a few days ago) will lose mandatory warranty service from the service center.
Physical malfunctions
Physical damage is a reason to contact a service center for repair. But there are also simple solutions that can be effective. You can do these steps yourself:
- Checking the functionality and integrity of the memory card. When saving videos and pictures to a memory card, the camera may give an error. Flash memory has a limited life cycle, so it is recommended to test the storage medium for errors and “dead” memory cells. To quickly find out, you can install a verified memory card in the gadget and check the functionality of the camera.
- Cleaning the lens. The camera sensor is protected by special glass, which can be exposed to dust, moisture, etc. In this case, the device will not be able to focus and will stop working. It is necessary to carefully clean the glass using special products (microfiber, monitor cleaning liquid).
If all of the above options do not solve the problem, then it is most likely due to a critical failure. Such malfunctions are the result of prolonged contact with water, strong impacts, falls and other external influences. This leads to failure of sensors, stabilizers, and cables. The worst case is considered to be a violation of the integrity of the printed circuit board, which is responsible for the operation of all components of the device.
Complex damage cannot always be repaired even by specialists in service centers, so you need to be careful when using your mobile friend. To protect your smartphone from damage, you need to follow these recommendations:
- Buy equipment from trusted retail outlets that guarantee product quality and protection against counterfeiting.
- Buy products from trusted brands that have positive reviews.
- Choose a device for your own comfortable use. Weight and dimensions must fully satisfy the physical characteristics of each person. The choice is very large, you can always
. “Could not connect to the camera”: this error message is displayed on the screen when there is a problem accessing the camera of an Android device - a smartphone or tablet computer. More and more users are reporting that they are encountering this particular error. The difficulty is that there is no single solution to the problem, since it can be equally likely to be related to both the software and the hardware of the device.
It all starts with the fact that when you try to use the camera on your Android device, you first see a blank screen with a camera icon in the center, and then you receive the message “Could not connect to the camera.” Sometimes it is possible to use the camera after rebooting the device, but, as a rule, the frequency of the error increases, and soon it becomes simply impossible to use the photo module to take a couple of photos. Many users also complain that they receive a similar error message when trying to shoot video at the minimum resolution (240p). Is it possible to somehow improve the situation? Let's try to figure out what's happening together and find accessible ways to independently solve the problem.
Available methods
Users report that the camera starts working after rebooting the Android device.
Sometimes you have to reboot the gadget several times to achieve the desired result. In any case, it makes sense to try this elementary method - turn off and turn on your smartphone or tablet again. Every Android device has a boot into "Safe Mode" feature, which means you reboot the phone and turn it on, activating only essential apps and a limited number of available features. Safe Mode is great for troubleshooting, as downloaded applications will be disabled and you will be able to determine whether there is indeed a conflict between various third party software and system software related to the use of the camera. To restart in safe mode:
If the camera works normally in safe mode, then you have narrowed down the search for the causes of the error. The problem is a conflict between third-party applications and system software. It is because of them that you cannot connect to the camera. Your next steps:
C
)
Remove conflicting third-party applications
Try uninstalling third-party applications related to the camera. These are applications that can take pictures during their operation. For example: Snapchat, Whatsapp, etc. Surely there are programs on your smartphone or tablet with which you can take photos directly from the application and share them. Remove such programs sequentially, one after another, checking after each removal to see if the error has disappeared. If you were able to connect to the camera, you have found a third-party application conflicting with the system software. And one more thing: do not forget to switch between video, panoramic shooting and other modes during the test - the problem can appear in any of them, and it is important for us to restore the full functionality of the camera.
D
)
Try using a third-party camera app
If the system app is the only program that can access the camera on your Android device, and you receive the message “Couldn't connect to the camera,” you might want to try using a third-party app to access it. The Google Play store offers many programs suitable for this purpose. Use the search function to find apps in the Camera category. Choose one of the popular applications - such as: Candy Camera, Open Camera, Camera 360, Camera MX or Camera for Android. Download and install the application, launch it.
If you managed to launch the camera from a third-party application downloaded from Google Play, then the problem lies in the official system application for it. Try the following:
Medium difficulty methods
These are the standard steps you can take when the app shows the error message “Failed to connect to camera”. Try using them all - it should help. And don’t forget to stop the application and restart it before each new attempt to connect the camera. The methods given here to fix the “Unable to connect to the camera” error do not carry the risk of losing saved photos and videos.
A
)
Clear cache and data
B
)
Uninstalling and reinstalling updates
Go to the same camera application settings as shown above. If there is an option to remove updates, do so. But remember that you should not use old versions of the apps, so you will have to visit the Play Store to update the camera app again.
B
)
Check permissions (Android Marshm only)
Android Marshmallow has a personalized permission system for core applications. You must confirm that your camera app has permission to access the camera. Typically, if the required permission is missing, it is requested during application startup.
- Go to Settings -> Applications -> Cameras.
- Click on "Permissions".
- Make sure the Camera Resolution slider is moved to the right. You can turn it off and on again.
Error resolution methods for advanced users
Attention
: These methods to fix the error “Couldn’t connect to the camera” when used will result in the loss of data saved on the Android device. To avoid losing contacts, photo galleries, games, music and other content, you need to perform a backup. Back up your photos, account information, and apps to your Google Account. All this will be re-installed after adding the same Google account to the device.
A
)
Clearing the cache
This action allows you to clear the device system of temporary data - outdated and only cluttering up the memory. This option is activated in Recovery mode, which becomes available after rebooting the phone using the bootloader.
To clear the cache, follow these steps:
Once clearing cache is completed successfully, restart your phone and try launching the camera app again. Please note that your Android device may have a different button combination for accessing maintenance and repair mode.
B
)
Reset to factory settings
Resetting settings is considered the most drastic way to solve problems, as it entails complete loss of data. But if no other methods help, then you will simply be forced to use it. However, backup will help you save your data, and re-configuring the device will only strengthen your skills in working with Android devices. Here are two ways you can use to reset your phone or tablet to factory settings.
Method I: From the recovery menu
Method II: From System Settings
If none of these methods worked, then the problem most likely lies in the hardware of your Android device. You can return the phone or tablet back to the seller if the warranty period has not yet expired. Otherwise, you will have to contact the authorized service center of the gadget manufacturer or choose a repair shop with a good reputation, whose specialists will be able to understand the malfunction of the device. However, if you are not sure that the cause of the “Unable to connect to the camera” error does not depend on the hardware, then you can wait for the next operating system update. Sometimes after updating some problems resolve themselves. The only pity is that this happens extremely rarely.
These days, a large number of users of all kinds of electronic gadgets prefer the Android operating platform.
The choice of this software is based on taking into account some important criteria, but in most cases the key role is played by the ability to get a practical video camera or photo camera at a relatively low cost.
But, in practice, situations often arise when the device one fine day does not work as it should, in other words, a certain failure occurs in the source code of the platform.
Service center
When none of the above tips bring the desired effect, do not despair: seek help from a qualified specialist or return your phone under warranty to a service center, where they will carry out a full diagnostic of the device free of charge and, if a software malfunction is detected, it will be fixed at the manufacturer’s expense.
Also, if a device is found to have a manufacturing defect that interferes with the correct operation of the camera, the faulty device will be replaced with a new one. It is important to understand that the warranty does not cover mechanical damage to the mobile device that occurred through the fault of the owner himself, that is, you have every right to refuse repair or exchange.