Android is a popular operating system for smartphones and tablets. Like any other OS, it requires cleaning the memory, resetting, and restoring some applications and elements. The phone's operating system already contains a program to perform these functions. We are talking about the Android System Recovery 3e menu. The instructions contain a description of it, as well as information on how to use the application.
What is System Recovery 3e
Recovery Android menu (translation: Android recovery) - BIOS (BIOS) of a smartphone or tablet. That is, this is a basic input/output system that works even if the main OS is damaged, and therefore mastering the use of Recovery is very important. Even if other applications are installed to clear the memory of a mobile device, as well as restore it, if the basic elements of the system are damaged, you can only restore the device using this function.
The BIOS menu includes a huge number of items and makes it possible to both update the smartphone and correct errors in the device’s operation, reset settings to factory settings, etc. However, for many users the problem will be that the interface of the Recover system is entirely in English. Therefore, it is important to know how to enable the BIOS, and also study the instructions on how to use System Recovery.
Types of custom Recovery
Custom Recovery is a modified recovery menu with which you can install new versions of the Android operating system.
There are 2 types of custom recovery:
- TeamWin Recovery (TWRP).
- ClockworkMod Recovery (CWM).
TeamWin Recovery is a custom recovery (not official) that can be found for almost all Android devices. This modification is distinguished not only by its greater capabilities compared to the stock version, but also by the presence of touch controls in the recovery menu.
ClockworkMod Recovery is an analogue of the above-mentioned TeamWin Recovery, it also has advanced capabilities and there are versions for most smartphones.
With Recovery on Android you can: create a backup copy of your data or reset all settings to factory settings. In custom recovery, you can install a newer firmware version on your smartphone or tablet.
Read how to install custom recovery in our next article publications.
How to enable BIOS mode
The first difficulty that many users will encounter is how to enter BIOS mode. On most devices, for example, Samsung, Lenovo, Nokia, you need to enter Recovery Mode by simultaneously pressing and holding the power and volume keys of the device.
In order to enter BIOS mode, you need to turn off your smartphone or tablet, then press and hold the indicated buttons. On some devices, you can go to the Recovery menu only when the device is connected to charging. After pressing the keys, the device manufacturer’s logo should appear on the screen. When this happens, you can release the buttons. After a few seconds, the BIOS menu should appear.
As for the mode buttons, you mainly need to hold down the volume up key, but on some devices you can use volume down or both buttons. In older smartphone models, you sometimes need to hold down the power key and the Home button.
If none of the proposed options worked, then you need to study the instructions for the device. Typically, non-standard ways to enable BIOS mode are found only in unpopular smartphone models, as well as Chinese-made devices. All modern devices from well-known manufacturers are manufactured according to certain standards, and therefore the method of enabling and working with System Recovery on them will be similar.
Part 2, How to Quit Android System Restore Error 3e
Here are some common solutions to fix Android system recovery screen not working. And you can also follow the below steps to check if something is going wrong and then Android system recovery error occurs.
Method 1: Test the keys/buttons to see if they work properly
Press these keys and buttons several times and then release them to test. Sometimes you just press too deep, so those buttons can still get stuck and not return to their original position. Check the functionality of the Android physical keys and buttons (Android power button not working?).
Method 2: Take out the battery and reinsert it again
Remove the battery from your Android device. Wait a few minutes and then reinsert it and turn it on to check if everything is ok.
Method 3: Reboot your Android phone
Long press the Power button and Volume Up button until its screen turns black. After that, hold down the Power button to turn on your Android phone. May work and exit Android recovery system with error 3e.
Main functions
Through the BIOS menu you can perform many actions with the device. Typically, the Android System Recovery menu consists of 9 sections, including sub-items. Let's consider the main ones with translation into Russian.
Reboot now is one of the main commands that allows you to reboot the device without additional actions. This item is not divided into subsections. By executing the command, the smartphone will reboot without any changes in the operation of the system.
Install from SD-card is one of the large sections of the BIOS menu, which includes 5 commands.
The main task is CWM (Clockwork Mod) - installing the necessary packages with an arbitrary file name. Main functions of CWM:
- installation of custom (official and unofficial) firmware and kernels;
- additions and correction of errors in the OS, installation of factory updates;
- creating a full backup copy of the device’s current firmware;
- restoring the system from a previous backup.
In this section of the Recovery menu of the Android in Russian you can see several commands. Each of them allows you to perform one of the above functions:
- choose zip from SD-card - install the package from the memory card;
- check md5sum of a file — checking the hash sum of a file;
- apply/sdcard/update.zip - installation of the CWM package in the update root folder. zip from the memory card directory;
- toggle sigrature verification - verification of the signature of the Clockwork Mod package to verify the authenticity of its contents, this function is disabled by default;
- toggle sclipt assert - checking whether the script matches the device settings, must be performed before flashing the device firmware.
Toggle usb storage - this mode allows you to connect a memory card to your smartphone to use the device as a USB drive for a PC or laptop.
Wipe (Format) - section intended for Wipe. You can either completely reset the data or delete only some files, for example, the cache, or format a specific partition of the device.
Let's look at the main options of this function:
- Wipe data (may also be called factory reset) - an option that allows you to reset your smartphone to based (basic) factory settings;
- Wipe cashe - function for formatting a cache partition;
- Format system is an option that allows you to completely remove the system, that is, all system files are formatted and the installed firmware is reset.
Backup (restore) - section where you can backup the firmware and restore the system. To create backup copies of the main sections of the software, use the backup function. If you select the restore option, this will allow you to restore the system from previously created backups. The Advanced Restore and Advanced Backup sections are designed for more advanced users, as they allow selective backup and recovery of main software sections.
EXT3 - 4EXT - a section that allows you to convert the system, as well as its individual elements from EXT3 to EXT 4 and back.
Mouts|strage is a function designed to mount and unmount system partitions. Thanks to this option, you can perform operations with the following sections: cache, data, sdcard, and system.
Advanced - a section with advanced settings that includes various unclassified functions. The Advanced option includes the following items:
| Function | Description |
| File System Check | a function that allows you to scan all system files |
| Print Partition Info | system analytics and display of view logs on the screen |
| Copy recovery. log to sdcard | option to copy the recovery log and write it |
| Fix Permission | function that allows you to change permissions on files in the /data partition |
| Partition SD Card | option to create ext and ext2 partitions on a memory card. Here you can either create partitions (to do this you need to go to Remove all partitions and start from scratch), or go back to the main Recovery menu without saving changes (to do this you need to go to the No - save my fat32 partition section). |
Power menu - literally translated as “power menu”. Here you can perform the following operations: completely turn off the device (power off), reboot the smartphone (reboot), reboot in Recovery mode (reboot recovery).
All these functions are present in the Recovery section of almost every device. Depending on the model of smartphone or tablet, the functionality of System Recovery may expand or contract.
Rare ways to log into Recovery
Some manufacturers have clever ways to enter the recovery menu.
Yes, Lenovo
To log into Recovery you need:
.
- Turn off your smartphone.
- the Power
,
Volume+
and
Volume-
buttons . - When the logo appears, release the Power
and continue to hold both Volume keys. - After the robot appears, release all keys and briefly press the Power
. - Turn off your device.
- Turn on.
- When the logo appears or the power indicator turns on, hold down either Volume+ or Volume-, or tap on the logo on the display.
To call the Recovery menu on Sony
:
To log into Recovery on Fly
sometimes you have to go through a whole ritual:
- Hold Volume+
and
Power
. - When the Fly logo appears, release the Power button.
- After the green robot appears, release the Volume + key.
- Briefly press the Power button.
Keep in mind! The recovery menu may be missing. Naturally, in this case it is impossible to enter it.
Every Android device has a so-called “recovery mode”, with which you can reset the device to factory settings and install the update (the file should be called update.zip).
Interested? Now forget about all this, because specifically “native” recovery will not be useful to us (it is generally required in extremely rare situations). Through the efforts of programmer Koushik Dutta, an alternative recovery was written, which has become the standard for almost any phone/tablet/any other Android device. And its name is Clockworkmod Recovery (CWM).
A lot of time has passed since that moment - at the moment CWM has version 6.0.xx and is divided into two types: regular and touch version. In the first case, control and navigation occurs using the volume keys (louder - step up, quieter - step down) and the power button, which acts as a confirmation (a kind of analogue to the computer Enter), in the second - using touches, not just That's how we have touch screens. There is no difference between them as such, except that the power consumption of the second option is slightly higher.
So, why can we use third-party recovery? First of all, for installing custom firmware, of course. If we consider the extended functionality in general, then you have the opportunity to “roll back” the device to factory settings, clear (wipe) cache and dalvik cache, create system recovery images (nandroid backup, nandroid, backup), restore system application rights and much more.
However, not CWM alone. There is also another popular and fairly widespread recovery, which, in my opinion, is much more convenient and thoughtful - Team Win Recovery Project (TWRP). It is completely based on finger control, has an optimized size of menu elements for this, and is much more logically structured. When creating backups, you can choose what exactly to save (which sections). There is also a keyboard (similar in appearance to that of ICS/JB) and a terminal emulator, which allow you to perform various actions without having to reboot the device. After flashing the firmware, TWRP will helpfully suggest you clear the cache and dalvik-cache (which you have to do yourself in CWM). The easiest way to get TWRP is the Goo manager program.
It would seem, why talk about CWM then? In its latest, sixth iteration, the algorithm for creating backups has changed - now, instead of a huge 400 MB-1 GB file, only a 25 MB image is created, saving changes that were not in the previous backup. In addition, the whole procedure is much faster (around 40-45 seconds), which makes life much easier, given the importance of performing this action before flashing.
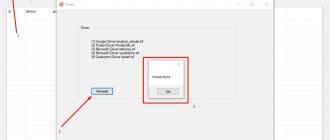
How to install Clockworkmod on your device? Depending on the device, the paths differ - somewhere you can get it through specialized utilities (ROM Manager in the Google Play Store or individual programs like the Galaxy Nexus / Galaxy S3 Toolkit), using the command line, or changing the kernel. Let's look at the installation process through Galaxy Nexus Toolkit 7.7.
We select your phone version and firmware, turn off the smartphone and, holding down both volume and power keys, enter it into Fastboot mode, and then connect it to the computer. In the Galaxy Nexus Toolkit, press key 6: Flash Recovery.
You will be asked to choose TWRP or CWM. Select option 1. Congratulations on the successful installation!
There are several ways to download CWM. The first way is directly from the OS (using the previously mentioned ROM Manager program), the second option is by selecting the Recovery item in Fastboot mode (on Galaxy phones, to do this you need to hold down the volume up key + “home” + power). If you did everything correctly, then a number of lines of English text on a gray background will appear in front of you. What do they mean? The names are similar to those in TWRP, so there should be no problems with migration.
Let's go through the points.
- Reboot system now – reboot the phone in Android
- Install zip from sdcard – install a zip archive from a memory card/device memory (on phones with both memory sources there is a corresponding sub-item)
- Wipe data/factory reset - clearing system data and restoring the phone to factory settings (or to a “clean” type of custom firmware; your multimedia files will remain untouched), must be performed before installing custom firmware, which is very different from the currently installed one (everything is always indicated in description for the ROM)
- Wipe cache partition - cleaning the cache partition, it must also be done before installing other firmware to avoid problems
- Backup and restore – creating recovery points and directly restoring from them
- Mounts and storage – allows you to connect/disconnect one or another section of memory; as a rule, it is no longer required, because everything happens automatically. It is also possible to format one of these partitions (as a rule, this is also not required, unless you intend to return the phone completely to its original state)
- Advanced - a menu of additional settings where you can reboot CWM, clear the dalvik cache (another necessary action when installing a theme/mod/firmware), partition the device memory, or restore the rights of system applications to default. The remaining actions are unimportant.
Third-party recovery is not only your first step to changing the firmware or modifying an existing one, but also a convenient tool for everyday use, which, alas, cannot be said about the built-in solution. This article discusses the two most famous and popular recovery, however, there are other options for this or that device, but they are not “multinational”.
That's all for today, let me take my leave!
If you find an error, please select a piece of text and press Ctrl+Enter
.
Many situations may lead to the need to reset the Android system, for example: frequent device freezes, the Android system cannot boot, or the gadget unlock password is lost. “Hard Reset” is a radical solution that allows you to return the device to working condition.
Looking ahead, it deletes data only from the device’s memory, without affecting the SD memory card, although there is option 2, which allows you to affect it as well.
Attention!!!
All contacts, installed applications, messages, etc. will be deleted. It is highly recommended to back up your phone data before starting the reset operation! One backup method is .
Step by step instructions
Let's look at the main features of Android System Recovery 3e:
- how to flash a mobile device,
- how to reset settings,
- clear partially or completely the device memory,
- make a backup.
Basically, Recovery mode is used in extreme cases. For example, when a smartphone needs to be reflashed after some damage to the internal system files, which makes it impossible to turn on the device. Here are brief instructions in Russian for Android System Recovery 3e.
If you need to reflash the device, then you need to go to the Install from SD-card section (may also be called Apply Update from External Storage). Here you can install the firmware from the memory card. To do this, you need to enter the Choose Zip from SD-card sub-item, if the new system is saved in the archive, or select the firmware image using the Apply Update from SD-card item.
If the firmware is being installed for the first time or there is no confidence in the compatibility of the new version of the system with the device, then before installation it is recommended to use the toggle sclipt assert option. It will allow you to verify the serviceability, authenticity and compatibility of the firmware and smartphone.
After updating the system, you need to use the Reboot now function, which will reboot the smartphone. Before rebooting, you should make sure that all necessary operations have been completed, since after the reset the version will be updated and all changes will take effect. Using Reboot now, you can also reboot if the user entered recovery mode by accident and needs to make a backup (return to the main menu of the system).
How to enter "Recovery"
To flash a device through “Recovery”, you must first get into this very menu. This couldn’t be easier to do, especially since on many devices the input combination is exactly the same. So, if the smartphone has a physical central button or a “Home” button (most often found in older Samsung and LG devices, but it can also appear in more modern devices), you need to hold down the “Home” buttons with the gadget turned off. and “Volume +”, then, without releasing them, press the power button.
The device will turn on in the desired mode. If you have a more modern device without a physical Home button, you need to repeat the process described above, but using only the Volume + button and the Power button. If the desired result was not achieved, you should refer to the extended list of ways to enter the “Recovery” menu for different manufacturers.
Extra menu
In the Advanced section, you can perform the following actions using the following commands:
- File System Check checks the validation of system files;
- Print Partition Info displays log information on the display;
- Copy recovery.log to sdcard is used to save copies of the recovery log;
- Opening ext and ext2 formats on an SD memory card – Partition SD Card;
- No - save my fat32 partition! stops partitions;
- Use Fix Permission to fix permissions in /data/data.
And finally, the last item is the Power Menu. It is used for power management:
- Reboot Recovery performs a reboot;
- In Bootloader mode, use Reboot into Bootloader;
- A simple reboot is carried out using Reboot;
- Power Off – normal shutdown.
Thus, using this menu you can perform a huge number of functions that are not available in the visual settings. If you have any questions, you can always ask them in the comments!
A simple way to solve the problem
If the device cannot exit from system recovery mode, then most likely this is due to a failure of one or more buttons used to access Recovery.
For example, if the phone uses the volume down and power keys, a situation may arise where the volume button is faulty and the device “thinks” that it is pressed. This leads to the fact that during startup the phone thinks that the user is trying to start Recovery mode. First of all, you need to make sure that the physical buttons on your mobile device work correctly, and especially the volume keys. Sometimes it happens that visually they look good, but they do not function properly. Before proceeding to the next step, it is highly recommended that you turn off your phone. It is not safe to remain in Recovery mode and manipulate the buttons, as this may
lead to accidental deletion of information on the device. Next, you need to try to press the keys several times. If it turns out that they are stuck, then a few clicks can help them return to their original position.
After such manipulations with the buttons, you need to try to turn on the phone and check whether the operating system boots.
If the device starts up normally, you will need to back up all important information as soon as possible. If the phone becomes seriously faulty or physically damaged, it may lose all important data.
After you have created the backups, you can turn your device off and on again to see if it can start normally again. If your phone is no longer stuck on the system recovery screen, then the problem has been resolved.
Why do you need CWM Recovery mode?
Clockworkmod Recovery (CWM) is a famous alternative to factory recovery mode developed by Koushik Dutta. You can install it on most Android devices. CWM Recovery helps even in situations that sometimes seem hopeless to the average owner. That is why it is necessary to know about its existence, and also be able to use it.
CWM mode has many options
What exactly does the utility do:
- Installs unofficial custom firmware and kernels.
- Installs factory system updates, add-ons and OS patches.
- Connects to a computer via USB in removable storage mode and for working with the ADB program.
- Creates a complete backup copy of the current firmware and its individual parts (system, settings, applications).
- Restores the device from a previously created backup.
- Resets settings to factory settings (Wipe - data/factory reset), clears cache (wipe cache), clears Dalvik-cache (wipe Dalvik-cache), clears battery statistics (wipe battery stats).
- Creates partitions on a memory card and formats them.