What is TWRP and why is it needed?
TWRP is an advanced mode that has control over the entire operating system.
This project allows users to very finely customize their device, from a deep backup to installing custom firmware. In addition, if the update is incorrect, you can roll back to the previous version of MIUI and return the smartphone to a working state, thereby saving it from its “bricked” state.
For those who like to always customize their phone, this solution is an excellent option. But do not forget that serious system errors and even complete failure of the smartphone are possible if you do not read the instructions carefully and perform certain actions incorrectly.
Internal errors
Additionally, during the process of loading another system onto the phone via the recovery menu, other problems cannot be ruled out:
- Error 7, suggesting incorrect selection of software that is targeted at a different model;
- Error 0 means that the resulting archive does not contain required components;
- Failure number 225 implies the need to replace urbater-binary, or when the proposed file is completely missing in the downloaded archive. For all problems there are corresponding solutions.
As a result, the process of installing TWRP is relatively simple, so if you fully follow the advice and guide, the operation can be completed by most confident users.
Installing TWRP Recovery on a Xiaomi (Redmi) phone via PC
Initially, XIaomi smartphones have the branded stock Mi Recovery (at the time of updating the article, version 3.0). It only offers the function of resetting to factory settings and connecting to Mi PC Suite, which almost does not work.
Previously, it was possible to install TWRP through the official application from the developers, but due to the fact that new Xiaomi models do not always receive TWRP support, you have to use third-party stable builds that are based on other models . The whole process takes place in several steps:
- Unlocking the bootloader on a smartphone.
- Downloading and unpacking ADB drivers.
- Checking for the presence of regular drivers so that the computer can detect the device.
- Search and download the correct recovery file ( Recovery.img ) for your phone model.
Preparation
Now let's start directly with installing custom recovery on Xiaomi or Redmi.
- Installing ADB drivers. After downloading, the archive must be unpacked to the root of the system disk so that it looks like in the example: C:\adb\.
- We also download a file with additional drivers from the article on connecting the phone to a PC so that the phone is detected in FastBoot mode.
- Find the recovery file for your smartphone. We choose between the official website TWRP.me and the w3bsit3-dns.com forum. I recommend looking in the 4PDA thread (section with firmware) for your model; in one of the topics there will be a “Recovery” item. Download and, if necessary, rename the file to “ Recovery.img ”.
- Enable USB debugging.
- When all points have been met, you can proceed to the TWRP installation process itself.
Step-by-step instruction
As soon as the preparation is completed, we proceed to the main instructions.
- We transfer Recovery.img to the folder with ADB files, check again that the folder is on the system drive.
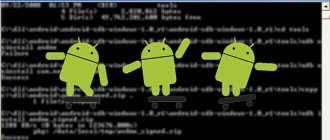
- Now, being in the ADB folder, hold down SHIFT and right-click anywhere , a menu appears and you need to click on “Open command window”. Or enter the command “cmd” in the system path line and press Enter (example in the video).
- Turn off the smartphone. We put it into Fastboot mode - press the power and volume down buttons at the same time .
- We connect the phone with Fastboot mode enabled to the computer via USB. If the connection is successful, the computer should produce the characteristic sound of a successful connection of a new device.
- In an open terminal (which we included in point 2) write fastboot devices. The device is being detected.
- You can also additionally check the bootloader status: fastboot oem device-info. Opposite the bootloader line there should be the inscription “true”.
- If everything is correct, we proceed to the last step. Now enter the Recovery installation command itself: fastboot flash recovery recovery.img and press Enter. The correct installation looks like this.
- Now for the phone to enter TWRP itself, enter the command fastboot boot recovery.img and Enter.
- Now, so that after rebooting the phone the built-in Mi Recovery does not override TWRP, you need to take several steps: click on “Reboot” - “Recovery”. The smartphone will re-enter TWRP.
If point 9 did not help solve the problem of stock recovery, then you need to try installing other versions of Recovery, perhaps not the newest builds. Or use the advice from the next paragraph.
Preparation
Next, you should begin the operation of installing a third-party recovery menu on a Xiaomi smartphone.
- Download ADB drivers. Once the download is complete, you need to unpack the archive to the root of drive C so that you end up with C:\adb;
- Also, you must install drivers on your computer to detect a mobile device in the Fastboot state;
- Find the recovery file for your phone model using the TWRP.me resource or the popular 4PDA forum. It is advisable to independently find the “Recovery” category in the category with “firmware” on the 4PDA portal. Download the file and, if necessary, change the name to Recovery.img;
- Enable USB debugging;
- After correctly completing all steps of the instructions, you can begin the procedure for installing the extended menu.
Errors and recommendations
The most common and rather unpleasant problem is the failure of the recovery to start with the official global firmware with version MIUI 11 and higher. You can encounter a similar problem by installing TWRP on updated firmware. If you still cannot enter recovery mode on Xiaomi, then you should try installing the image again.
TWRP disappeared after reboot
To prevent TWRP from being replaced by stock recovery, you need to patch the kernel, that is, install a kernel patch or Root. Look for information on the kernel in the thread for your model on 4PDA, there are links to downloads and the instructions themselves. This is a mandatory action if you want the stock Mi Recovery to not minimize TWRP after rebooting the phone.
Internal errors
Also, when installing new firmware into the device using recovery, other problems are possible:
- Error 7 : you selected the wrong firmware, that is, it does not match the model.
- Error 0 : the firmware archive does not contain all the necessary files.
- Error 225 : The urbater-binary file needs to be replaced, or it is missing from the archive altogether.
As new problems and their solutions are found, this list will be updated.
Problems
Of course, not everyone can carry out these manipulations, but an average user should still figure out how to work in recovery mode.
If the smartphone simply does not enter this mode, regardless of which options you use, then in this case you can look for alternative options on how to enter the desired mode. But we strongly advise against using untested methods, because this can cause the complete collapse of your smartphone. It is much safer to entrust this matter to a professional, preferably one who has already dealt with Xiaomi smartphones.
The main reason that the user cannot enter recovery is a conflict between the utility code and the firmware. The solution to this problem is simple - you can reinstall the recovery itself. But this is just a temporary solution, and then you will have to look for another way to enter the system menu of interest.
What is TWRP for?
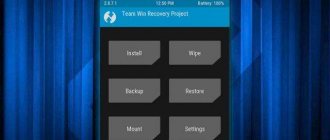
Team Win Recovery Project (TWRP) is a modified snail for smartphones that provides more functionality than factory recovery. The main advantages are represented by the possibility:
- full backup of the working system;
- installation of any software;
- recreating the firmware from the recovery file;
- fine-tuning an existing or new system;
- obtaining ROOT rights;
- firmware for any operating system without restrictions.
What is needed for firmware
Do not rush to immediately start installing the utility and installing a new shell. You need to prepare well and download certain materials. We will need:
- A computer running Windows 7, 8, 8.1 or 10 (the Ubuntu operating system is also suitable, but you need to do completely different things there).
- Xiaomi phone with Qualcomm Snapdragon processor. Devices running MTK are sewn through special programs Xiaomi SP FlashTool or Mi Flash Pro.
- Drivers for smartphone recognition by computer. They are usually installed automatically as soon as the user connects the phone to the PC via USB. There is no need to install special drivers for MiFlash: the utility will load them on its own.
- Mi Flash program. You can download it from any reliable source, for example, the 4pda forum. It is advisable to download the latest version if it works correctly.
- Firmware file with the extension “.tgz” for Fastboot. We recommend downloading from the official website. Carefully choose an assembly for your phone model.
- USB cable for connecting to a personal computer. Use the factory cord that came with the phone.
Tips and nuances
| Preparatory procedures | Solving common problems |
| Be sure to charge your smartphone to 50-60% before starting the firmware. If the phone turns off during the operation, you can get a “brick”. | Flashing via Fastboot requires an active bootloader. You can only work with a locked bootloader through EDL or TestPoint. |
| As noted above, the standard version of MiFlash does not flash devices with an MTK processor. Therefore, we advise owners of such devices to immediately install the improved MiFlash Pro program, which works with both MediaTek and Snapdragon. | The computer does not see the phone when connected? This means that the necessary drivers are missing. If they are not installed automatically, you will have to install them manually. Download ADB Driver from a reliable source and install it using the standard method. And of course, check if USB debugging is enabled. |
| Disable driver digital signature verification in Windows settings. MiFlash installs its own drivers, which may conflict with the factory ones, so we immediately turn off the check. | During flashing, you cannot turn off/restart your phone and computer, or remove the cable from the USB connector. If an unexpected situation occurs, for example, a power outage, try to correct the problem as quickly as possible and turn on the device again. |
If you pressed the wrong key and got into Fastboot Mode by mistake
If you mixed up the keys ( Volume Down and Power ) and ended up in Fastboot mode instead of recovery, don’t be alarmed. Yes, there is no “turn off” or “reboot” option. The most important thing is to make sure that the device is not currently in the process of updating the firmware. If this is the case, then disconnect the USB cable and simply hold down the Power key. You need to hold it until the phone reboots.
Now, to enter Recovery, simply turn off your Xiaomi from the Android OS, or (if Android does not boot) press the power key again to force shutdown and repeat the procedure for entering recovery correctly.
I hope I answered all the questions regarding entering Recovery mode on Xiaomi phones.
Firmware via TWRP
Despite the apparent simplicity of the steps described below, you need to remember that modified recovery is a powerful tool whose main purpose is to work with device memory sections, so you need to act carefully and thoughtfully.
In the examples described below, the microSD card of the Android device is used to store the files used, but TWRP also allows you to use the internal memory of the device and OTG for such purposes. The operations when using any of the solutions are similar.
Installing zip files
- We download the files that need to be flashed into the device. In most cases, these are firmware, additional components or patches in *.zip , but TWRP allows you to write image files in *.img .
- We carefully read the information in the source where the files for the firmware were obtained. It is necessary to clearly and unambiguously clarify the purpose of the files, the consequences of their use, and possible risks.
- Among other things, the creators of modified software who have posted packages on the network can note the requirements for renaming the files of their solutions before installing the firmware. In general, firmware and add-ons distributed in *.zip DO NOT need to be unpacked with an archiver! TWRP manipulates exactly this format.
- Copy the necessary files to the memory card. It is advisable to arrange everything in folders with short, clear names, which will avoid confusion in the future, and most importantly, accidental recording of the “wrong” data package. It is also not recommended to use Russian letters and spaces in the names of folders and files.
To transfer information to a memory card, it is advisable to use a PC or laptop card reader, and not the device itself connected to the USB port. This way the process will happen much faster in many cases.
- We install the memory card into the device and enter TWRP recovery in any convenient way. A large number of Android devices use the combination of hardware keys on the device “Volume -” + “Power” to enter. With the device turned off, press the “Volume-” button and, while holding it, press the “Power” key.
- In most cases, today users have access to TWRP versions with Russian language support. But in older versions of the recovery environment and unofficial recovery builds, Russification may be missing. For greater versatility in the use of instructions, the work in the English version of TWRP is demonstrated below, and the names of items and buttons in Russian are indicated in parentheses when describing the actions.
- Very often, firmware developers recommend performing the so-called “Wipe” before the installation procedure, i.e. cleaning the “Cache” and “Data” sections. This will delete all user data from the device, but avoids a wide range of software errors and other problems.
To perform the operation, press the “Wipe” button. In the menu that opens, move the special unlocker for “Swipe to Factory Reset” procedures to the right.When the cleaning procedure is complete, “Succsessful” will be displayed. Press the “Back” button and then the button at the bottom right of the screen to return to the TWRP main menu.
- Everything is ready to start the firmware. Click the “Install” button.
- The file selection screen is displayed - an improvised “Explorer”. At the very top is the “Storage” button, which allows you to switch between memory types.
- Select the storage into which the files planned for installation were copied. The list is as follows:
- “Internal Storage” – internal storage of the device;
- “External SD-card” (“MicroSD”) – memory card;
- “USB-OTG” is a USB storage device connected to the device via an OTG adapter.
Having decided, set the switch to the desired position and press the “OK” button.
- We find the file we need and tap on it. A screen appears with a warning about possible negative consequences, as well as an option to “Zip file signature verification.” This item should be checked by placing a cross in the checkbox, which will avoid using “incorrect” or damaged files when writing to the device’s memory sections.
After all parameters have been determined, you can proceed to the firmware. To start, move the special procedure unlocker “Swipe to Confirm Flash” to the right.
- Separately, it is worth noting the possibility of batch installation of zip files. This is a rather convenient feature that saves a lot of time. In order to install several files in turn, for example, firmware and then gapps, click the “Add More Zips” button. This way you can flash up to 10 packages at the same time.
- The procedure for writing files to the device’s memory will begin, accompanied by the appearance of inscriptions in the log field and the filling of the progress bar.
- The completion of the installation procedure is indicated by the inscription “Succsesful” (“Ready”). You can reboot into Android - the “Reboot System” button, clear partitions - the “Wipe cache/dalvik” button, or continue working in TWRP - the “Home” button ").
Carrying out a batch installation is recommended only if you are fully confident in the functionality of each individual software component contained in the file that will be written to the device memory!
Installing img images
- *.img image file format via TWRP recovery, generally the same steps are required as when installing zip packages. When selecting a file for firmware (step 9 of the instructions above), you must first click the “Images...” button (Installing Img).
- After this, a selection of img files will become available. In addition, before recording information, you will be asked to select a section of the device’s memory into which the image will be copied.
- *.img recording procedure, we see the long-awaited inscription “Succsessful” (“Ready”).
Under no circumstances should you flash inappropriate images into memory sections! This will make it impossible to boot the device with almost 100% probability!
Thus, using TWRP to flash Android devices is generally a simple procedure that does not require many steps. Success largely determines the user’s correct choice of files for firmware, as well as the level of understanding of the goals of the manipulations and their consequences.
We are glad that we were able to help you solve the problem. In addition to this article, there are 12,259 more instructions on the site. Add the Lumpics.ru website to your bookmarks (CTRL+D) and we will definitely be useful to you. Thank the author and share the article on social networks.
Describe what didn't work for you. Our specialists will try to answer as quickly as possible.
What it is
Recovery is a method of restoring the OS on smartphones, with which you can perform various actions on the device, for example, deleting data, completely resetting it, or flashing it. It is used on devices that run on the Android operating system. Therefore, Xiaomi is no exception. To work with the bootloader, you will need some skills.
Stock is the standard recovery mode that was provided by developers on Chinese phones.
Custom Recovery, often referred to as TWRP, is a recovery menu that was developed by unofficial manufacturers. Users use this type extremely rarely, since it is intended for more advanced users. The disadvantage is that system recovery often causes problems. There have been cases when important information from the smartphone was completely lost during the process.
The main feature is that it has a lot of features and functions for Android phones. TVRP allows you to install unofficial firmware on a mobile device and roll back the system in its current state.
What is Recovery ROM and Recovery Mode
Xiaomi Recovery Mode is a special system recovery mode that, in some cases, allows you to correct the situation if the smartphone does not want to boot. Most often, a factory reset is used to solve the problem.
There are two types of Recovery:
- Stock (official) is a recovery pre-installed on a smartphone by Xiaomi developers (Mi, Redmi, POCO). It is installed along with the standard MIUI firmware. There are not very many functions, so it’s easy to understand it even without knowing English. This is what we will talk about next.
- Custom (unofficial) - this often means custom TWRP recovery. This is a powerful tool for installing patches, mods and firmware on your phone. To install such a recovery you need to have certain skills.
There is a Recovery ROM - this is a special type of firmware for installation in stock recovery mode. Fastboot bootloader mode is not suitable for this type of firmware. Recovery ROM is always in ZIP format.
Attention! When working with recovery, you need to be careful and strictly follow the instructions. If you do something wrong, you can lose all user data and even damage the operating system.
There is no need to confuse Recovery ROM with OTA updates - they are different things. You can read in detail about their comparison in the material about OTA updates.
How to reset settings through recovery
Resetting Xiaomi to factory settings through recovery (Hard Reset) returns the operating system to its original state (as when selling a smartphone). Hard Reset removes glitches, eliminates errors and corrects lags.
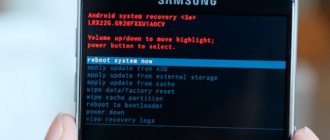
How to reset your phone via recovery:
- Turn off your phone completely.
- Hold down the Power and Volume Up buttons.
- In recovery, select Wipe Data.
- Click Wipe All Data - this means erase all data .
- Confirm the action by selecting Confirm.
- The reset procedure will start, after which you will see the message Data wiped successfully - translated into Russian as data wiped successfully .
All you have to do is return to the main menu, select Reboot and click Reboot to System so that the first boot after resetting the settings may take from 3 to 7 minutes. You cannot turn off your phone during the process.
Attention! During a reset, all user files will be deleted: photos, videos, music. All applications except standard ones will also be deleted. Therefore, before performing this procedure, you should create a backup copy (if the smartphone starts and there is such an option).
Option #2. Official TWRP App
Of course, the creators of this wonderful and convenient menu also made their own application for installing recovery.
But the problem is that often the operating system itself blocks its bootloader.
Therefore, you have to use the above-mentioned manager or other programs, which we will talk about later.
However, you should not try to understand why this happens. You won't succeed. Also, do not be afraid of unofficial applications for installing TWRP.
All of them are absolutely safe, at least those described in this article.
So, to use the Official App, do this:
It all starts, of course, with downloading. Here is the download link on Google Play. After installation, open the program. In the first window, click on the “TWRP FLASH” button at the bottom.
Rice. 5. “TWRP FLASH” button in the first window of the Official App
In the next window, select your device. To do this, click on the drop-down menu where “Select Device” is initially written. Next, click on the “Download TWRP” button to download the installation file. Here the principle is the same as in the first option - if the name of your device is not in the name, then something is wrong. And it's very easy to check. You need to go to the “Download” folder or the place where all downloaded files go and check the recovery file there. When this step is completed, the program may automatically determine what needs to be installed. If this is not the case, then the field under the device will still contain the inscription “Select a file to flash”. Then click on it and select the downloaded installation file. In the end, you just need to use the “FLASH TO RECOVERY” button.
Rice. 6. Main menu for installing TWRP via the Official App
As you can see, in this case everything is also quite simple. We recommend trying to use the Official App first. But this does not always work out.
Then you need to take one of the managers mentioned in this article.
And if neither the Official App nor GooManager wants to cope with the task we are considering, then there is also ROM Manager.
Method 2. Go into recovery on your Xiaomi phone from Android (MIUI)
For those who are scared or find the first method difficult, there is another one. Although, if you look at it, it’s about the same in terms of the number of clicks. So:
- Go to Settings:
- At the very top, select About the phone:
- Now select System update:
- In the upper right corner of the screen, tap on the menu icon (three dots).
- Select an item Reboot to Recovery mode:
- Confirm by clicking Reboot: