" Programs
Evgeny Opanasenko 12/27/2017
Every smartphone user has at least once heard the concept of recovery , let's figure out what it is , in what cases the mode should be used and how to launch it on your device.
Contents:
- Definition
- Recovery in Android
- How to get to Android
- How to manage menus in Android?
- Explanation of mode names
- Stock and Custom Recovery. What is the difference?
- How to install a custom version on Android?
- Recovery on Windows Phone
- Recovery in Windows 10
- Recovery on Mac OS
Definition
Recovery (recovery mode) is factory software that is included in mobile and desktop operating systems. The purpose of the work is to restore the operation of the gadget, back up data, and configure system parameters of the phone/computer.
By logging into Recovery you can:
- Recover device errors;
- Flash your smartphone or reinstall the OS on your computer;
- Get superuser rights.
Let's take a closer look at how it works in all popular operating systems for smartphones and computers.
How to enter the Recovery menu on Android?
To enter the Recovery menu on Android, you must first turn off your device . After this, you will need to start the smartphone by holding down certain buttons at the same time. On different models, the combination to enter Recovery is different, but the general list comes down to several options:
- power button + volume up/down key (or both controls at once) - the most common method, it is suitable for most Androids;
- Power button + Home key;
- “Power” + “Home” + volume control (up or down) - this combination is most often found on Samsung smartphones.
On some devices, entering Recovery is preceded by a launch mode selection menu, where you need to select the appropriate option among the “Normal Boot”, “Fastboot” and “Recovery” options.
Note: find out how to get root rights on Android so you can change the system files of your smartphone.
Recovery in Android
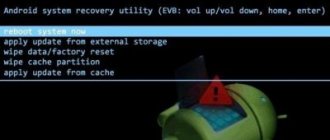
In the Android operating system, recovery mode helps solve more than 90% of problems with device software errors. The standard set of menu options includes:
- Reboot – forced system reboot;
- Reset to factory settings;
- Restoring a backup copy of data;
- Resetting the partition for storing cache data;
- Installing an update from the cache;
- Installing an update from additional memory.
Fig. 2 – window in OS Android
The login method may differ depending on the brand of Android device you are using.
Let's consider all possible options.
Notice! Some smartphones and tablets may not have a Recovery menu.
If you are unable to start it using any of the methods below, most likely recovery is not available on your device.
Features of the recovery menu on Android
I think the general message about what Recovery Mode Android can do is clear. Let's take a closer look at all the capabilities of the recovery menu so that if problems arise, we can understand what this mode is capable of.
List of Android system Recovery functions:
- resetting the operating system to its original state through recovery;
- installing firmware or updating an existing operating system;
- return to one of the previous versions of the operating system;
- recovery of the system in the event of a malfunction, returning to a previously created recovery point;
- creating a backup copy through which you can restore the operating system in recovery mode;
- creating and changing partitions in system folders (this feature is not available on all mobile devices);
- obtaining root rights, which are translated as superuser rights.
Some functions may not be clear to users who do not speak English. This is due to the fact that the recovery mod is only available in English.
There is also a recovery mode in Chinese, but it only happens on mobile devices that are intended specifically for the Chinese market.
How to get to Android
Samsung phones of any model - before launching the system recovery menu, be sure to disconnect the device from the USB cable or charger. Next, follow these steps:
- Unlock your desktop screen;
- Press the “Home”> “Volume Up”> “Power button” keys simultaneously;
- After 5-7 seconds a screen should appear.
Fig. 3 – keystroke diagram for Samsung devices
If you are the owner of a Google Pixel or Nexus , then hold down the volume down button and the power key.
In the Recovery window that opens, confirm the use of the system menu by clicking on the “ON” field in the window that appears.
Sony devices : press the power key and hold it there for 5 seconds. Release the button and click on "Volume Up".
For gadgets from Lenovo and Motorola : turn off the phone and press “Power”, “Volume Up” and “Volume Down” at the same time.
For Xiaomi, press the volume up and power key at the same time. Please note that for devices from the Xiaomi brand, the Recovery menu is displayed in Chinese by default.
You can change the language to English by pressing the indicated key:
Fig.4 - changing the language in the recovery menu for Xiaomi
For older models of smartphones and tablets (pre-2014), you should:
- Open a desktop window;
- Press the “Power” and “Power on” ;
- Keep them pressed for 5-7 seconds;
- Next, the Bootloader window will open, in which you need to select the “Recovery” item. Selecting items is done using navigation with the volume keys. The choice is to press the Home key.
Fig.5 – Bootloader window
Universal method.
If none of the above options work or you are using a gadget from another manufacturer, try logging into Recovery using the standard method (works in 80% of cases):
- Hold down the "Power" and "Volume Up" keys;
- Then additionally press the volume down key;
- Release the Volume Down key and press Home. Next, recovery mode will start.
ROOT rights . If superuser rights are activated on your gadget, you can log in and manage the menu using a simple Terminal utility.
It can be downloaded for free from Google Play using the link. Install the software and use the program menu as Recovery.
Meizu smartphones do not provide Recovery, however, Flyme OS users can easily enable OS recovery mode.
In it you can run the option to update the firmware or reset it to an older version, reset the settings to factory settings and scan the OS for problems.
Fig.6 - analogue for Flyme OS
System Recovery Options: what to do when a window appears with a system boot error?
The very first and correct solution would be to use an additional dialog of the same name, which appears after the main window with OS recovery parameters when one of the menu items is activated. But don't rush! It is quite possible that the failure was short-term and for now there is no need to resort to drastic measures.
First, try simply force restarting your computer. If the situation is not corrected, and the window with the System Recovery Options Windows recovery options appears again, restart the terminal or laptop again, then immediately after the start screen disappears, press the F8 key and call up the additional menu.
It is best to use either loading the last known good configuration, or try to start in safe mode, and then use the rollback tools already in the loaded system, which are located in the “Control Panel”. This solution is applicable only for systems version seven and lower.
In the case of the “eight” and “ten”, in which calling this menu by pressing F8 is disabled, you will have to boot from a removable drive with the distribution kit. If the system starts in Safe Mode, you can use additional boot options or perform a restart while holding down the Shift key.
How to manage menus in Android?
After the recovery window has been successfully launched, the user must continue working with it, selecting the necessary actions.
Please note that the window does not have any auxiliary keys and you will not be able to move between its tabs using regular touches.
To control the system menu, use the side buttons of the phone and the Home key. Move up and down or left and right using the volume keys.
Confirming your selection is by pressing the Home button.
Fig.7 - control
To exit recovery, click on “Power”. Remember, never disable the system menu until the process is completed.
This can seriously damage your device (cancel firmware update and data recovery).
Start the phone after disconnecting or use the reboot keys in the system menu itself.
If the volume keys do not work on your gadget, you can connect a regular mouse to the device using an OTG cable and easily control the system menu.
Why doesn't Android go into Recovery?
Some smartphones do not have official Recovery at all, so you have to immediately install a custom one. If the message “No command” appears on the screen with the robot lying down, this means that Recovery is available, but there were problems launching it. To fix the problem, quickly press the power button and volume up key.
p, blockquote 4,0,1,0,0 —>
p, blockquote 5,0,0,0,0 —>
If Android absolutely does not boot into Recovery, then the reason for this behavior may be an error, which can also be eliminated by installing a custom Recovery. If installing custom Recovery does not help, you should contact a service center - there may be hardware damage that cannot be repaired using software methods.
p, blockquote 6,0,0,0,0 —>
If the device starts up normally, you will need to back up all important information as soon as possible. If the phone becomes seriously faulty or physically damaged, it may lose all important data.
Explanation of mode names
Depending on the device manufacturer, the design and placement of tabs may differ, but the set of functions and control principles remain the same.
In 99% of cases, the recovery menu is displayed in English.
In order not to be mistaken in choosing the right item and to configure your phone correctly, first read the explanation of each option:
- Mounts with Storage is a tab for memory management. With its help, you can format disk space partitions or view the usage of internal and additional memory;
- Reboot system – forced reboot of the device at the moment. In practice, this function allows you to quickly rid your smartphone of most software problems without the need to reset to system settings. After a reboot, all user files and applications are saved;
- Install from SD – launches the installation mode for the archive with firmware, which is stored on the memory card. If you want to flash your smartphone manually, you should first download the ZIP archive from Android for your device onto the card and then use Recovery to start the OS reinstallation process;
- Wipe Cache Partition – clears the device’s cache memory. Please note that this function works much more efficiently than any third-party program for clearing cache and temporary files;
- Factory Reset (or Wipe Data ) - return the gadget to factory settings. As a result, you will receive a smartphone with the firmware version that was installed by the manufacturer. All user files and programs will be deleted. The settings are also not saved. Before performing this process, we recommend that you create a backup copy of your data and upload it to the cloud;
- Backup or Restore – launches a backup mode for device data or selects a copy to restore user files and settings.
Recovery menu items
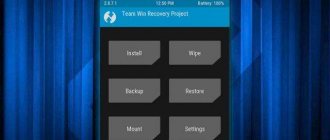
TWRP (Team Win Recovery Project)
The presence of the following options can be seen in the menu:
- Install – here is a file manager where you need to select the firmware file to install. Here you can select any ZIP or IMG file to install it on the system;
- Wipe – reset and clean your phone. Includes the following settings:
- Advanced Wipe – here we select what we will clean: Dalvik/ART Cache – Clearing the program cache;
- System – Cleaning the system and its parameters;
- Data – Clear files (factory settings);
- Internal Storage – deleting data from the internal storage;
- Cache – delete cache files;
- Micro SDCard – deleting data from a memory card;
- USB Storage – cleaning from any USB storage device.
In TWRP, swipe the bar to the right to clear Data, Cache and Dalvik.
- Format Data – formatting the drive. Maybe you have a question, how is Wipe different from Format? Nothing, it’s the same thing, but with Wipe you will find files of the wipe type along the /system/xbin path, and Format is a simple formatting, sometimes to a different file system.
- Backup – creating backup copies. Here you can make backups of the following data: Modern;
- Boot;
- System;
- Data;
- Cache.
Subsequently, backup files can be encrypted with a password. You will also find the following settings there:
- Enable compression – compression of the copy file;
- Skip MD5 generation during backup – Skip MD5 calculation;
- Disable Free Space Check – Disable free space check.
- Restore – recovery options. Here you select the previously created backup.
- Mount – mounting. The option allows you to disable or re-enable certain sections.
- Settings – Recovery settings. Here you can set the time zone, select the menu language (if you set it to Russian, it will be much clearer), screen brightness, vibration strength and a couple of other settings. All changes you have made in recovery can be reset in the settings. The “Restore Defaults” function is used for this.
- Advanced – additional options. Includes the following parameters: Copy Log – copy logs;
- Fix Context – Fix the context;
- File Manager – enter the file manager;
- Terminal – open a terminal to enter certain commands;
- Reload Theme – reload the menu theme;
- ADB Sideload – includes clearing Dalvik Cache and just Cache.
- System – loading into the Android system;
I talked about all the points of TWRP recovery. In CWM the situation is a little similar.
CWM (ClockworkMod)
- Reboot system now – reboot the device to log into Android;
- Install zip from sdcard – select a firmware file to install it from a memory card or internal storage;
- Wipe data/factory reset - quickly clear system data and return the smartphone to its original state (as after purchase). In this case, the SD card files will not be affected;
- Wipe cache partition – delete cache;
- Backup and restore – creating and restoring backups;
- Mounts and storage – mount or unmount any partition of the smartphone. In simple words, enable and disable;
- Advanced – additional options, the same as in the TWRP type.
Both of these recoveries are easy to find on the Internet. For example, on the same website w3bsit3-dns.com there are a huge number of themes for any smartphone, where you will find firmware, recovery and detailed instructions.
Stock and Custom Recovery. What is the difference?
Among Android OS users you can often come across the concept of “ custom ” and “ stock ”.
Despite the same purpose, these two terms mean completely different recovery modes for your smartphone. Let's take a closer look.
Stock is a standard recovery menu that is already preinstalled on your phone by its manufacturer.
As a rule, the appearance of stock recovery on different gadgets has minimal differences in design and functionality and is launched using the same keystrokes.
The only drawback of the stock version is that it cannot be used to install third-party versions of Android updates from the user community on your smartphone or tablet.
Custom is a recovery menu created by the users themselves. The purpose of creating this version of the menu is to simplify the work and make the functions section more convenient.
Also, in the custom menu you can install absolutely any version of Android firmware, regardless of the developer’s certificate or guarantee of authenticity.
Custom Recovery is recommended to be used only by advanced users who are 100% sure that installing unofficial software will not harm the device in any way.
Also, you can work with this recovery menu if you don’t like the regular interface of stock Recovery.
TWRP is the most popular custom firmware. It features a convenient user menu and the ability to translate the interface into more than 50 languages, including Russian and English.
Fig.8 - TWRP interface
Another common custom recovery menu is Clockwork Mod .
Among its features are:
- Availability of additional options for installing unofficial firmware;
- Ability to select design themes;
- Suitable only for devices with ROOT rights.
Program control menu
After you have entered Recovery on Android, the mode menu will be displayed on the screen. The main difference between working in Recovery Mode and conventional control of smartphone functions is the inability to control using the front panel sensors. To navigate through the menu, only the buttons located on the body of the mobile device are used:
- The rocker or volume down/up keys act as arrows on the keyboard; they are used to move up or down;
- The power button acts as an analogue of the Enter key. When pressed, the currently highlighted menu item is activated.
A rather unexpected surprise for owners of devices made in China may be the Recovery menu on Android, displayed in Chinese. For experts in hieroglyphs, this will not create obstacles; for other users, it will be difficult to activate the necessary function.
What to do in such a situation? First of all, make sure that in front of you is really the menu of the desired mode. To do this, we pay attention to two points:
- The hieroglyph located at the beginning of the first line of on-screen text resembles a combination of capital Latin I and Russian G. That is, the text of the line begins with a symbol very reminiscent of “ІГ”;
- the seventh line ends with three clear letters in a row - “MMC”.
If the indicated signs are present, this is the Recovery menu in front of you.
The order of operations in it is absolutely similar to the English version. Therefore, on a computer or other mobile device, we look for the appearance of the menu in a search engine and use the Chinese version, checking the found picture. The only alternative is to go to a service center to reflash your smartphone.
How to install a custom version on Android?
Before installation, you must unlock the BOOTLOADER system bootloader.
Thus, you will “allow” your gadget to work with system software not only from the official developer, but also from the user community.
To unlock BOOTLOADER, enable USB debugging on your smartphone. Next, install it. Connect your mobile gadget to your PC.
Fig. 9 – activation of USB debugging
Wait for your smartphone to be recognized in the installed program and click on the “Other download” tab.
In the “SDK Tool” field, check all the proposed options and save the changes. Wait for all packages to be installed and close the program.
Now you can proceed to installing custom Recovery.
Fig. 10 - setting up BOOTLOADER via the SDK Manager utility for Android
To install a third-party TWRP recovery menu, you will need a downloaded archive with a custom version.
You can download it from the link.
Don't forget to select your device model and manufacturer.
Save the resulting archive in the memory of your PC - any directory and system drive. Follow the instructions:
1Make sure that USB debugging is enabled and the BOOTLOADER bootloader is unlocked;
2Install and run the Android SDK utility on your PC;
3 On your smartphone, enable quick component installation mode. To do this, press the Volume Down and Power buttons simultaneously until the robot icon appears;
4Next, connect your phone to your computer using a cable.
After connecting your phone to your computer, follow these steps:
- Open the folder with the downloaded custom Recovery firmware. It must be in IMG format. Click on an empty space inside the firmware folder while holding down the Shift key. The “Open in command window” option will appear in the drop-down list. Click on it:
Fig.11 – folder with firmware
- In the command line window that appears, enter the command “FASTBOOT FLASH RECOVERY FIRMWARE_NAME.IMG” and press Enter. Please note that FIRMWARE_NAME.IMG is the unique name of the file with the custom Recovery image, which is located in an open folder on the computer.
Fig. 12 - entering the command to start the installation
The installation result will be displayed in the command prompt window.
On your smartphone, exit FASTBOOT mode by pressing the power key once.
After installation, try launching a new Recovery. To do this, use a unique keyboard shortcut for your smartphone or tablet.
Detailed instructions for launching the recovery menu are described at the beginning of the article.
After launching TWRP for the first time, you need to select the interface language and your favorite theme . Unlock the screen by flicking to the right to allow changes. Continue to use the updated version with a convenient Russified menu for updating the OS, resetting to factory settings or managing memory.
Fig. 13 - first setup of the TWRP custom menu
How to exit Recovery Mode
To exit this mode in the standard version (Stock Recovery):
- Go to the “Reboot system Now” item.
- Click enter (the Power button is responsible for this).
After this, your device will reboot and start in normal operating mode.
If you have custom recovery (TWRP) you need:
- Go to the “Reboot” item.
- Then select “System”.
After which the device will reboot and enter the normal Android operating state.
Why doesn't it exit Recovery?
If you have tried the above exit options and it didn’t work out. We offer several options for how to remove your device from recovery:
Press and hold the Power button for about 10-15 seconds. If you have a removable battery, remove and reinsert the smartphone battery. If you have a non-removable battery, you can wait until your Android smartphone discharges itself and then exits recovery. Connect your Android device to your computer (via USB), go to the ADB RUN program (RUN is possible with w3bsit3-dns.com), go to the “Manual Command” menu and go to the “ADB” section, enter the adb reboot normal command.
Friends, let’s add to the table “How to access Recovery” on an Android smartphone or tablet. Leave in the comments information about your device (name, model) and what combination is suitable for entering the menu.
5 / 5 ( 6 votes)
Recovery on Windows Phone
Unlike Android smartphones, Windows Phone users do not have as many recovery menu options.
Also, there is no possibility of installing third-party menu options.
However, you can still easily resolve OS problems and resume normal operation of your smartphone or tablet.
There is no need to use complex key combinations to log into Windows Phone. Just download the special utility to your computer and install it.
Download link
Connect the gadget to your computer and open the recovery program. Wait until the utility recognizes your smartphone.
Then run troubleshooting and repair mode or install a new version of the OS. Information about current firmware is displayed in the main program window.
Fig. 14 – main window of Recovery for Windows Phone
Also, users can view the battery status and check for errors. Using the troubleshooting window, you can run automatic troubleshooting for your OS.
Other ways to enter recovery mode
The most common method is with a key combination. It is also important to know the keyboard shortcut in case the system does not boot. If the system is working properly, there are two other ways to go to the recovery menu.
Via system application
Universal programs, such as Rom ToolBox, allow you to reboot the device into various modes. Find the reboot section in the menu, where select reboot to recovery.
Important! The program requires root rights to operate.
Reboot into recovery mode via the Rom ToolBox application.
Via ADB console
Instructions
- Install ADB or ADB RUN drivers for your phone model on your PC.
- Enable debugging mode on your device.
- Connect the device to the PC using a sync cable. Important! Requires a data cable.
- If you are using ADB, enter the adb reboot recovery .
- When using ADB RUN, select item 2 from the menu, then item 4.
Recovery in Windows 10
Recovery mode is also available in desktop Windows 10.
Using this system utility, you can quickly scan your computer for malware, errors, bugs, and updates.
The menu is designed to minimize user interaction.
The computer performs diagnostics automatically and corrects problems on its own, including instantly installing the necessary drivers and certificates.
How to launch Recovery in Windows 8/10?
To launch Diagnostics and Recovery in Windows 10, follow the instructions:
1Open Notification Center by clicking on the corresponding key in the lower right corner of the screen;
2Select the “Options” ;
Fig. 15 – Windows Notification Center window
3 You will be taken to the window for viewing and configuring OS parameters. Click on the item “Update and Security” ;
Fig. 16 – “Windows Settings” window
4In the window that appears, select the “Recovery” (on the left side of the screen). At the same time, a window of available settings will appear on the right. Click on the “Start” to launch it.
Fig. 17 – recovery menu launch window
After a few seconds, the system will log out of the user account, and you will be taken to the Recovery window:
Fig. 18 – main window of Recovery for Windows 10
In the system menu, Windows 10 owners can:
- Restore the system . By clicking on this tab, you launch a utility that automatically scans the entire OS and its interaction with PC hardware components. If problems are detected, they will be fixed without user intervention;
- Restoring the OS image . This option allows you to reset the settings of your installed Windows using an existing copy of the image. The image can be launched using a bootable USB flash drive or disk;
- Windows boots correctly . The mode will begin to reboot the OS, correcting all the problems that prevent it from turning on;
- Command line . Through Recovery, users can work with the command line, performing their own steps to troubleshoot OS problems;
- UEFI parameters – this option involves setting up the factory software (BIOS). It is recommended that this feature only be used by those who truly understand the intricacies of UEFI configuration;
- Reverting to an older build version . This tile in the window allows you to roll back to the old generation of Windows OS or roll back the Windows 10 OS firmware to the previous update package.