When reading instructions for installing modified firmware, a Google application package, or obtaining root rights, you can often come across the words recovery or recovery. This article will tell you what it is, its capabilities, and how to open it.
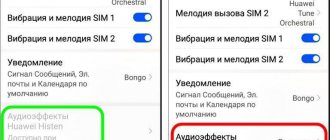
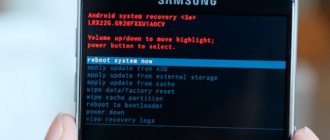
Translation into Russian of the phrase “Reboot system now”
Translated into Russian, the phrase “Reboot system now” looks like “Reboot the system now.” Activating this option allows you to restart the Android OS as usual, restoring its standard functionality.
Option "reboot system now" in the recovery menu
The appearance of a menu with the “Reboot” option usually signals that you have entered “Recovery” mode on your gadget. It allows you to reset your phone to factory settings, clear the system cache, and install the necessary updates to the system. This is a convenient tool for restoring the normal functionality of your phone after a failure or various fluctuations in its operation.
How did you get into “Recovery Mode” with the “Reboot system now” option on Android? And what to do if there is no Russian language in the menu? Let's find out below.
How to turn on a Huawei phone.
To turn on the Huawei hg8245h, p20, e3372h touch phone, you must do the following:
- Press and hold the Power key until the phone vibrates. - If the phone was turned on but the screen went dark, press and release the Power key to turn it on. - A lock image will appear on the screen; to unlock the screen, drag the lock icon or tap on it. - When prompted to enter a code, enter the PIN code from your SIM card. In most cases this is 0000 and press OK - wait until the phone starts up.
Note: The PIN code for the SIM card is located on a plastic card or in a package received when purchasing a SIM card at a mobile phone store. But be careful, if the PIN code is incorrect three times, you can activate the SIM card only through the PUK code, which is also included in the package received when purchasing the SIM card.
If the PUK code is lost, it can only be restored using the passport of a citizen of the Russian Federation for which the SIM card is issued. Therefore, do not enter your PIN incorrectly more than three times. If you have lost your PIN code and there is no way to recover it through your telecom operator, you can do the following.
Cancel the PIN code prompt when turning on your Huawei 701u, l21, g750 dual sim phone. To do this, find another SIM card with a PIN code you know (you can assign a PIN code in the settings) and insert it into your phone. Turn on the phone according to the steps described above, when entering the password, enter the PIN code you know from another SIM card.
After successfully turning on the phone, go to the phone settings and cancel the PIN code prompt when turning on the Huawei p10 - dpi phone. Having done this, turn off the phone and change the SIM cards. Now, when you turn on the phone, the system will not require you to enter a PIN code.
This is, of course, elementary advice, but there are solutions to more serious problems.
Advice. The SIM PIN is initially provided by your network operator, but can be changed in the Settings menu. To correct an error when entering your SIM card PIN, tap the “Delete” icon.
How to get into Recovery Mode on Android and what it is
You can get into the “Recovery” mode either accidentally or by activating the desired key combination. In the first case, the reason may be a normal failure of the device or the owner chaotically pressing the smartphone buttons, activating the transition to the “Recovery” mode.
In another case, the transition to reset mode occurs due to the activation of the following buttons (with the device turned off):
- “Volume down” plus “Power”;
- “Volume up” plus power button;
- Press "Volume Up" plus "Power" button plus "Home" button;
- “Volume down” plus the “Power” button plus the “Home” button;
- You need to press “Volume Up” plus the “Volume Down” button plus the “Power” button.
One of the options for entering “Recovery Mode”
All you have to do is hold down the specified key combination (depending on the phone model), after which the phone will turn on, vibrate, and boot into recovery mode.
This is useful to know: How to use Android Pay in Russia.
Installation nuances
Replacing a stock recovery with a custom one is not so difficult, but before you start installing it, you need to find out one important nuance: whether the device has root rights (the Root Checker application will help with this).
Instructions for devices with root rights
Installing TWRP is done using the GooManager utility. The program has an English-language interface, but you can also find a Russian version on 4PDA. After downloading and installing the application, you need to launch it and perform the following steps:
- Press the “Menu” button on the device and select Install OpenRecoveryScript in the program window.
- Confirm that you are ready to install recovery by pressing the appropriate button.
- After the proposed img from recovery appears, you must click Yes, after making sure that the file name contains the name of the device model. If the program fails to correctly determine the gadget model, it is best to refuse installation to avoid damaging the phone.
To install ClockworkMod use the Rom Manager application. Using the program, you can also install third-party firmware, but to do this you will need to purchase its full version.
To install CWM, you need to do the following:
- After launching the downloaded application, go to the “Recovery Mode” section.
- Tap on the Recovery Setup line, and then click on the ClockworkMod Recovery item.
- Find your device in the list of suggested ones, touch its name and confirm that it is ready for installation by pressing the appropriate button.
- After downloading the necessary files, you should grant the program superuser rights and wait for the recovery installation to complete.
You can reboot into CWM mode from the main Rom Manager window by tapping on the “Load Recovery Mode” button.
https://youtube.com/watch?v=qYU27dYw-Ig
Working with non-rooted gadgets
On devices with an MTK processor, you can reflash the recovery partition using the SP FlashTool program, and for gadgets on Spreadtrum, the ResearchDownload and SPD Upgrade Tool flashers are suitable.
There is another way to install custom recovery - through the ADB console application, but this method does not work on all gadgets. To carry out the operation, you must:
- Download the ADB utility from the official website and install it in the root of drive C.
- Find and install drivers for your device on your PC.
- Download an img file containing recovery and intended for a specific gadget model (it can be found on specialized sites). The file must be saved to the adb folder, renaming it recovery. img.
- Using the Start menu, find and run the cmd application as administrator. exe (Windows command line).
- Connect the device to the computer, having previously activated the “USB Debugging” option in the smartphone settings.
- Enter the command cd c:\adb\ into the console window and press Enter.
- Enter the adb reboot bootloader command and wait for the device to reboot into fastboot mode.
- Flash the previously downloaded recovery file with the fastboot flash recovery recovery command. img.
If everything is done correctly, the stock recovery of the device will be replaced with a custom one.
You need to understand that recovery files are developed strictly for certain gadgets - this means that TWRP, intended for Samsung, will not be suitable, for example, for HTC. Moreover, even identical models of devices may not support the same version of custom recovery if changes were made to a later version of the smartphone, such as an updated display revision. Installing an inappropriate custom recovery can lead to malfunctions of the gadget or even disable it, so users carry out all operations with the firmware at their own peril and risk.
Functionality of the factory reset menu on Android
After the menu with “Reboot system now” appears at the top, you will have access to the recovery menu functionality. Unfortunately, the menu is not available in Russian, but we will provide a transcript.
Its options are as follows:
- “Reboot system now” – reboot the system;
- “Reboot to bootloader” - restart into bootloader mode, directly boot the OS to gain access to recovery mode;
- “Wipe data/factory reset” - clearing data and resetting to factory settings. Used before receiving the “factory” version of the phone, when unnecessary data has been deleted from it;
- “Wipe cache partition” - clearing the cache partition;
- “View Recovery Logs” - allows you to view recovery logs;
- “Run Graphics Test” - runs a graphics test.
- “Install zip from sdcard” - installation of a zip archive prepared in advance by us from an SD memory card;
- “Backup and restore” - creating a backup copy of partitions and restoring them from a backup;
- “Mounts and storage” - mounting individual partitions and formatting them;
- “Advanced” - additional options.
One of the recovery mode menu options
Moving the cursor between these options is usually done using the “Volume Up” key, and selecting the desired option using the “Volume Down” key.
What is CWM?
CWM is a custom recovery that allows you to backup firmware and user data. In addition, the utility can install third-party software, custom OS builds and other modifications on the device. ClockworkMod can be installed in place of the factory recovery menu, or next door, giving you the opportunity to work with both recoveries.
An approximate list of ClockworkMod Recovery features:
- firmware of various software (from OS builds to simple application updates);
- installation of official updates, as well as third-party modifications and system fixes;
- connection to a PC in mass storage mode;
- connection to a PC for debugging in the ADB terminal;
- backup and restoration of firmware and individual areas of device memory (system, settings, applications and data);
- reset the system to factory settings, clear cache and dalwick cache, clear battery statistics;
- working with a memory card.
If the "Reboot system now" option does not work
If when you try to exit the “Recovery” mode and select “Reboot” this function does not work, then do the following on your Android:
- Try holding down the power button of your gadget for more than 10 seconds;
- Remove the battery from your phone for a few seconds, then put it back in. Try to turn on the phone in the usual way;
- Wait until your gadget's battery drains;
- Connect your gadget to your PC.
On the latter, launch the special program “ADB RUN”, and select “Manual Command” from its menu; Select the "Manual command" option
Next, enter the following command:
adb reboot normal
After this, the gadget can reboot in normal mode.
Part 2, How to Quit Android System Restore Error 3e
Here are some common solutions to fix Android system recovery screen not working. And you can also follow the below steps to check if something is going wrong and then Android system recovery error occurs.
Method 1: Test the keys/buttons to see if they work properly
Press these keys and buttons several times and then release them to test. Sometimes you just press too deep, so those buttons can still get stuck and not return to their original position. Check the functionality of the Android physical keys and buttons (Android power button not working?).
Method 2: Take out the battery and reinsert it again
Remove the battery from your Android device. Wait a few minutes and then reinsert it and turn it on to check if everything is ok.
Method 3: Reboot your Android phone
Long press the Power button and Volume Up button until its screen turns black. After that, hold down the Power button to turn on your Android phone. May work and exit Android recovery system with error 3e.
Conclusion
From the article you will learn what the phrase reboot system now means. Where is it located and what is it used for. This is an important command in the recovery partition, the use of which will allow you to easily leave the partition and start the operating system.
If you have any questions, don't hesitate to ask in the comments section. Also share the article via social networking buttons so that your friends and acquaintances know about such a simple but important command as reboot system now.
With each subsequent generation, operating systems for electronic computing devices become more and more user-friendly. For example, those who had the opportunity to work with Windows version 3 remember very well that it was necessary not only to understand how to interact with the graphical interface, but also to be an expert in MS-DOS at the level of a confident user. Now all this is a thing of the past. However, it is worth recognizing that some questions still arise.
Unofficial Recovery
As mentioned above, the standard Recovery Mode very often has somewhat limited capabilities, so it is best to use third-party, unofficial developments. The most popular are two of them - ClockworkMod recovery (abbreviated as CWM) and TeamWin Recovery Project (abbreviated as TWRP). Both developments have excellent functionality and allow you to very quickly and conveniently modify or change the firmware, obtain root rights, reset settings to factory settings, or restore a backup copy.
CWM looks very similar to the standard one, only with a slightly different arrangement of menu items. Navigation through the menu is carried out using the volume buttons, and selection is made through the power button. There is a version with touch controls. Well, TWRP has an unusual tiled interface and is controlled via a touch screen. You can navigate through the menu by pressing the display, and you need to confirm the action by swiping. Some Android devices have one of these recovery installed either by default or with the standard one. Installing and downloading custom recovery may differ depending on the model, so look for information in the sections about your tablet model on specialized forums.
"Scary" message
Almost all operating systems allow users to make certain adjustments to the operating mechanisms, fine-tuning them to suit their needs. However, sometimes the user, after making a change and clicking the “Apply” button, sees a dialog box with the message “reboot system now”, urging him to perform a certain action. Since not everyone understands what exactly is being said, a person’s further actions depend on his mentality: take a risk and click “OK” or protect yourself by choosing cancellation.
The funny thing about the situation is that if the message “reboot system now” is displayed, then consent or refusal does not play a fundamental role - the end result is the same, although with some reservations. Today we will talk about exactly what this dialogue means.
Via recovery menu
One of the known ways to perform a hard reset is through the recovery menu. This method is effective if the device cannot be loaded and a hard reset cannot be started using the settings. In this situation we act like this:
- We turn off the tablet completely, including rebooting the battery by removing it and installing it again;
- Press and hold the volume key;
- Press and hold the “Home” key;
- We hold down the power key, hold down all the above-mentioned keys and wait for the Android recovery mode to start;
- A recovery menu will appear in the window, from which we select “Wipe Data/Factory Reset”;
- We are waiting for a full recovery.
Internationality of the popular “Windows”
The creator of the Windows operating system is American. Each final version comes in different localizations (language packs), that is, you can download and install the operating system in Russian, Chinese, Japanese and other languages. The exception is some rarely used languages and dialects. However, no one sets out to translate all the messages that are provided in the original English-language Windows, so sometimes users see incomprehensible technical terms in English. For example, one can only guess what the text on the famous “blue screens of death” says.
This approach with incomplete translation is quite justified: a complete overhaul of the program code requires time and unnecessary man-hours, and this way only those names and messages are localized that are most often encountered in the course of normal work. In other words, the “heart” of Windows is still American, and one should not be surprised if in a “completely” Russian-language system a person receives a message like “reboot system now.”
Main functions
Through the BIOS menu you can perform many actions with the device. Typically, the Android System Recovery menu consists of 9 sections, including sub-items. Let's consider the main ones with translation into Russian.
Reboot now is one of the main commands that allows you to reboot the device without additional actions. This item is not divided into subsections. By executing the command, the smartphone will reboot without any changes in the operation of the system.
Install from SD-card is one of the large sections of the BIOS menu, which includes 5 commands.
The main task is CWM (Clockwork Mod) - installing the necessary packages with an arbitrary file name. Main functions of CWM:
- installation of custom (official and unofficial) firmware and kernels;
- additions and correction of errors in the OS, installation of factory updates;
- creating a full backup copy of the device’s current firmware;
- restoring the system from a previous backup.
In this section of the Recovery menu of the Android in Russian you can see several commands. Each of them allows you to perform one of the above functions:
- choose zip from SD-card – install the package from a memory card;
- check md5sum of a file – check the hash sum of a file;
- apply/sdcard/update.zip – installation of the CWM package in the update root folder. zip from the memory card directory;
- toggle sigrature verification – verification of the signature of the Clockwork Mod package to verify the authenticity of its contents, this function is disabled by default;
- toggle sclipt assert – checking the script’s compliance with the device settings, must be performed before flashing the device’s firmware.
Wipe (Format) - section intended for Wipe. You can either completely reset the data or delete only some files, for example, the cache, or format a specific partition of the device.
Let's look at the main options of this function:
- Wipe data (may also be called factory reset) - an option that allows you to reset your smartphone to based (basic) factory settings;
- Wipe cashe - function for formatting a cache partition;
- Format system is an option that allows you to completely remove the system, that is, all system files are formatted and the installed firmware is reset.
Backup (restore) - section where you can backup the firmware and restore the system. To create backup copies of the main sections of the software, use the backup function. If you select the restore option, this will allow you to restore the system from previously created backups. The Advanced Restore and Advanced Backup sections are designed for more advanced users, as they allow selective backup and recovery of main software sections.
EXT3 - 4EXT - a section that allows you to convert the system, as well as its individual elements from EXT3 to EXT 4 and back.
Mouts|strage is a function designed to mount and unmount system partitions. Thanks to this option, you can perform operations with the following sections: cache, data, sdcard, and system.
Advanced - a section with advanced settings that includes various unclassified functions. The Advanced option includes the following items:
| Function | Description |
| File System Check | a function that allows you to scan all system files |
| Print Partition Info | system analytics and display of view logs on the screen |
| Copy recovery. log to sdcard | option to copy the recovery log and write it |
| Fix Permission | function that allows you to change permissions on files in the /data partition |
| Partition SD Card | option to create ext and ext2 partitions on a memory card. Here you can either create partitions (to do this you need to go to Remove all partitions and start from scratch), or go back to the main Recovery menu without saving changes (to do this you need to go to the No - save my fat32 partition section). |
Power menu - literally translated as “power menu”. Here you can perform the following operations: completely turn off the device (power off), reboot the smartphone (reboot), reboot in Recovery mode (reboot recovery).
Options for applying changes
After adjusting any settings, the user must confirm them by clicking on the corresponding button in the graphical interface (“Apply” or immediately “OK”). As a result, three applications are possible:
- After clicking, nothing happens externally, but the new settings begin to work. For example, if you select “Properties – Advanced system settings – Environment variables” for the “My Computer” shortcut and change the paths, a reboot is not required. The system will immediately start working with the new variables.
- Once applied, changes are visible immediately. Thus, changing the screen resolution in the latest versions of Windows occurs instantly.
- A reboot is required to use the new settings (that is, reboot system now).
Wipe Battery Stats
This feature helps you refresh your device's battery. After clicking on this item, the battery cache begins to be cleared, into which the current state of the battery, its nominal capacity and other necessary parameters are recorded. By resetting the battery usage statistics, you can slightly extend its life. And the new firmware will work more adequately with the battery. For some reason, many Android gurus are dismissive of this option. But in fact it is very useful. However, it is not recommended to use it too often. Only before flashing the device.
Important Feature
Typically a reboot is required when adding any key files to the system or updating libraries. Previously, you had to reboot even after changing the resolution in Windows. We have already indicated that you should not be afraid of the “reboot system now” message. What to do next depends on the other applications. So, if the answer in the dialog box is positive, the computer will forcibly close all running applications and restart the system. And if, for example, the user had browser pages, office programs or any other similar applications open, then the results of their work will be lost.
The solution is simple: when asked about an immediate reboot, you need to answer “No” and after all programs have completed correctly, reboot the computer yourself. In the case when nothing important is running, then you can safely answer “Yes” (Ok).
Sources used:
- https://sdelaicomp.ru/programmy/reboot-system-now-perevod-na-russkij-i-chto-eto-takoe-na-android.html
- https://androfon.ru/article/reboot-system-now
- https://fb.ru/article/173562/nujno-li-boyatsya-soobscheniya-reboot-system-now
Use Assistive Touch for iPhone
Your iPhone has a convenient “Assistive touch” function that will help us reboot the device. Follow the path:
“Settings” – “General” – “Universal Access” – “Assistive Touch”.
We activate the “Assistive Touch” function using the slider.
Activate Assistive Touch
A translucent button will appear on your iPhone screen. Next, click on the “Top-Level Menu”, swipe from the bottom up, and select “Restart” from the list of options at the very bottom. Now click on the menu button in the form of a circle, and our “Restart” option will be there. Confirm the reboot by clicking on it.
Recovery errors
Sometimes there is such a common error in Android System Recovery 3e as canceling the installation of the firmware or package. It can occur for several reasons: the firmware file is damaged, incorrect information in the binary file, or the firmware simply does not suit this device. But there is another option: before flashing the firmware, the device was not reset to factory settings. It’s good that they can be easily fixed in the same recovery. There are several ways to do this.
So, if the error occurs due to a broken firmware file, then you should download it, connect your smartphone to the computer, go to the Mount & Storage menu item and select Mount USB Storage. After this, you can copy the firmware again to the root of the memory card. If you forgot to “wipe”, then there is nothing easier than moving a few levels higher and selecting the appropriate menu item. But the Android System Recovery 3e error “No command” is very rare. It only appears when the user tries to install an update via ADB. Usually this method doesn't work. As a result, this error appears. So there is no point in using this method. Nothing will work anyway.