How to turn on the proximity sensor
Before you enable the proximity sensor on your Android device, it is important to find this option in the settings of your mobile device. On equipment of different brands it is placed in different places.
Usually you need to open "System Applications" and go to the "Phone" .
Here you should select the “Incoming calls” and move the slider opposite the line with the module name to the working position (or set the checkbox).
On smartphones from some companies, the required section can be found by dialing the number and opening call settings. In other cases, for example, on Samsung smartphones, you should open call logs, go to settings and activate the desired function there.
What is the proximity sensor responsible for in Android?
The proximity sensor in Android is responsible for the display's response to the approach and distance of the smartphone from the object. The operation of the indicator is especially clearly visible when receiving a call. It’s easy to check the proximity sensor of an Android device, since the screen pressed to a person’s ear is blocked. That is, the display fades and its illumination disappears.
What is a proximity sensor
Modern smartphones use two types of sensors. The most used (budget) is an infrared sensor. When an object is approached, the signal is reflected from it and read by the module. The second, more expensive one is an ultrasonic sensor. It is based on the reception and transmission of ultrasonic waves.
For your information! The ultrasonic sensor is more accurate.
The sensor has two purposes:
- saves battery power when talking;
- Screen lock allows you to avoid accidental clicks.
How to configure (calibrate) the proximity sensor
In cases where the module does not work correctly (the display does not turn off when approaching a person’s head or goes out when moving away from it), it will need to be adjusted. To do this, it is important to know how to calibrate the proximity sensor on Android. This problem can be solved using built-in system tools, through the engineering menu, or through third-party utilities.
Recommended: How can I run an “.exe” file on Android?
Before you begin calibration, you need to find the module on the smartphone body. Most often it is located at the top of the display, near the front camera. To find it, when making a call, move the mobile device away from your ear so that the screen lights up, and then move your finger to the selfie camera and swipe left or right from it. If the display turns off, it means that the required node is located in this location.
In some cases, the functionality of the module is impaired due to dust. To fix such a breakdown, just turn off the gadget and thoroughly blow and wipe the area around the element. Next, you should restart the device and check its functionality. If the problem persists, you should proceed with calibration.
System capabilities
Built-in services are the easiest way to perform calibration. To do this, you need to go to the settings of your smartphone and select this option “Display” or “Accessibility” Next, you will need to follow the system prompts during the operation.
First you need to remove all objects located in front of the sensor, and then activate the setting. After this, you need to place a sheet of paper a few centimeters opposite the element, and then successively move it closer to the module and away from it. If the screen goes out and lights up again during these steps, it means the calibration was done correctly.
Engineering menu
The module can be diagnosed and, if necessary, adjusted through the engineering menu. To do this you need:
Select number entry and enter *#*#3646633#*#* or *#*#6484#*#* .
- Go to testing components ( “Hardware Testing” ), open the “Sensor” , then “Light/Proximity Sensor” (light and proximity sensor).
- To perform testing, collect module information ( “PS Data Collection” ).
- Click “Get One Data” when “0” lights up on the screen, bring your palm closer to the element and click “Get One Data” .
- “255” appears on the screen , the module is working.
- To configure, you need to select “PS Calibration” , then “Calibration” .
- Click “Calculate min value” , and the module should be open.
- “Calculate succeed” on the screen , move the paper sheet a couple of centimeters closer to the screen and click “Calculate Max Value” , and then “Do Calibration” .
After these steps, you need to restart your mobile device.
We recommend: How to restore your phone after a factory reset
What is a proximity sensor and why is it needed on a smartphone?
A proximity sensor is a small sensor device that reacts when you approach an object. As a rule, these sensors are physically located at the top of the front panel of the device, most often next to the hearing speaker. In smartphones, they are used mainly to automatically turn off the screen when you bring the gadget to your ear. This not only prevents you from accidentally pressing touch buttons and calling up unnecessary functions, but also saves battery power, because if the screen remained on during a call, which could last for more than one minute, the battery would drain much faster.
The proximity sensor can also be used for another purpose, for example, to automatically receive calls (again, when you bring the gadget to your ear). There are other options. Thus, the sensor is sometimes programmed to increase the speaker volume when the user puts the phone in his pocket.
There are two main types of proximity sensors. The first, optical, is an infrared transceiver that emits waves in the invisible spectrum and receives their reflection from an object. The signal reflection time serves as a parameter for enabling a particular function. If the signal is not reflected or the reflection time is longer than specified, the sensor does not operate. Sensors of the second type are ultrasonic (sonar). They work on a similar principle, but instead of infrared radiation they use ultrasound. Sensors of this type have not yet found widespread use in smartphones.
What to do if the sensor does not work when making a call: how to calibrate
How to disable the voice assistant on Android - reasons to remove it
If the sensor does not work, you can try to correct the situation. First, you need to find out whether your smartphone accessories are interfering with the proximity sensor.
The problem can be solved by removing the cover or replacing the glass with a new, better one. No matter how absurd these tips may seem, they can often help restore the correct operation of the device.
The next step should be to check the software. Software errors can be eliminated by calibrating the module. The most commonly used third-party utilities are PlayMarket or AppStore, “Proximity sensor Reset repair” from Mobile Direction.
Replacing the sensor
If the above methods do not give the required result, you need to reset the settings to factory settings. This usually fixes the problem permanently. The undamaged device begins to work correctly. But after the reset, many users complain about the screen interface increasing in size. Therefore, you need to know how to disable screen magnification on Android by triple tap. To do this you need:
- Enter settings.
- Select "Accessibility".
- Click on "Magnify Gestures".
- Set the "Off" sign.
Important! Resetting the settings makes any information on the phone inaccessible. It would be better to back up your data.
The last way to restore the functionality of the gadget is to have it repaired at a service center.
↑ Touchscreen calibration
Many users often encounter the following problem: when they tap on the screen, it either does not respond or perceives the touch in the “wrong place”. To deal with this problem, you need to calibrate the screen.
↑ Method one
We will use a third-party Touchscreen Calibration program
Touchscreen calibration
Optimization and acceleration
- Download, install and launch the above application.
- Click the blue “Calibrate” button.
- The program will ask you to make one “tap” on the screen.
- After a single click, you will need to make a double tap.
- Then we will be required to make a long press.
- The next step is to swipe your finger to the right on the display.
- Then we place two fingers on the screen and move them towards each other, as if we want to reduce the image or text.
- Then we perform the opposite action, as if we wanted to enlarge the image.
- The message Calibrate Successful will appear on the screen, which means everything was successful.
↑ Method two
We use another popular program Display Calibration
Display Calibration
Tools
- Download, install and launch Display Calibration.
- Click the big blue “Calibrate” button.
- Once the process is complete, the message “Calibrate Successful” will appear, confirming the successful completion of calibration.
You can find many similar programs on the Internet that work on the same principle, so you shouldn’t have any problems with mastering them.
Disconnection methods
If the sensor interferes with you during calls, opens other applications, dials other numbers, or stops working, then it can be disabled at the request of the owner. How can you disable the proximity sensor on Android smartphones:
- Through the settings of your smartphone.
- Through the installation of special programs. 2 programs will be considered - Smart Screen on/off and Sensor Disabler.
We will analyze all the methods so that you can use the most suitable one. Options will be considered on the Android version from 9.0 Pie. You can check the installed firmware by going to the “System” section in the settings and then “About phone”. The line “Android Version” will indicate the current one.
Through your smartphone settings
To turn off the option through your smartphone settings, follow these steps:
- Go to the settings section of your smartphone and scroll down to the “System Applications” section.
- Among the available applications, find “Calls” and go to the section to view detailed information.
- Among the listed options, find “Incoming calls” and click on the line to go.
- Find the "Proximity Sensor" item and click on it so that the slider turns gray. This means it will be disabled.
Through the installation of special programs
First, let's look at turning it off using the Smart Screen on/off program. To do this, follow these steps:
- Find the program in the Play Store and install it.
- After successful installation, open the application and click on the “OK” button to allow access to the device.
- You will be redirected to the next page where you need to click the “Activate” button.
- You will be redirected to the main page of the application, where you need to move the largest slider to the left to disable the proximity sensor. It should turn red.
The last way to disable it is through the Sensor Disabler app. To use this shutdown method, follow these steps:
- Install the application of the same name in the Play Store.
- After installation, click on the “Open” button to start working with the application.
- Check the box indicated and click the “OK” button.
- Swipe right to go to settings or click on the three horizontal lines in the upper left corner.
- Scroll down the settings menu to the “Proximity” section and click on it.
- From the available options, select “Remove sensor”.
- Click on the save button, which is located in the lower right corner.
After saving the data, the parameter settings will be saved.
Sensor location and functional features
The proximity sensor is located on the top plate of the front side of the device. Usually there is a speaker, camera, proximity and lighting sensors. In the latest models, these sensors are combined into one.
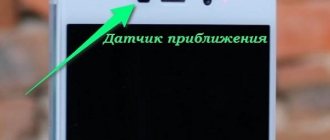
How to find out where the sensor is located? Call a friend and place your finger close to the sensor (example of location in the screenshot below). When the screen goes dark, congratulations, it’s a proximity sensor.
Proximity sensor location
The main function of this sensor is to react to an object approaching the phone screen. This technology was invented to automatically lock the display during phone calls, Viber or WhatsApp. The next time you make a call, notice how the screen goes dark when you bring the device to your ear and then lights up when the call ends.
The sensor itself sends an infrared light signal to determine how far away an object is and blocks it when it approaches.
Proximity sensor device
With this approach we get two big advantages:
- The screen is blocked from accidental ear presses, which prevents accidental termination of a conversation, turning on the speakerphone, you can also accidentally put the call on hold, etc.;
- The second point is saving smartphone battery power. The phone's display is the main source of power consumption; when the screen is on, consumption increases and the battery drains quickly. When making calls with the screen off, the battery lasts longer;
Sensor calibration
The proximity sensor is a very precise device, and even the slightest glitch can cause it to not work properly. If the problem is that the sensor does not respond at the right time, it must be calibrated.
Standard Android tools
You can find the corresponding option in the general settings of your smartphone. Usually, to do this, you should open the “Special Features” section; on some models you should go to the “Screen” section.
The calibration procedure involves three steps. It is best done by placing the smartphone on a flat surface. First, the wizard will ask you to remove all objects in front of the sensor, and then click “Start”. After a few seconds, you will be asked to bring an object a short distance (2-3 cm) to the sensor. This could be a book, a thick sheet of paper, etc. Click “Next” and follow the wizard’s instructions, moving the object further and closer to the sensor. After a few seconds, save the settings by clicking “OK”. If everything goes well, the message “Calibration completed successfully” will appear on the screen.
Engineering menu
What other way is there to configure the proximity sensor on Android? If you have the proper experience, dig into the engineering menu of your device. After dialing the code corresponding to your phone model, go to the menu, click on the “Hardware Testing” tab, click the “Sensor” button and select “Light/Proximity Sensor”.
Next, sequentially select “PS Calibration – Calibration – Calculate min value”. When the message “Calculate succeed” appears at the bottom of the screen, bring the object to the sensor and first click “Calculate Max value” and then “Do Calibration”. Upon completion of all manipulations, reboot the device.
If you do not know the code to enter the engineering menu of your smartphone, install the Engineer Mode MTK application.
Special Applications
An alternative to the standard engineering menu is third-party applications. One of them is called “Proximity sensor: Reset”. After installing the program from the Market, launch it and click “Calibrate Sensor”. Cover the sensor with your hand or a piece of paper, click “Next”, then open the sensor and click “Next” again.
Now click the “Calibrate” button, confirm the action by clicking “Confirm” and reboot. The developer recommends using this application on rooted devices; if you do not have superuser rights, you most likely will not be able to calibrate the proximity sensor with it.
What to do if none of the methods helped solve the problem? The reasons why you cannot enable or disable, or calibrate the proximity sensor, in some cases are hardware in nature, and can only be eliminated at a service center. Also, the source of problems is often the “inappropriate” firmware of the gadget, which does not properly support all the functions of the hardware.