How to fix a socket by changing position?
It is worth noting that it is impossible to repair the nest in this way.
This is an emergency measure in cases where you urgently need to charge your phone. Also take into account that if you use this method too often and put off going to the technician, the situation can only get worse. Sequencing:
- Connect the charger to power and to your smartphone.
- Try moving the cord in different directions. This way you can close the contact if it becomes loose.
- If you managed to find the correct position and the gadget is charging, then try to fix it with something that you have at hand: be it a book or other heavy thing.
Before using this method, you must be sure that the problem is in the socket and not in the battery. Over time, the battery begins to hold a charge poorly or stops charging altogether. In this case, you just need to replace the battery, and not try to fix the supposedly broken socket. The charger itself may also be faulty, which can be easily checked by trying to charge the phone with another accessory.
How to clean iPhone charging socket
At first, you may not even see the accumulated dirt in the iPhone charging socket. It is important to proceed carefully until you get at least some of the debris out. After this everything becomes easier.
Note. Take extra care when cleaning around the charging contacts to avoid accidentally damaging them. Otherwise, you may need to replace your iPhone's charging port entirely.
- Turn off your iPhone.
- If you are using cotton, place it on the toothpick and twist until it catches on the toothpick (use only a small amount of cotton).
- Holding your iPhone with the socket facing up, place a toothpick in the charging port.
- Swipe along the back wall of the connector and try to pull out the dirt from there.
Be careful, don't press too hard
Sometimes you may need to thoroughly clean the sides of the port as well. There may very well be debris stuck there. Be careful not to damage the clips that hold the Lightning cable in place.
Once you're done, reconnect the charging cable to your iPhone and see if it works. You don’t have to wait for dirt to clog the charging socket and carry out this procedure once every 3-4 weeks.
Is it possible to repair the charging module socket?
How to fix the charging port on your phone at home? You need to figure this out thoroughly, then everything will work out. Careless use of a mobile device very often ends in some kind of breakdown that needs to be fixed. Sometimes the breakdown lies in the connector for connecting the power cable. In this case, you need to find out how to fix it, and for this you should familiarize yourself with the main causes of the defect.
The main reasons for device socket failure:
- You can spill some liquid on the device or simply drop it thoroughly to disable this module.
- Constant mechanical stress deforms the socket, which can make charging the gadget simply impossible - the plug will not fit into the connector or will dangle in it, in which case the socket will need to be replaced.
- The contact pads may also bend, which will completely block access to electricity.
Let's talk right away about the worst thing - moisture.
Contact of a mobile phone connector with moisture is the most dangerous damage. Corrosion will start a chain reaction and all neighboring components will oxidize. This kind of defect can also damage the speaker, which is most often located in the lower part of the device. Also, the speaker itself allows moisture to enter the cable or connector. Therefore, even light rain can damage your phone.
The most important thing is to assess the complexity of the damage, since not all cases allow for home repairs. The best option is to use the services of a qualified specialist from a service center. This way you won’t risk breaking your device.
Is it possible to repair the device at home?
Very rarely restoration work can be carried out independently. It is best to find an alternative charging method for a while until you decide for yourself whether to repair it yourself. While you are saving the necessary amount for repairs in the workshop, read the instructions for charging a phone with a broken socket:
Insert the charger into your smartphone and plug it into the network.
Carefully move the cord and device in different directions. You may be able to close the contact and charge the device. If the mobile phone nevertheless detects the presence of a charger, then it is worth recording the found position
Books and other items can be used that can install the phone so that the power continues. Before carrying out all these actions, you should make sure that the problem is in the socket and not in the battery. Using your phone for a long time causes it to no longer hold a charge. In this case, you will have to get a new battery rather than deal with a “phantom” breakdown. If the problem is still in the nest, then repairs cannot be avoided. If the socket is moving away from the tablet or the USB input is loose, try changing the socket itself or replacing the cable.
If everything is fine with the connector now, but the problem of lack of energy in the battery still does not disappear, read about what to do if the phone does not charge when charging.
What to do if the charging socket is loose
First of all, it is necessary to localize the fault - it can be either in the socket or in the connector of the charger or in its cord (periodic loss of contact). The easiest way to do this is if you have a gadget with the same connector or a second similar charger (or at least a suitable cord). If another smartphone (tablet, etc.) charges normally from the charger, then the socket is most likely broken. If a faulty device is poorly charged from a known working cord, the same conclusion can be drawn.
Another situation is the battery is faulty. In this case, the gadget will also not charge from a known-good adapter. If the battery is removable, you can try installing a battery from another device or, conversely, placing the battery in another device. If the device is non-separable, you can understand what the problem is only by analyzing the indirect signs that precede the malfunction. So, if the battery's operating time steadily decreased, and then it stopped charging, it is logical to assume that the battery is faulty. The same conclusion suggests itself if the battery is swollen or changes shape. And in the case when, before a fatal problem occurred, there was an unclear connection of the connector, it was necessary to select a position to find the contact, the socket is most likely defective.
This video describes an easy way to repair Micro USB by pressing the “antennae”.
The charging connector on the phone is broken - charge directly
If you don't know how to change the charging socket on your phone, you can try to recharge the battery without having to use the power socket. The method is relatively complex and requires some skills in working with electricity. The point is this:
You need to remove the battery from your phone. Cut off the insulation from the charger wire, expose the wires (unplug from the outlet). Strip the veins, determine where the plus and minus are. Find the corresponding terminals on the cell phone battery
It is important to observe the polarity of the wires and the device. Fix the wires and plug the plug into the socket. It is strongly not recommended to use this method if you are not 100% sure of your skills
You should not carry out manipulations when you are alone at home; there must be a person nearby who could help you in case of a possible electric shock. Please note that this connection option is not normal for the battery and can lead to breakdown or premature depletion
It is strongly not recommended to use this method if you are not 100% confident in your skills. You should not carry out manipulations when you are alone at home; there must be a person nearby who could help you in case of a possible electric shock. Please note that this connection option is not normal for the battery and can lead to breakdown or premature depletion.
Guaranteed ways to charge your tablet
Even under conditions of proper use, it is not always possible to avoid damage to the connector, which wears out over time. Special devices allow you to charge your tablet if the charging socket is broken.
These methods do not require the use of a charger and are safe for the electronic device.
The first method is a “frog charger”
The method does not apply to monoblocks. If your tablet PC has a molded case and there is no access to the electronics, you will not be able to remove the battery for charging.
The principle of operation of the “frog charger” is to charge the battery directly.
The battery is powered through a special universal device, similar in design to a frog, which is why it received the name of the same name. This budget charger is widely available and is suitable for any portable gadget with removable lithium-ion batteries (Lithium Ion Battery or Li-ion Battery).
To charge the battery, it must be removed from the case, then placed in the “frog”. The contacts are connected to the corresponding terminals on the power supply (negative - to minus, positive - to plus). Then the battery is secured and the device is connected to the electrical network. The indicator will light up if the battery is installed correctly in the charger. Once filled, it is detached and returned back to the tablet.
This method does not require special knowledge and guarantees an increase in the charge of the portable device without charging.
The second way is to use a spare battery
To use the tablet without a power socket, additional batteries are also used: external PowerBanks with high capacity or spare internal batteries.
The portable battery is connected to the electronic gadget via a USB port, which is provided in all modern portable PCs or smartphones. Such devices differ in power, amount of available charge, and strength of outgoing current. With a current of 3A, the PowerBank provides faster charging, while the standard rate is 1A.
The diagram shows how many charges a power bank with a capacity of 10,000 mAh will last for different devices.
The capacity of an inexpensive PowerBank is enough for one charge; models with a larger charge capacity can be used several times. The external battery is filled from a computer, laptop or connected to an outlet.
A replacement battery can be purchased separately and used in place of the exhausted one. Before purchasing, you should check the size and capacity of the device installed in the tablet. It is not necessary to use a replacement battery from the same manufacturer. For any model of portable equipment (from inexpensive Lenovo to Samsung flagships), the Digma universal internal battery is suitable.
The third method is wireless charging
Some modern devices provide wireless charging, for example, the latest Samsung Galaxy smartphones. For older models that cannot be charged wirelessly by default, such devices are purchased separately and are expensive.
The Wireless Charger device connects to the power supply and automatically transmits a pulse to a special sensor on the smartphone's battery. If there is no such sensor on the battery, you can buy it and install it via a USB connector.
The mobile device is placed near a wireless power supply to receive electromagnetic pulses uninterruptedly. The rate of filling the battery in this way is significantly lower than with a standard charger connection.
Gadgets that support wireless charging have an advantage if the charging socket breaks down.
Some smartphones and tablets do not support this function; in this case, installing an additional receiver on the battery for wireless charging will not work.
Charging iPhone 4, 5, 6, 7 without a charger
If you need to charge your iPhone, but there is no working charger or outlet at hand, then there is no need to panic. The best solution would be to repair the original charger and use it as usual. You can charge your phone without a power supply and even without an outlet using a wind generator or even a battery made from fruits or vegetables, but these are completely exotic methods that require partial disassembly of the device and can cause irreparable harm to it. It is much safer to use standard methods if the power supply or charger suddenly breaks down.
If the wired charger is broken, you can use wireless
They consist in using:
- USB port of a personal computer or laptop;
- wireless charging;
- battery case;
- some other possible options.
The charging process using a USB cable involves using the original wire or cord from any other manufacturer that fits the iPhone connector. The cable connects one side to the phone, and the other to any working port on the PC or laptop. Charging this way is slower than charging from a regular outlet. The thing is that the port power is usually not enough.
Phone charges slower on PC
The second method of how to charge an iPhone without charging at home is to use a special wireless device. It is not suitable for all phone models. The official website provides the following list of supported gadgets: iPhone 8, iPhone 8 Plus, iPhone X, iPhone XS, iPhone XS Max, iPhone XR, iPhone 11, iPhone 11 Pro and iPhone 11 Pro Max.
The use of the Smart Battery Case also allows you to successfully replenish the battery with energy. Before using this method, you need to update the iOS firmware on your iPhone to the latest version. To put it simply, the case is a regular power bank.
Important! There are several other options. One of them is based on the use of solar-powered charging. You can also purchase a dynamo charger that will power your phone by rotating its handle and generating an electric current.
Where to connect the terminals to charge the phone directly
Another option for charging directly will require some accuracy and knowledge of basic electrical engineering. To do this, you will need to cut off the connector on the charger with a knife and thoroughly clean the wires. A red wire is usually “+”, a blue (or other, for example black) wire is “-”.
After cleaning the insulation, the wires are applied directly to the battery contacts. The main thing is not to confuse the polarity and not to touch the metal with your hands. The wires are secured with pieces of insulating tape. After this, the charger is plugged into the outlet.
The method is also only a temporary solution. It provides unstable contact, which damages the battery, and is also unsafe in terms of the risk of electrical injury.
Whatever method you choose to charge the battery bypassing the damaged socket, you will almost certainly have to contact service. It is better not to delay such treatment, because all “amateur” manipulations only increase the likelihood of damage to the battery. But if lack of time or money does not allow you to repair your phone immediately, knowing these useful methods will be very useful.
It so happened that my phone’s connector was badly damaged... at first it just started malfunctioning; when charging, I had to move it a little and the contact would appear. But recently my son stepped on the phone with the charger turned on and the phone refused to charge at all! (I think this method is also suitable for those who, for example, have a faulty charger or no charger at all, but really need to charge the phone)
What we need: blue electrical tape, of course! and another phone with a charger.
I just had a Samsung dialer lying around, battered by life. Unfortunately, there was no blue electrical tape, I had to use white. But blue would be better, of course! We look at the polarity of the batteries and, in accordance with the polarity, we screw it in with the help of some mother, securing it with electrical tape. Ready!
Alternative charging methods
To charge a flat smartphone battery without using a standard input, you can use an external power source. There is a problem with connecting to a battery of this shape; it is most convenient to use a “frog” power supply.
Charging the battery from a frog.
It is specially designed for such procedures. No additional materials are needed - the battery is connected directly to the contacts of the charger. The disadvantage of this method is that the phone cannot be used while replenishing energy. If there is no “frog”, you can use alternative methods:
- laboratory power supply;
- charger from another phone.
To connect to an external power supply, you will have to be smart. You can, for example, make clips from safety pins.
Clips made from safety pins.
You can try to attach two flexible and thin conductors with a piece of adhesive tape, and then connect a laboratory source or a charger from another phone to these wires.
Fastening the wires with adhesive tape.
You can cut off the charger connector and then twist the wires together, or try to connect to the standard connector.
Connecting the battery to a “foreign” connector.
With such “manual” charging, you must monitor the level of energy replenishment yourself, avoiding overcharging the battery. This may lead to its failure or even fire.
All these methods only work for phones from which the battery can be removed . Another problem is that the connector not only serves to replenish battery energy, but also serves as a port for communication with external devices (computer, etc.), and this malfunction cannot be circumvented in this way. If the battery is not removable, all that remains is to replace the charging socket on the mobile phone.
More details here: How to charge your phone without a charger
How to proceed?
There are a few features of the charging socket that you need to know. The cause of micro-USB connector failure is frequent use or incorrect connection to the cable. Often, getting used to one device, a person automatically tries to connect the cable in the same way as before. But the port itself can be installed in different ways.
In the first case, the narrowing occurs towards the front of the smartphone, the second type involves a directly inverted connection.
Inserting the plug in the wrong position creates excess pressure on the attachment points and connections. This can lead to backlash appearing and contacts may be broken.
The cable plug has special protruding clips, which can be in the form of slightly protruding strips or hooks. This ensures a reliable and tight connection.
No additional effort is required when removing the charging cable. The latches can cling to the grooves and a sharp jerk can break the connector.
Since the phone is constantly with the owner, dust inevitably gets into the open parts. Grease and dirt adhering to the contacts impairs energy transfer and can complicate the charging process. Cleaning the nest will avoid this problem. You can use:
- Toothpick. Gently move it around the perimeter of the connector.
- A toothbrush. Run the bristles several times inside the nest.
- By air. You can blow into micro-usb or use a special can of compressed air for this.
- Alcohol. You can spray an alcohol-containing liquid, such as eau de toilette, into the port. The procedure allows you to dissolve accumulated dirt and dust.
You must act carefully and carefully in any case. No need to apply much force, make sudden movements or fill the port with solvent
If there is play in the place where the connector is installed, it can only be eliminated if it is possible to disassemble the device. In the case of a monoblock, it is better to contact a special service.
You can carry out the repair yourself. To do this you will need:
Soldering iron with a thin tip and related materials (tin, acid, rosin). New micro-usb connector
When purchasing, pay attention to the type of possible installation (A or B). The procedure is not complicated:
The procedure is not complicated:
- The mounting location must be freed from the old connector or its remains.
- Treat installation areas to clean contacting elements.
- Set up a new port. All legs must be in the correct places. You cannot skip elements.
Solder
It is important to ensure that the tin between the different contacts does not touch. This leads to malfunction and failure of the device.
To obtain a guarantee of further operation of the device, you should contact a specialist. A professional has the necessary tools and skills.
Replacement with a hair dryer
Now let's move on to the question of how to fix the charging connector. First, let's try to make a replacement using a soldering gun. We disassemble the smartphone and inspect the components located next to it. In our example, there is a camera made of ordinary plastic located very close by. When you remove the socket with a hairdryer, it will simply melt.
If the camera is removable, then remove it by disconnecting the cable. If it is soldered or other non-removable components are located nearby, seal them with thermal tape.
We apply soldering flux to the mounting and interface contacts and heat it with a hair dryer set at 360 degrees Celsius. We will warm it up in a circular motion.
Periodically check with tweezers to see if the solder has melted. As soon as it melts, the connector can be removed from the board.
Important! If there are other elements located near the socket, we try not to overheat them so as not to desolder. If you are not sure, seal them with thermal tape.
Now, using a soldering iron, we apply a small amount of lead-tin solder to the mounting and interface pads. This will lower the melting point of the standard lead-free material, allowing you to solder the socket at a lower temperature. Otherwise it may melt.
Expert opinion
Alexey Bartosh
Specialist in repair and maintenance of electrical equipment and industrial electronics.
Ask a Question
Healthy! If you irradiate the mounting pins and interface contacts with tin-lead solder before dismantling, the temperature of the hair dryer can be reduced to 300–320 degrees. This temperature is enough to dismantle the tinned connector, but not enough to melt the factory solder with which the remaining components of the circuit are soldered.
We set the hair dryer thermostat to 300 degrees and heat the seat. As soon as the solder melts, we install the connector in place, warm it up slightly, press it with tweezers, making sure that the contacts in the socket recess coincide with the interface pads on the board.
The mounting contacts are soldered, all that remains is to solder the interface ones. To do this, apply just a little solder paste to them and heat them with a hairdryer. The temperature is the same - 360 degrees.
If we apply too much solder paste, adjacent contacts may become soldered. We immediately pass between them with tweezers, or even better, with a soldering iron with a thin tip.
Since the soldering flux is acid-free, it does not need to be washed off. We connect the device to the charger, then to the PC to determine the operation of the interface contacts. If everything is in order, then the work can be considered completed.
Healthy. Replacing a Type-C connector is no different from replacing a microUSB. We do everything exactly the same, there are just a lot more interface contacts - you have to use a good magnifying glass and tinker.
Why won't my smartphone charge from the charger?
Before taking drastic measures and blaming the device itself for the malfunction, it is worth checking the following points:
- Charger performance;
- Compliance of the charger with the phone;
- Serviceability of the charging cable and plug;
- Status of the connector and contacts of the smartphone.
The serviceability of the sockets can be checked using a voltmeter or a special screwdriver, at the end of which a light bulb lights up if voltage is present. If it is not there, then check another outlet.
A problem with electrical wiring can affect the entire apartment. If this is confirmed, then everything is fine with the phone and the problem is not with it or the charger.
How to fix the charging socket on a phone or tablet?
There are two ways to solve the problem:
- Take the device for repair.
- Try to fix it yourself.
The first option is the most reliable. Only professionals can properly repair the charging socket. It would be even better to contact a specialized service center, where the technicians understand the features of your brand of devices.
Self-repair at home is strictly not recommended, since this is beyond the capabilities of a beginner. But so that you know approximately what replacing a socket is all about, a brief guide is given below. To work you will need:
- Set of small screwdrivers.
- Tweezers.
- Knife (stationery or kitchen).
- Soldering iron and its accessories.
The job of replacing the socket goes like this:
- Unscrew the screws and remove the body by prying it off with a knife.
- The soldering iron must be grounded, and then solder the negative wire. We bring the second end to the body of the soldering iron. This will protect the device from static electricity shock.
- Next, you need to unsolder all the wires from the socket to prevent a short circuit.
- We remove the retaining screws from the board, thereby opening access to the USB connector.
- We take out the burnt socket and replace it with a new one.
- Now you need to assemble the gadget in reverse order.
- The final stage is to check the functionality of the phone and charging socket.
There is no guarantee that both the socket and the phone will be working properly after this method. Do not take risks if you are not confident in your abilities and if you value your gadget.
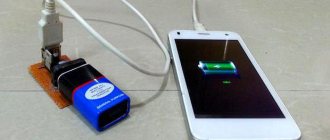
Direct battery charging, or “bypass” power supply
All modern batteries have inside not only battery packs, but also many other electronics responsible for the same functions. For example, a charge controller. Therefore, when connected to a power supply without a smartphone, such a battery will begin to fill with energy normally, and when it reaches 100% it will simply turn off. This method can only be used with lithium-ion batteries. You need to do the following:
- On the laboratory power supply, set the rated voltage and current of your standard charger.
- Connect the outer terminals of the battery in accordance with the markings to the “plus” and “minus” of the LBP.
- Apply power to the device.
- Watch the ammeter screen on the LBP: as soon as the current consumption begins to drop, turn off the power supply - the battery is charged.
You can connect your phone or tablet to power using approximately the same method, bypassing the battery:
- Set the nominal current and voltage of the battery on the LBP.
- Connect the contacts to the terminals inside the phone. You can now turn on the device and use it.
It is possible to charge the necessary gadget with a faulty connector. But all the above methods are only half measures, and you should resort to them only in the most extreme cases. Repair the charging connector as soon as possible and return to normal use of the device.
Problems with contacts
The contacts may become dirty or bent. If your phone is “floating”, then they may also become covered with plaque or rust. In this case, they need to be cleaned.
This is done as follows:
- Remove the back cover of the phone and take out the battery.
- Clean the contacts on the battery and in the phone itself using a cotton swab (it can be replaced with a toothpick or a match with cotton wool). Actions must be smooth and careful.
- If you see that the battery's teeth are bent, then they need to be returned to their original position using either a toothpick or a match.
- Use a cotton swab to also clean the Mini-USB connector. Often this is where dust, dirt and dried debris accumulate.
Causes and temporary solutions
The reason may be contamination of the internal space of the connector - dust, leakage of dirty liquid, etc. In this case, you can try to clean the nest with a sharpened toothpick or match. You should not try to use a metal object - you may damage the contacts or plastic structural elements of the connector. Another option is to blow out the hole with compressed air (for example, from a can). You can use a vacuum cleaner, but the cleaning efficiency will be much lower.
It would not be the best option to try to wash the connector with a solvent (if it is not pure ethyl alcohol). Other compositions can dissolve not only dirt, but also plastic parts of the connector, as well as parts of the phone case if it gets on them, as well as other polymer structures inside the smartphone if they flow under the case. In addition, many solvents, after evaporation, can leave a film that disrupts contact. Therefore, this may be a last resort option when there are no alternatives left.
Another reason is a violation of the nest design.
Connector design.
It consists of a contact part and an outer shell, which is made of a fairly plastic material. This shell guides the inserted plug correctly so that the contacts of both parts of the connector match. If used incorrectly - applying excessive lateral forces - the metal is deformed (stretched), the plug fits freely into the socket, its position is not accurately fixed, and it is impossible to match the contacts of the plug and socket. Repairing the mobile phone charging socket in this case is almost impossible. It will not be possible to straighten the shape of the shell due to its small size and the need for high precision impact. Therefore, we must try to find a position where the contacts still coincide. If a position is found, it must be fixed. You may need foreign objects or tape for this. It is better not to touch the gadget until the end of charging.
Lack of charge due to inattention
Inattention is one of the most common reasons for a dead phone. Everyone has several gadgets with the same connectors. Also, almost everyone among the different cables and chargers will have at least one, but with a different plug.
In a hurry or distracted by other things, we take the wire without looking, try to connect it to the phone, but nothing works. Or it works, but the charge does not go. Then the first thought that comes to mind is that the charger or smartphone is broken.
If the situation with a large number of cables is familiar to you, then do not rush to contact the service center. Just check if you have connected the charger to your phone. You also need to make sure that the cable is inserted into the connector all the way. After all, sometimes we just connect the charger, and it can move away. Therefore, always check that the cable is fully inserted. If it happened to you as stated above, then this is just an annoying oversight. But what to do if it really is a technical fault?
Can I charge my phone from my phone?
One interesting charging technology is USB OTG (On-The-Go). It is implemented on the Android platform and allows you to quickly recharge one phone from another. You will need a device with an OTG port and a capacious battery (we will use it as a power bank). You will also need a special cable.
Having connected one phone to the OTG connector and the other to a regular charging socket, we wait until charging occurs. Of course, it will not be possible to fully charge the battery this way, but it will be quite possible to get the minimum required for 3-4 calls of high importance.
How to understand that a portable speaker is charged
A portable speaker, unlike a smartphone or tablet, does not have a screen that can show the percentage of charge remaining and the progress of replenishing the battery capacity. However, tracking the process is still possible.
To do this, one or more LED indicators are located on the speaker body. They display battery charge according to one of the following principles:
- If there is one LED, its color changes when the charger is connected. When charging is complete, it turns off or changes color again. When discharged, such an LED may begin to blink.
- If there are several LEDs in series, the indication works on the same principle as that used on smartphone screens. When the battery is fully charged, for example, three lights are on; when it is low, one light is on (sometimes blinking). During charging, all three lamps light up alternately. When the last one is highlighted, the battery capacity has reached its maximum value.
By following the instructions presented, you will be able to charge the portable speaker in several ways, as well as identify the reason for the lack of charge. Do not forget that such a device often has a PowerBank function and is able to share charge with a smartphone or tablet.
Vitaly Solodky
Darova!
They brought me this column. They said the charging connector came off.
Here's a column
Remove the decorative mesh.
We remove the muzzle.
Hidden inside is a small Chinese battery with a Chinese 1800 mAh.
Hehe... Why bother when you can push the LED into the connector...
This is how we implemented NFS in this column. It was simply covered with masking tape.
This place may contain your advertisement.
There should be a subwoofer speaker in this place, but this is just a decorative membrane.
The battery died in the trash.
Look how much free space there is in this case!!! About 15-17 batteries will fit here at a fair 2500 mAh. You can make a mature power bank with an honest 37000-40000 mAh. With such a capacity, the speaker will hum songs without stopping for several months.
Let's push the battery a little to 2.8 and test for capacity.
Here are the speaker parts.
Damage on the other side.
The sneaky, narrow-eyed little guys soldered the connector only to the pad under the connector and just a little bit along the edge...
We will make an eternal connector! Well, of course, if the plastic in the connector doesn’t break...
Let's remove the mask from the negative tracks. This is where we will solder the connector.
Solder a suitable connector.
Now we will strengthen the structure.
Let's strip some wiring, twist the veins so they don't unravel, and tin it.
Solder the wires under the connector.
Wrap it over the connector.
Let's solder it.
Let's wrap it again and solder it again.
Now with such a connector, you will not know grief.
Here's what happened
This is the full capacity of the battery, but in the operating range up to 3.5 V it turned out to be only 700...
We collect and check.
Everything works, everything rustles and now the song box can be recharged.
well, according to tradition...
I’ll write you an email for questions and consultations... [email protected]
I only take laptops from St. Petersburg, or you can give them to me through someone else. There’s a lot of fuss with them at the post office... Courier services won’t work either, because they deliver it when it’s convenient for them, not for me...
Let me remind you, dear pick-up people, that I do not work at the Service Center (SC). This is my hobby, repairing various electronic things...
38
Initially, a mobile phone was a simple device for making calls. Now it is a multifunctional device, without which a person will not be so comfortable. If used carelessly, the power socket sometimes breaks. In this case, you should know how to repair the phone's charging connector or charge it in another way.
Why won't my charger charge my phone?
If you are faced with the fact that the charger does not charge your mobile phone (the rule also applies to other gadgets), first of all you should understand the causes of the problem. There may be several of them:
- The charging device has failed. Chargers often have cords that break off at the connector and at the point where the cord enters the inside of the case. Another similar device (you can rent it from friends) will help you check this assumption. If the charge is normal with another power supply, then the problem is not in the socket.
- The battery has deteriorated due to prolonged use. Over time, batteries begin to charge slowly or lose their ability to hold a charge. To check, put another battery in the phone.
- The USB socket has failed. Unfortunately, charging problems are also a common cause. If it is proven that the problem is not with the charger or the battery, we can only assume this option.
Only a service center can fully repair the nest. But there are several ways that will help charge the battery bypassing the socket. Of course, these are half measures, but you can hold out like this for a while.
We use the "frog"
Another option is to purchase a universal device. In everyday life it is called “crab” or “frog”. Even a device with a completely defective power connector can be charged with a “frog”, because the current flows directly to the battery terminals.
The frog is a plastic case equipped with a plug that is inserted into an outlet. It also has a place for mounting batteries and a pair of movable “legs”. Having inserted the battery into the socket, the tabs are connected to the terminals, observing polarity. A frog plugged into an outlet effectively charges your phone.
The method has several disadvantages:
- You have to spend money on buying “crab”. At the same time, a high-quality device is expensive (more than you will have to pay for service).
- Low degree of security, especially when using inexpensive devices. Cheap crafts from unknown “craftsmen” from China will not burden your pocket, but no one can guarantee the safety of the battery.
- While charging is taking place, you will not be able to use the phone.
Do not leave the “crab” inserted into the outlet unattended. Periodically (every 20-30 minutes) check whether the battery is swollen, whether the case is overheated, and whether the charge indicators are on. These simple measures will help protect your home from fire.
A much safer charging option that bypasses the connector is to use a wireless charging station. But such technologies are supported only by the latest generation devices.
We recommend: How do LED TVs differ from conventional LCD panels and are they worth the money?
How to charge your phone directly?
There is another way to charge your gadget without having to connect a charger. This method is quite complicated and even dangerous, so we do not recommend using it, especially for beginners and those who do not understand technology and how electricity works. The essence of this method is as follows:
- You need to cut off the tip of the charger and remove a couple of centimeters of insulation from the wire.
- Then you need to strip the wires and determine the “plus” and “minus”.
- Next, the battery is taken out and the corresponding terminals are located on it.
- The wire cores are connected to the terminals, and polarity must be taken into account.
- The charger is connected to the network.
It is also worth noting that this method has a bad effect on the battery itself, leading to depletion and breakdown.
Charge the battery directly
If your smartphone's socket is broken, you can try to charge the battery directly. To do this, you first need to remove it from the phone, then cut off the plug from the charger and strip the wires going to the charger. Most often, the red wire has a positive polarity (plus), and the black wire has a negative polarity (minus).
You can check what voltage is supplied through which wire using a voltmeter. We attach the wires to the battery connectors and secure them with electrical tape or tape. The charger can now be plugged into the outlet.
Attention! Do not charge the battery for a long time. During charging, you need to monitor the process from time to time. If the battery begins to get very hot or swell, you must immediately remove the charger from the outlet.
You can also use a special device, popularly called a “frog,” to charge your phone. To do this, you need to remove the battery from the phone and insert it into the device. Then combine the connectors of the battery and the gadget. To connect the battery, the two outermost contacts are usually used.
To make sure the connection is correct, you need to press the TE button, which is most often located on the “frog” on the left. When connected correctly, the CON indicator should light up. Some gadgets do not have a TE button, and the CON LED lights up when the battery is connected. To change the polarity, you need to press the CO button. If your device does not have indicators or test buttons, then most likely your device is equipped with a polarity detection system.
Now insert the frog along with the battery into the outlet. After this, the PW (or power) indicator should turn on. When the FULL LED lights up, you can turn off the power and remove the battery.
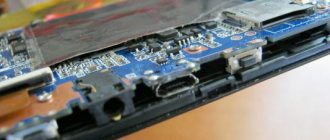
Connector repair methods
The listed methods for increasing battery charge are temporary measures and cannot be used permanently. Failure of the power slot negatively affects the condition of adjacent connectors and will soon lead to their failure.
Resoldering
To dismantle the screen. it needs to be carefully picked up from the edge.
Self-repair of the device is complicated by the fact that you need to completely disassemble its case. This will require special equipment: small screwdrivers, tweezers, a thin knife (a stationery knife is used) and a soldering device
The most difficult part is to remove the screen and touchscreen to access the internal components of the tablet. You need to pry it off slowly from all sides, otherwise the glass may crack.
After opening the tablet, the board is removed from it. To do this, all cables and wires are unsoldered from it, and the fixing screws are unscrewed. Afterwards, the old connector is removed, the attachment point is cleaned and a new power slot is placed there. The contacts are soldered in place of the previous ones. Then all the parts are inserted back one by one, and the device is turned on for testing.
Unbend the "antennae"
If the socket has become loose from frequent use and does not hold the charger in place, you can lift the locking latches on the plug. This method will not give a long-term effect, but is suitable for quickly charging the tablet.
An example of a broken and normal charging socket.
You will need a needle or small forceps to straighten the antennae. By default, they are hidden and extend when the charger is placed in the power connector, but over time they often stop locking. By lifting them, you can improve the contact of the charger with your tablet PC or smartphone.
Clean the charging socket
Sometimes the cause of the problem is dust accumulation inside the power connector.
It is important to clean it with the device turned off and the battery removed, so as not to short-circuit the contacts
A toothpick or a thin wooden stick will help remove dust from the connector; the main thing is not to overdo it and not damage small parts in the slot
To clean, just place it shallowly in the slot and carefully collect the dirt inside in a circular motion.
Give it to the service center
The fastest way to determine the cause of the problem and fix it is to help specialists. The service center will conduct a full diagnosis of the gadget, and then replace the broken parts.
The price of such repairs varies: sometimes it is possible to restore the tablet's operation only by replacing several components. If the cause of the breakdown is a failure of the power socket, and the remaining parts are in order, then the repair will be inexpensive.
Continues to dangle - change the charging connector
The defect will not go away on its own. If the connector shell is deformed, the problem can only get worse - when trying to select a position for charging, the guide will become looser even more until the plug completely stops being fixed in the socket and begins to fall out of it with any movement. You can change the terminal in a specialized workshop; all the necessary equipment is available there, including a special microscope - with its help, operations to replace elements are done at high magnification and the likelihood of incorrect actions is minimal. If you have the skills and tools, you can try to do it yourself.
Required tools and spare parts
To replace a socket (except for the connector itself), you will need at least:
- soldering station with hair dryer;
- a special screwdriver for disassembling the phone.
A hairdryer is absolutely necessary - with a soldering iron, even the smallest one, it will be very difficult to desolder and solder the socket back. A small part, several soldering points that need to be heated at the same time, tight installation - all these are reasons that make it difficult to use a conventional tool.
Soldering station with hair dryer.
You will also need a special screwdriver for removing small screws. In many cases, a “star” of the appropriate size will do. Some manufacturers may use hardware with other heads in their designs.
Star screwdriver.
You will also need soldering flux for installation and disassembly. It is more convenient to use thickened compounds, but if this is not available, you can use regular LTI or prepare the flux yourself by dissolving rosin in concentrated ethyl alcohol. During the assembly and disassembly process, you may need other small tools (scalpel, etc.). You may also need some low melting point solder. Magnifying glasses or a lens on a tripod will also help - they will allow you to accurately position the connector on the board when installing a new socket.
How to replace the charging socket on your phone
The only proven way to get rid of the problem is to leave the matter in the hands of professional workers. You may not want to try any “workarounds” after they tell you how much it costs to fix your phone charging socket. In modern devices, this connector also performs the function of connecting to a computer and transferring data, so its failure greatly reduces the functionality of the device. This is a microcircuit that cannot be repaired at home on your own. Phone repairs often cost a lot of money and you should be prepared for this.
In this case, it is best to contact a certified center. The ideal option would be a branded service point from the same manufacturer as your mobile phone. They know all the intricacies of their products and will be able to provide qualified assistance to fix the breakdown. Inexperienced or careless workers can aggravate the situation and lead to even greater damage to the device.
What is better not to do when charging an iPhone?
There are several points that not everyone knows. So, some people think that the phone should not be left on charge for a long time. In fact, this applies to very old models and these are not iPhones. Any Apple gadget, like other modern smartphones, has an internal chip that manages the entire charging process. When the cycle reaches its limit, it automatically stops supplying power and prevents overcharging. The battery simply remains in a state of inactivity, and the phone itself runs on mains power.
How to strengthen the signal of a Wi-Fi router at home
It is better not to use the gadget while charging and let it go through the entire cycle calmly. Of course, this will not cause any damage, but the process itself may take a long time. This is especially true when a person plays demanding games and charges an iPhone at the same time.
Important! It is recommended not to use unstable or problematic devices while the iPhone is charging. They can cause short circuits or voltage surges in the house, which the controller chip is sometimes unable to withstand.
The principle of operation of the charging controller
Therefore, it is possible to charge an iPhone using other devices, but it is important to remember that sometimes this can be unsafe for both the phone and the person.
How to replace the charging socket on your phone
The only proven way to get rid of the problem is to leave the matter in the hands of professional workers. You may not want to try any “workarounds” after they tell you how much it costs to fix your phone charging socket. In modern devices, this connector also performs the function of connecting to a computer and transferring data, so its failure greatly reduces the functionality of the device. This is a microcircuit that cannot be repaired at home on your own. Phone repairs often cost a lot of money and you should be prepared for this.
In this case, it is best to contact a certified center. The ideal option would be a branded service point from the same manufacturer as your mobile phone. They know all the intricacies of their products and will be able to provide qualified assistance to fix the breakdown. Inexperienced or careless workers can aggravate the situation and lead to even greater damage to the device.
Find out how to charge your phone without charging it.
Replace the socket yourself or have a service center?
Can I fix the charging socket myself? Theoretically, yes. But do not forget about the functions that this connector performs:
- Files are transferred from the phone to the computer and vice versa through the charging socket. This is perhaps the most important function, besides charging the gadget, considering how much important data can be stored in a memory card.
- Through the charging socket, you can charge the phone directly from the computer using a special cord that comes with the mobile phone.
- Using the charging connector, you can connect your mobile phone to your TV to view photos and videos.
- Some other possibilities.