It's unpleasant to discover that the microphone on Android doesn't work. This makes it impossible to use such familiar functions and necessary phone functions as calls, creating audio and video recordings. Sometimes this can derail even the most serious plans. For normal operation, you need a working microphone and the ability to freely pass sound. What are the causes of failure?
- Moisture getting under the housing,
- Shocks, phone drops and other damage,
- Unprofessional cleaning of the microphone with a sharp object,
- The microphone is clogged, preventing sound waves from passing freely,
- Problems with the speaker of your interlocutor, after a conversation with whom there were suspicions about a breakdown,
- The sound does not work in a specific application, and not on the phone as a whole,
- Program error.
What can be done? Think about what's happened to the smartphone lately. If everything points to the presence of mechanical damage to your device, it makes sense to think about contacting a repair service center. In this case, you won’t be able to fix something yourself, and the intervention of an unqualified specialist can increase the cost of repairs and damage the phone even more. If problems with your old smartphone happen frequently, maybe it makes sense to buy a new one if possible?
Before we figure out how to fix the microphone not working on Android, let's look at how a microphone works. A microphone is an electro-acoustic device that converts sound vibrations into electric current. It is needed for recording and amplifying audio. The principle of operation is that the vibration pressure touches a sensitive membrane. It also creates electrical vibrations that are processed by other parts of the phone. For proper operation of the smartphone's acoustic system, as you understand, the following conditions are needed: the possibility of unhindered passage of waves, the functionality of the microphone, and the correct operation of other elements.
Does the sound come and go again? This means that the electrical contacts are damaged. Most likely due to moisture or impact. Take your phone for repair. If the signs of the problem are different, move on.
Doesn't work when talking. Sometimes this does not prevent the use of third-party applications with the same function. The fact is that many phones have two built-in microphones: a conversational one and an external one. They work together to distribute functions to improve sound quality. During a normal call you can’t hear anything, but when communicating in the application everything is fine? This means that your conversational microphone is broken, but the external one is working, so the microphone on Android does not work when making a call. Such a problem can be accurately diagnosed and repaired at a repair service center.
Why the microphone does not work on Android - the main reasons
Microphone malfunction in Android can be caused by hardware or software reasons. What to do if you can't hear the person you're talking to? Here is a list of the most common cases:
- mechanical damage;
- clogging;
- humidity inside the phone case;
- consequences of improper cleaning;
- software glitch.
Phone hardware problems are difficult for an ordinary person to deal with - it is better to go to a service center. Problems with software are solved by changing or resetting settings, flashing, or updating the operating system. Each situation on Android must be considered separately.
Moisture getting into the hole
The opening of the sound outlet leaks and water quickly seeps into it. This leads to the following effects:
- Oxidation of contacts. As a result, the electrical signal between them becomes less good and, as a result, the operation of some components is disrupted.
- Short circuit. In the worst case, some elements will burn out; at best there will be local failures. For example, if water gets into the wired headset jack, the phone will consider it to be incorrectly connected and block the built-in microphone.
Trying to dry your gadget with a hairdryer may have the opposite effect: the air flow will retain moisture even more. It is necessary to disassemble, clean the contacts, professionally check the condition of all components and, if necessary, repair.
The microphone hole is clogged
It often happens that the microphone hole becomes clogged with debris and the sound is poorly transmitted to the microphone.
The microphone hole can be designed in various ways. Some smartphone models have it immediately visible, while others share it with a polyphonic speaker.
For example, this phone has a hole in the frame.
Cleaning it up is pretty easy. Take a pair of tweezers and carefully run them over the entire area of the hole.
Don't push the tweezers in too far or you will damage the microphone diaphragm.
And on this smartphone, in order to clean the microphone hole, you had to disassemble it. It has a microphone hole next to the speaker holes. They are difficult to clean with a brush, so I had to completely disassemble the device.
Instead of tweezers, you can use a toothpick or sewing needle. For easier cleaning, use a thicker needle.
Additionally, the rubber bands that protect the microphone from moisture and dust can be dirty. Be sure to check them out too.
If you unsuccessfully cleaned the microphone with a toothpick or needle
Careless movements using improvised tools such as a needle or toothpick can lead to complete failure of the microphone, so it is necessary to replace it with a working analogue. It doesn't matter that you wanted to clean the microphone to restore it to its previous working condition. Under such circumstances, the user may accidentally break the BGA solder in the controller or processor.
Most often, the defect manifests itself as follows: the microphone is very quiet, the background can be heard along with the voice. In the first case, the microphone is faulty. If we talk about the second option, then, as a rule, the microphone fails, or one of its circuits breaks. To fix the problem and return the smartphone to its previous state, you need to replace the microphone with a new, working component.
Software glitch
The first reason why the microphone does not work on your phone is a failure of the operating system. No matter what operating system is installed on your device - Android, iOS, Windows or any other, crashes occur everywhere and occur spontaneously.
How can you deal with the malfunction? There are several options here, the simplest of which is to reboot the device. Typically, in most cases this will completely fix the problem and the microphone will resume working. The second option is more radical - resetting the settings to factory values. Sometimes a software glitch can be much more serious than it may seem at first glance, and a simple reset will not solve it.
Faulty microphone and poor contact
No sound at all from the microphone may also mean that the microphone or its contacts are broken. Let's look at this case with a specific example.
Disassemble the phone and go to the bottom board. A microphone on two wires is soldered to it.
Wire soldered to the microphone.
And now we have to weld it back. Red is a plus and black is a minus.
You can't mix them up, otherwise the microphone won't work.
The microphone has been restored and is ready for testing.
Of course, if you have an SMD microphone, soldering will be more difficult.
Detailed instructions for soldering a microphone can be found in this article.
The train has come off
It is also possible that the flat cable on the bottom of the microphone has become disconnected from the motherboard after being hit.
If there is debris or traces of water on the connector, clean it with a brush.
Just reconnect it. Carefully place the cable over the connector and insert it into the connector without any additional force.
The microphone works fine, but I would like to increase its sensitivity
It is better to make this decision with caution and implement it carefully. You can download the Volume+ application, but for more serious changes, use the engineering menu. Note that increasing the sensitivity will not help when the microphone is faulty.
- Open the engineering (service) menu in the phone number dialing section. The combination of numbers depends on the smartphone manufacturer. If you don't find the manufacturer's code for your model in articles and forums, try a combination of other popular developers.
- Select the “Audio” section – “Normal mod” (normal mode, not a loudspeaker, for example) – “Type” (volume) – “Mic” (microphone) – “level” (the level by how much the volume will increase when the sound is increased in games, when talking, etc.).
- Set level 6.
- Value is 0
255 set 64.
Save the changes by clicking on “Set”, confirm with “ok”. Find the highest allowable value for the “Max vol” (maximum volume) column of your smartphone model. Indicate it in this column. Exit the engineering menu as you would from any other application.
We hope that you will no longer be bothered by the problem that the microphone on your Android smartphone does not work, and using the device will become more comfortable.
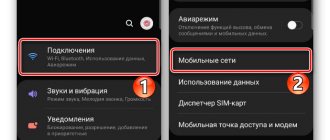
Turn your microphone on or off
Sometimes a user accidentally mutes the microphone during a call. This happens because the proximity sensor does not work properly on some budget smartphones. If the sensor is working correctly, the phone screen will automatically turn off during a call and the sensor will not respond to touch. Otherwise there may be false positives.
In any case, make sure the microphone is on during a call. If it's turned off, just turn it on:
Many instant messengers and video conferencing programs have the ability to mute the microphone. Be sure to check that the microphone icon is not crossed out:
Checking the microphone's functionality
To determine whether an audio recording device is functioning properly, it must be thoroughly tested. There are several ways to do this. The first, the simplest, is suitable for tablets with Windows - the functionality of the microphone is checked using operating system components. To determine how well a device reproduces sound, just record your own voice and play it back. It is worth noting that it is advisable to increase the volume while listening, otherwise you will not be able to hear all the shades of sound.
Another simple way to check is through Skype. If the tablet's microphone does not work, communication will be impossible - the interlocutor will not hear anything. In addition, the program provides data on the quality of communication. Using the "Check" option, you can make and play a recording. You can also find many programs on the Internet that allow you to test an electroacoustic device online. If everything is in order with the device, the user can safely make high-quality audio recordings and send voice messages. If the tablet's microphone does not work, it needs to be repaired and configured. You can do this yourself or at a service center.
With your voice, the interlocutor hears extraneous sounds and noises
Google Assistant access to your device's microphone:
Step 1: Open Android Settings.
Step 2: Go to Applications.
Step 3: Open All Apps.
Step four. To quickly find the program you need, start by typing “Google” in the search bar. Then open the Google - Google Assistant .
Step 5: Go to the Application Permissions section.
Step six. Select Microphone.
Step 7: Click "Prohibited".
Step 8: A warning will appear on the screen indicating that basic device functions (including voice search) will not work. Select "Refuse Anyway."
Step 9. Restart your device and check if you can be heard well when talking through instant messengers.
How to set up your tablet microphone
Now let's learn more about how to set up a microphone. To do this, you need to use one of the third-party applications. I recommend Skype as it has a great sanity check feature.
Instructions for setting up and checking:
- Go to the official application store (Play Market for Android, App Store for iOs, Windows Store for Windows).
- Enter “Skype” into the search bar.
- Click on the application found.
- In the window that opens, tap the button to install the application.
- Once Skype is installed, launch it.
- Log in or create an account.
- Open the application settings and go to “Microphone”.
- Here, configure your microphone settings. If you connected an external microphone for your tablet, you need to select it as the audio output.
- Check the functionality of the internal headset by calling the official bot.
- Listen to the recording.
There is another way to check, much simpler than the previous one. Any tablet computer, regardless of operating system, has a voice recorder.
Therefore, you can check the internal headset by recording your voice on a voice recorder and listening to it. If everything is audible, then there are no problems with the micro.
If the recorded voice is not heard, then the reason is a system malfunction or mechanical damage to the component.
The microphone does not work during a conversation
Sometimes users encounter such things after performing a custom refresh. Try to install official versions of "operating systems", otherwise the hardware will conflict with the system. To install standard firmware, you need to go to the Recovery menu. If the microphone does not work on Android during a call, the algorithm will be as follows:
- Let's move on to recovery.
- Enable the "Data Reset" option (the current settings should be reset).
- Clear cache.
- Run "installzipfromsdcard".
- Marks the path to a folder saved on the memory card.
- Embrace the action.
- I'm waiting for the results.
Adjusting microphone settings
To enter the engineering settings menu, you must use a special utility or enter a code. With the code, everything is more complicated, since each model has a separate one. The most typical way to enter is to enter the following code into the phone line: *#*#3646633#*#*. In some versions of Android, the codes *#*#4636#*#* and *#15963#* may work.
If at the moment you can’t cope, then you can install the Mobileuncle MTK Tools software, which will allow the device to launch its engineering menu, where you can configure a large number of parameters. Before changing parameters, you need to copy their factory values onto a sheet of paper. In case of negative manifestations, all settings can be returned to their original position.
So, we entered the engineering menu and continue setting up. To increase the microphone in call mode over a cellular network, you need to select the “Audio”, “Normal Mode”, and then “Mic” sections. To adjust the microphone for recording mode, you need to select “LoudSpeaker Mode” instead of “Normal Mode”. Now 7 sensitivity levels will be displayed, which can be adjusted on the gadget. These levels vary from the quietest level 0 to the loudest level 6.
According to futurologists, voice communication will soon replace text messages, since it is this that brings a person closer to the ideal - the ability to instantly and effectively transmit information. Already today, many Internet users prefer to social networks Skype and other applications that can be installed on a tablet to talk with friends and colleagues using a microphone. In order for the communication session to be successful, the electroacoustic device built into the gadget must be properly configured. Otherwise, extraneous sounds, noise and echo may interfere with the conversation. If the microphone on the tablet does not work, it is not only impossible to contact your interlocutor via online messenger, but also to make an audio recording or use the voice control option for the device. Having discovered a malfunction, care should be taken to eliminate it as soon as possible.
What should I do if the microphone does not work in specific applications?
Sometimes it happens that the person you are calling from a messenger (Viber, WhatsApp, Telegram, etc.) does not hear you. To start diagnosing, you need to make sure that the problem is in the gadget and not in another device. To do this, ask someone close to you to call you. If your voice is clearly heard, there is no reason to worry.
However, if the opposite happens, then this is possible:
- Check your messenger settings. The microphone may be turned off
- Allow the app to use the microphone when making calls. Check the list of applications in your phone settings.
- Write to support. For example, in Skype this is Echo, a dialog box that appears every time you open the application.
Troubleshooting
In some situations, nothing has happened that could cause a malfunction, but the microphone stops working. The reasons are divided into two groups:
- Hardware failure - a problem in the hardware of the gadget (the device requires restoration or replacement of spare parts).
- A software glitch is a problem in the operation of the software.
There is no need to be upset; in most cases, the reason for the microphone failure on an Android tablet and smartphone is due to software glitches that the user can fix on his own.
Preventing microphone problems
Even if you haven't experienced unstable audio performance on your smartphone, it's worth following these rules to avoid such problems:
- Do not drop or knock the phone. This rule does not only apply to protect against audio problems.
- Carry your phone in a case.
- Periodically clean all phone connectors and wipe it with a dry cloth to protect it from dirt and dust if problems arise.
- Avoid situations where the device may get wet. If this happens, you must rid it of moisture by taking action as soon as possible.
- Update your gadget's operating system periodically.
- Do not overload your phone with unnecessary and large memory files so as not to reduce the performance of the device.
- Don't be afraid to contact support or a service center for help if you can't solve the problem yourself.
On your Android phone, the screen does not turn off during a call.
Fixing software crashes
Method 1. Go to “Settings”, there we find “Backup and reset”. In this paragraph, we indicate a complete reset, during which all settings will be deleted.
Increase
This method works often, and when using it you need to be careful, since all contacts, music, games, passwords, photos and other information located on the tablet or smartphone will be deleted. Therefore, you need to save everything first.
Method 2. Changing the device software or flashing it. Often this method requires certain skills and is carried out when contacting a service center. If you want to flash the firmware yourself, then you need to go to the official website of the manufacturer of your gadget to download the necessary utilities for flashing and the firmware itself, and then it should be reinstalled on the device.
Method 3. Here you need to install additional software to solve problems with the microphone on your Android device. This applies to utilities that control all processes inside the device. Now there are a lot of them, but the fewer functions an application contains, the more effective it is.
The Multi Cleaner utility is the best at monitoring system functions, fixing and correcting various types of synchronization and settings errors. This free application is easy to use.
After installing the application, you only need to launch it, and then nothing else is required from the user. The utility will take over all device control. Another advantage will be increased system speed and performance, and the device itself will charge 20% faster.
The noise level outside is always higher than at home. Therefore, for normal communication on a smartphone, you need to properly adjust the microphone. You will also need to adjust the microphone at low volume levels after recording video or audio on the tablet. Then how is the microphone configured and what is the best threshold value to set so as not to damage the device?
The answer is simple - you need to go to the gadget settings menu and make the required settings. Since the settings are engineering, they are not intended for ordinary users, so there are no special tips. Incorrect actions can cause product failure, which can only be repaired by specialists.