Has your microphone stopped working? It's not a common problem, but it's not particularly rare either. There are many reasons why this happened, and a banal breakdown requiring equipment replacement is just one of them. Sometimes things can be much simpler. The article will look at options for why the microphone stopped working on a laptop or computer, what can be done about it, and in the most tragic case, how the microphone is repaired.
Microphone not included
Oddly enough, absent-mindedness is sometimes the cause of many troubles. So, the microphone may be in perfect condition and ready to work, but simply not be turned on.
How to check if this is not true and that the microphone has stopped working due to the forgetfulness of the owner of all the equipment? To do this, you need to go to the “Recording devices” tab (it can be found in the menu that appears if you right-click on the speaker image in the panel at the bottom of the screen), and the PC itself will display on the display all available microphones for recording and their current status.
The same can be checked in the “Device Manager” (you can find it by searching for “Windows”).
Microphone not working on Skype
Most often it is necessary for communication on social networks, for example, Skype. If you notice that the microphone does not work in Skype, you can only fix it in the settings of this program. You can find them in the program's control panel. Open the pop-up menu and set the desired options using the recommendations below (Figure 4).
Figure 4. Solving the problem with the microphone not working in Skype
Checking Skype settings
If you are wondering why the microphone does not work on the computer, namely in the Skype program, then it may not work due to incorrect settings. If you updated the day before, you may have selected the wrong device for communication in the program settings (Figure 5). Instead of one device, another device may be indicated, which is currently disconnected from the computer.
Figure 5. Sound settings window in Skype
To change this, you can click in the settings on the item that allows automatic configuration. After this, the necessary parameters will be selected independently, without any effort on your part. At the same time, you can not take risks and avoid possible mistakes that you could make when setting up the microphone yourself.
Driver problem
Also, the microphone may stop working if the drivers for it are installed incorrectly, are outdated, or do not exist at all. You can check this manually in Device Manager. But a microphone program can also help with this; it will automatically find the necessary executables on the Internet and install them on the PC.
There is another advantage to using it. A microphone program (correctly chosen, of course) can diagnose the condition of recording devices, identify problems and give advice on how to fix them.
How to check if your microphone is working properly
When checking the operation of the microphone, users need to understand that in addition to software errors, there are also hardware errors associated with violating the integrity of the device. There are two ways to check this: through the device manager and the sound control panel.
In the description of the troubleshooting method through updating the driver, an example was presented when the microphone is connected, but does not work in Windows 10. If an attempt to update the driver was unsuccessful, this is the first sign that the microphone is not working.
The second way to check functionality is to use the sound control panel. The “Listen” tab allows you to test the device’s ability to record sound. If the sound was not transmitted, you should try changing the device.
Weak microphone
How will the user know that the microphone has stopped working? You can't hear him on the recording. But there is an option that the performance is not impaired, the signal is simply insufficient and the voice (or any other sound) is ultimately not perceived by the device and, as a result, is not reproduced. This problem can be solved using the “Microphone Gain” option in the settings of this equipment. You will need to check the box next to the function.
Microphone does not work in Windows
If your audio recording feature is not working in Windows 10, this issue may occur no matter what sound card you are using. If the problem occurs after the update, you can fix the problem yourself.
Here's what to do if the microphone doesn't work:
- In the taskbar, find the image of the volume control.
- Select “Recording Devices” from the menu.
- Find "Record".
- Specify the desired device and click “Properties”.
- Open "Properties: Microphone".
- Go to the "Advanced" tab.
- Go to the "Default Format" section.
- Open settings (Figure 2).
- Select “2-channel, 16-bit, 96000 Hz (studio quality).”
- Apply the changes and click “OK”.
Close the window and check the operation of the equipment. As a rule, it starts working immediately after making the necessary settings. The check can be done using the local Voice Recorder program or Skype.
Figure 2. Microphone set properties window
Performing all of these steps will be relevant if you have recently used other equipment that, for some reason, you decided to replace. Since a computer often does not have the ability to automatically replace the device it is using (as is the case with a printer), you will need to select it yourself. Once you do this correctly, you can use additional programs to communicate and record audio.
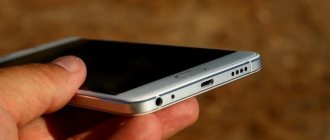
Connecting a microphone to a laptop or PC
For it to work, it is important to connect it correctly, since this is how you can provide the device with the necessary power. Each such device is equipped with a pink plug. Make sure it is inserted into the appropriate connector of the same color (Figure 3).
Note : If your PC or laptop has two such connectors, try inserting the wire alternately into one of them, simultaneously checking its functionality in the manner described above. If this method does not help, then the installed drivers may be to blame.
Figure 3. Audio inputs and outputs on the laptop panel
Driver problem
If you have checked the integrity of the connections, plugs, sockets and the correct connection and did not find that the device for recording and transmitting sound is working, the problem may lie in the operation of the drivers. This could be due to
- Incorrect installation.
- Expired version.
In the first case, you will need to reinstall the driver by uninstalling the previous version. In the second, update it by downloading the required version from the supplier’s official website. When downloading utilities, make sure that they are from the original manufacturers' websites. Otherwise, you can download a virus onto your PC, which will interfere not only with the operation of the audio recording device, but also with other computer systems.
But more often than not, sound may work on the entire PC and not function in a specific program. Since a microphone is most often needed specifically for communicating on Skype, this can turn into a real tragedy for those who are used to communicating with friends and relatives located at a great distance. How to solve this problem will be discussed further.
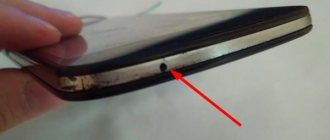
Line input failure (for externally connected recording devices)
If an externally connected microphone stops working, the problem may not be with it, but with the line input. It’s very easy to check: firstly, try using the “native” recording device of the PC, and secondly, you can connect an external microphone to another device (any other laptop, tablet, smartphone, computer, etc.). If there is a problem with the linear input, well, you will have to take it in for repair.
Checking the microphone for functionality
So, if the user is actively searching for the reason why the microphone stopped working, he will be forced to constantly check it. Standard Windows capabilities (any version) allow you to do this in real time.
You just need to go to the “Recording devices” tab (how to do this was already written in the same article a little earlier), select the appropriate one and find the “Listen” option in the parameters. Place a checkmark next to it. Done - now all sounds received by the microphone will be simultaneously output to the PC speakers.
There you can also find other configurations of the recording device: experiment with microphone gain, noise reduction and everything else.
The microphone does not work in games or on Steam
Steam has a huge number of microphone settings that can be tailored to the needs of a specific device. To do this, in the settings of this program, go to the “Voice” section, where you can set the output volume, set the sound transmission key and select the microphone that is currently in use. Using these options, you can not only improve the sound quality, but also optimally adjust it to the operation of your device and personal preferences (Figure 9).
Figure 9. Microphone and sound settings window in Steam
Now you know why the microphone on your computer or phone does not work and how to deal with this problem. Use the recommendations presented and use the devices for your pleasure.
If this did happen
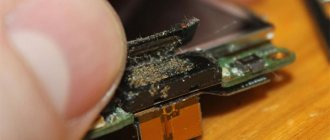
It is possible that there is another reason why the microphone stopped working, which was already mentioned at the very beginning. If it's broken, that's also possible.
The likelihood increases if:
- the microphone did not stop working suddenly, there were prerequisites for this;
- the device has been dropped or otherwise subjected to physical impact;
- the microphone does not work in all cases in which it can be used, and not just in one service (such as Skype, RedCall or a regular voice recorder).
In this case, the microphone (if it comes separately from the PC) or the entire laptop will have to be taken to a service center, where they can provide professional assistance.
Microphone repair can be quick or lengthy (depending on the severity of the damage). The price also varies widely depending on which recording device needs to be repaired and why it broke.
Causes of microphone problems
After purchasing a new microphone and connecting it to your computer, you may find that for some reason it does not work. Of course, you might think that the microphone is broken.
However, in fact, the reason may not lie in the microphone at all, but in your operating system. This is where the first reason comes from.
Microphone is disabled in Windows settings
To solve this problem, first check to see if you have connected the microphone correctly.
If you see that the microphone plug is not connected to the corresponding jack (usually pink), then reconnect your microphone. Your system unit may have several pink connectors. You can try connecting a microphone to each separate connector.
If this does not help, check the operation of the device via sound recording. Type the name of the “Sound Recorder” utility in the search for Windows 8 or find this utility through Start in the Standard Programs (Entertainment) directory for Windows 7 and Windows XP.
In the case of Win XP, you need to click on the Options tab in the window that opens and select Recording. In the new window, look at the box where the volume controls are shown. If a microphone is not selected, check the box next to it. You will now be able to see your microphone settings. You will need to move the slider up if necessary. If you are using newer versions, then you need to open the menu on the taskbar, which has a speaker icon. Right-click on this icon and select "Recorder". The system will automatically take you to the recording devices directory. Among them you can find your microphone. Double-click it and click the Properties button. In the window that opens, in the General tab, select Use this device.
If you do not have a microphone in the list of recording devices, then you need to open the driver settings and select the microphone jack. To do this, right-click on the volume icon again, open the volume mixer, go to the Levels tab. There you can adjust the sensitivity of your microphone.
- Download 14.9Mb (SoundMax sound driver for Windows 7 and 8 for 32 and 64 bit)
- Download 48.7Mb (Realtek sound driver for Windows 7 and 8 32bit)
- Download 52.9Mb (Realtek sound driver for Windows 7 and 8 64bit)
Please note that when talking about microphone settings, it is important to take into account your sound card. It can be compatible with different drivers, namely Soundmax or Realtek. Therefore, when downloading drivers, be sure to make sure that you download them specifically for your sound card. You can check which drivers your sound card supports through the taskbar in the volume mixer.
A special case of this problem may be a microphone failure in Skype. To resolve this problem, you need to go to “Settings”, select “Privacy” and “Microphone”. Next you will see a list of applications. Among them should be your microphone. Check if it is enabled; if not, move the slider to the Enable position.