Under the cover on the back of the case
Relevant for Digma, Explay tablets, and also the only way to insert a SIM card into an Irbis tablet - even in the 2018 model.
Here, not the entire back cover is removed, as was done in older models of smartphones and phones, but only part of it - a narrow panel along the upper or lower edge of the back of the case.
What do we have to do:
- Turn the tablet with the back side facing you. Let's see where the removable panel is located.
- We hook the panel by the special groove, carefully pull it towards us and remove it from the body.
- Place the card in the slot. You can see how to insert a SIM card into the tablet correctly (which side) in a special drawing - it should be imprinted next to the slot or directly on it.
- We return the panel to its place.
- Turn on the tablet and start using it.
The same instructions are suitable for inserting a SIM card into a Prestigio tablet.
For Lenovo Yoga
To insert a SIM card into the Lenovo Yoga tablet, you also need to remove a special panel. However, it is located on the left (as if we were looking at the spine of a book) and unfastens differently.
Here's what to do:
- Turn the tablet with its back surface facing you. With a convex, rounded edge away from you.
- There is an oval button on the panel (cover) covering the slots. Click on it.
- We open the lid.
- To the right of the button there is another cover - a plastic rectangle. Pick it up with your fingernail and remove it.
- Unfold the SIM card as shown on the plastic above the slot. Insert it into the slot and push it all the way in. You should hear a slight click.
- Replace the second (inner) cover, and then snap the first, outer cover into place.
If you are not used to using a tablet, but most often you use a phone - read our other article about how to insert a SIM card into an iPhone or, for example, into a Samsung!
To remove a SIM card from such a slot, use the instructions below, from the subsection “How to remove...”.
Please note: the cover, which is removed to insert a SIM card into the Digma tablet, covers the entire upper end of the device and the space where the camera eye is located. The panel itself is soft and easily separates from the body.
Installing a SIM card in the Tablet
Important! To install a SIM card in the tablet, you need to turn it off; some devices can work in hot mode, that is, they detect it without turning it off, but most often the tablet does not see the SIM card without rebooting.
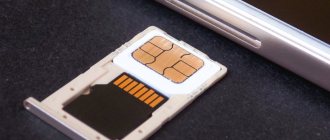
After turning off, you need to find a place for the SIM card, the options may be different, in modern Huawei tablets it is inserted into a special slot, to open it you need to use a small paperclip that comes with the kit. The carriage extends from the tablet and places the card on it, regardless of the manufacturer, the appearance of the SIM card is the same - a rectangular shape with a truncated corner. In fact, it is difficult to misplace the card on the carriage, since there is only one position in which it will fit.
The second option is an open slot; this connector is installed using Asus technology.
Here the SIM card is simply inserted into the case; to correctly insert the SIM card into the tablet, you need to look at the icon next to the slot. It shows how it should be placed in the device; when installed correctly, you will hear a click; to remove the card, lightly press it with your fingernail - it will pop out, as if pushed by a spring.
The third option is that the slot is closed with a plastic plug; in this case, there will be a small gap that can be easily pryed off with a fingernail. In this case, the installation side of the SIM card will again be indicated on the case. This type of slot is found in Samsung tablets.
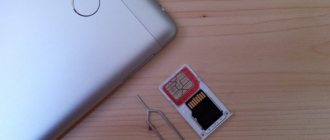
The last option is a removable cover; owners of Prestigio and Digma often wonder where the SIM card is inserted in the tablet. These brands are one of the few that allow you to use two cards at the same time. To install the device, you need to turn it upside down; at the top of the device there is a removable panel of small width; in the central part above the camera there is a gap that needs to be pryed off with your fingernail. After removing the cover, the user will see a slot for a SIM card and a microSD card. In this case, the card is placed with a token in the middle, the cut corner should be on top.
There are no other places in the tablet; if the question of where the SIM card is inserted in the tablet remains unresolved, refer to the technology documentation. There are recommendations on where and how to install it.
Most often, after installing the card and rebooting the device, it will automatically detect the SIM card and start working. During the initial installation, an SMS with settings will be sent to your tablet, open and save them. In some cases, you will have to configure the tablet yourself; to do this, go to the settings and find the “mobile network settings” item. Then open "Access Points" and create a new point.
When creating a point, it is important to correctly specify the address at which the device will access the network. This item is called APN; different operators have different addresses, so you can check the correct settings on the operator’s website.
The address usually looks like this: internet.tele2.ru, APN and password in the case of Tele2 do not need to be set, while Megafon and MTS may have them, so you will have to look for information on the official website or go to the salon so as not to make a mistake.
How to insert a SIM card into Digma, Explay and Irbis tablets
Applicable to Digma, Explay tablets and the only way to insert a SIM card into an Irbis tablet - even in the 2021 model.
Here, not the entire back cover is removed, as was the case in older models of smartphones and phones, but only part of it - a narrow panel on the upper or lower edge of the back of the case.
What to do:
- Turn the back of the tablet towards you and check where the removable panel is located.
- Lift the panel by the special groove, carefully pull it towards you and remove it from the case.
- Place the card in the slot; how to insert the SIM card into the tablet correctly (which side) can be seen in a special picture - it should be stamped next to the slot or right on it.
- Reinstall the panel.
- Turn on your tablet and start using it.
The same instructions can be used to install a SIM card in a Prestigio tablet.
Instructions for iPad
The most modern tablet models (Apple, Samsung, Nokia, etc.) use a carriage design for the SIM card compartment, which is accessed through a special clamp. In general, the operation is similar to replacing a SIM card in a regular phone:
- On the body of the device you should find a slot tray, next to which there should be a special hole for a paper clip.
- Insert the key (paperclip) into the recess and press lightly.
- This action will cause the edge of the tray to bounce off the body.
- The tray is removed from the machine.
- The correct location is determined.
- The symbols of the required size (usually nano) are installed.
- The tray slides into the frame until the surface of the tablet is completely level.
It is necessary to determine the correct location of the SIM card in the tray, usually it is designed to accommodate 2 SIM cards or an additional memory card.
How to insert a SIM card into a Samsung, ASUS tablet
Moving on to the question of inserting a SIM card into a tablet, we can distinguish two main types of installation - directly into the case or through a special tray. If you use the first option, you need to install the SIM card directly into the tablet. You remove the cover and install the SIM card into the slot, in the example there are three slots: two for SIM cards and one for a memory card, installing a SIM card is possible in each of the first two slots.
Most tablets use a special SIM card tray, this is what it looks like:
To install a SIM card, you must first remove the tray from the case. This is done using a special paperclip, which usually comes with the device. It looks like this:
You can also use a paperclip if necessary. Take a paperclip and locate the tray on the case, it is flush with the case, so it is not always clearly visible.
Insert a paperclip into the hole on or near the tray and the tray will “slide” out of the housing slightly.
Use your hands to carefully remove the tray from the housing that contained the SIM card.
Then, in the same way, insert the tray with the SIM card back into the case until it stops.
The tablet will now detect the SIM card, enter the PIN if necessary.
How to open the tray
After the purchase, the user of the new equipment was surprised to discover a complete set of devices of unknown hardware.
As it turned out later, this is a special key for opening the SIM card tray. Simply insert the key into the hole on the tray and lightly press and pull. You can also use it:
- Clip.
- Toothpick.
- Thin wire.
- Nail with groove.
Be careful! Try not to break anything inside the tablet computer, this may result in serious repairs.
External slot, with cover and without tray
This is a transitional option - here, to get to the slot, you no longer need to remove the panel covering it, but the SIM card tray is not yet included in the design.
How to insert a SIM card into a Samsung tablet or other device of a similar design:
- We look on the case and move aside the plug for the slot socket. Depending on the brand and model of the tablet, it may be located on its right or left edge, or on the upper end.
- We insert the SIM card into the slot, having first unrolled it according to the picture/print on the plug.
- We recess the card into the body of the device - you can help a little with a fingernail or a thin flat object.
- We return the plug to its place.
By the way, some models of Lenovo tablets do not have a regular slot under the plug, but with a pull-out tray. Its side is slightly convex and is easy to grab onto. The chip in this tray on the Prestigio is placed according to the picture on the plug.
If you want to choose the right 4g tablet, read our article with a review of the top models!
How to remove a SIM card from such a slot?
Perhaps the above instructions on how to insert a SIM card into a tablet seemed familiar to you, but a guess arose in your head on how to remove the card.
Yes, the same principle that is used for SD cards in cameras and laptops really works here:
- We remove the plug. As you can see, the SIM card “sits” deep in the slot and you won’t be able to grab it to pull it out.
- Press something flat and hard onto the visible edge of the card. Lightly, so that the record goes a little further into the body. And let go immediately.
- The edge of the chip will extend a couple of millimeters beyond the housing. We take this edge with our fingers and pull the card out.
Please note: you should move the plug carefully, do not pull it to the side too much. The “leg” that attaches the plug to the body is made of a thin piece of silicone and can come off.
Side outer slot with sliding tray
This option is found in the most modern tablet models. We proceed exactly as in the case of a smartphone:
- We look for the edge of the tray with slots on the case.
- We insert the supplied key (or something similar) into the recess on the side, apply light pressure and immediately release.
- The side of the tray will extend slightly beyond the body. We grab it with two fingers and pull it (completely) out.
- Place the SIM card in the slot on the tray.
- We push the tray into the slot until the side is level with the surface of the body.
How to find out your tablet model
Let's return to the preparatory stage and try to figure out where to go to get information about your device. Suppose the device cover is not removed - you will not be able to read the information on the battery. Catch the universal algorithm for all Androids:
- Open “Settings” (gear icon).
- Go to the “About the tablet” section (sometimes “About the device”).
- Scroll down.
- Find the “Model Number” option.
Here you will see symbolic markings.
Go to Google and enter the number you received. It turns out that you are dealing with a Galaxy Note 3 smartphone that supports LTE technology. This is the simplest example. With tablets everything works exactly the same.
Why does the tablet not see the SIM card?
There may be several reasons for this. Below we list them from most common to rare.
- System failure in the tablet. This can happen due to an incorrectly installed update or for no obvious reason. This is usually cured by rebooting the device.
- The SIM card has failed. It's easy to check - insert it into another tablet or any smartphone. If it doesn’t work there either, then you need to go to a communication store and write an application for re-issue of the SIM card.
- The SIM card is not inserted into the tablet correctly. Pull out the chip, check the picture on the device body or on the slot cover and insert it back.
- Chip contacts are dirty. This is not always determined visually - the card may appear clean. Try wiping it with a soft cloth or napkin.
If your tablet does not see the SIM card, do not despair, try following the instructions for resolving this problem from another article on our website.
We remind you that the slot openings located on the surface of the case must always be tightly closed with plugs or sides of the trays.
We live in the era of mobile communications. Manufacturers did not stand aside and equipped their products with a slot for a SIM card. It is worth noting that not all companies and models have such slots on their tablets. Nowadays you can often meet a person on the street talking on a tablet. But many who bought such a gadget for the first time were faced with the problem of how to insert a SIM card into an Android iOs and Windows tablet.
A seemingly simple task can turn into a serious problem. It’s even worse if the sim is stuck in the slot or falls through, and you can’t remove it. Let's try to figure out how to insert and remove a SIM card quickly and without problems.
The article will help owners of tablet computers of the following brands, including Chinese ones: Sony, PiPO, Onda, Irbis, Samsung, Huawei, Digma, Chuwi, Teclast, Cube, FNF, Colorfly, Ainol, Ramos, Vido, Prestigio, Lenovo, Digma, No- name, running on Android; as well as Dell, Asus, HP, Microsoft, Acer on Windows OS. Also relevant for iOS devices (iPad Pro, mini).
Depending on size
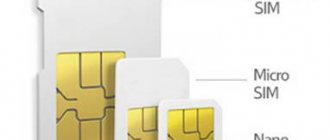
When cell phones first appeared in the lives of ordinary people, all SIM cards looked the same. The standard SIM card - mini - had a size of 25 by 15 millimeters and could be successfully inserted into any mobile phone of those times. But years have passed.
Manufacturers decided to optimize the space in their devices. The pioneer was Apple.
It was on their iPhone 4s that a MicroSIM slot appeared in 2010. And a little later, iPhones 5 series began to be produced for nano sim. It is worth noting that all products that provide 3G, LTE Internet and mobile communications, including iPad, are equipped with trays.
On Android devices there are combined connectors with MicroSD, we recommend that you refer to the instructions so as not to make a mistake.
Manufacturers are actively introducing eSIM technology - essentially a virtual SIM card that does not have a physical carrier. It has not yet become widespread in Russia due to legislation, but everything has its time.
Trim
When changing gadgets or buying a new tablet, you often have to cut the SIM card so that it fits in the new slot. A similar service can be provided in a store when purchasing equipment. You can do it yourself, you will need a template for this. Read more in this article.
The picture below shows how to reduce Mini to Micro.
Use adapter
In cases where the card needs to be extended, a special adapter is used. It is worth noting that today all mobile operators issue cards in three versions at once. It looks like a standard micro sim. It, in turn, must be carefully divided into mini and micro. The remaining pieces of plastic should not be thrown away. They will serve as an adapter from one format to another on occasion.
Installation
- Disable the tablet.
- Before you begin installing a SIM card, carefully read the instructions for your device. The whole process should be described there in detail and with pictures.
- Find the tray cover on the device body. Usually it is on the side. Less often on the back wall. On cheap models - under the battery.
- Unsnap the lid. By pressing, picking, or using a special key.
- Place the SIM card in the tray. It is always made according to its shape, pay attention to the “corner”. The main thing is to install it on the correct side. As a rule, it should “look” with the chip towards the back of the device. Sometimes there is a drawing on the body of the correct location.
- There are cases when a special metal frame (tray) is missing. On such devices, you just need to insert the SIM card into the hole indicated by the picture until it clicks.
- Snap the cover back.
- Turn on the gadget and make sure that it recognizes the mobile operator (the name and icons 3G, 4G, LTE, Egde will appear).
How to open the tray
After the purchase, the user of the new equipment was surprised to find an incomprehensible piece of hardware included with the device.
As it turned out later, this is a special key for opening the SIM card tray. All you have to do is insert the key into the hole on the tray and press and pull it a little. You can also use:
- A paperclip.
- A toothpick.
- Rack nail.
- Thin wire.
Be careful! Try not to break anything inside the tablet computer. This could result in major repairs.
Instructions for iPad
Not all versions of iPads are equipped with 3G and 4G communications. A distinctive feature is the black plate on the back of the “tablet”. The picture below shows how to insert micro sim into iPad.
How to get it out if it's stuck
It often happens that if installed or removed incorrectly, simka becomes tightly stuck in the device. Removing it becomes problematic. Recommendations for this case:
Shake
First of all, try shaking the tablet properly. If the card is not secured tightly in the case, it can fly out. But there are more serious cases.
Tweezers or angle
If you fail with the first option, use tweezers or a needle. If the edges of the card are visible, try to carefully grab it with tweezers and pull it towards you.
Be careful. Do not damage the fragile chip.
Disassemble the case
The most radical method. Having disassembled the “tablet”, you will be able to free the SIM card without any problems. You can find out how to disassemble the tablet here.
Micro sim is not detected
If the SIM card is not detected after installation and cannot be activated, this may be caused by the following factors.
- The chip is damaged. In this case, you need to contact the salon with a request for a replacement.
- This type of mobile communication is not supported by the tablet. Chinese equipment sometimes does not support Russian mobile networks. Or it is locked for a specific operator - firmware will be required.
- Software faults. It is necessary to set the Internet settings correctly.
- Technical problems. The connector may be faulty. The module is responsible for reading and recognizing sim. The cable connecting the motherboard and the slot may also be damaged.
We are sorry that this post was not useful for you!
Let us improve this post!
Thanks for your feedback!
Tablets
How to correctly insert a SIM card into a tablet and how to remove it
Many who buy a new tablet are faced with one problem. It lies in the fact that not everyone knows how to correctly insert a SIM card into the device and, on the contrary, remove it from it. With all this, at first glance everything seems ordinary and natural. But that's not true. Inconvenient movement and you can even break your tablet computer. Therefore, it is not worth the risk. Moreover, we will talk in detail about how the SIM card in the tablet is changed.
If the tablet computer does not recognize the SIM card
Sometimes situations arise when the gadget does not see the SIM. What are the reasons for this phenomenon:
- The gadget experienced a system failure. Try rebooting your gadget.
- The chip is broken. It could become deformed due to improper installation. Try putting it in another device. If a SIM card does not work in a known-good gadget, it means it is faulty. You will need to replace it or purchase a new one. You can buy an MTS, Beeline or SIM Yota SIM card in our online store.
- SIM is not installed correctly. We take it out and install it on the desired side.
- Contacts are dirty. Gently wipe the chip.
You can use different ways to install the card into the tablet.
September 19, 2021
Sim card for tablet
First, let's look at one important point. It concerns which SIM cards can be installed in the tablet. After all, each device has a special slot designed for a specific type of SIM card.
It turns out that there are devices into which only standard-sized SIMs are connected. True, there are fewer and fewer of them. Such gadgets include old tablet models from manufacturers such as Prestige, Irbis, Digma and many others. etc.
At the same time, the slots of many other devices are designed only for micro-sim. This is iPad 2, 3, 4 and most Android tablets - Samsung Galaxy Tab, Asus Phonepad, almost all models from Lenovo and many others. etc.
Moreover, do not forget that there are also tablets with slots for mini-sim and nano-sim. For example, these are the popular iPad Mini and Air devices all over the world.
Therefore, before connecting a SIM card, you need to study the characteristics of the tablet. They will definitely indicate which SIM standard the device supports. Also, this information may be contained next to the connector itself into which the SIM card is inserted.
What to do if the SIM card does not fit into the tablet? If it is slightly larger than necessary, then you can try trimming it. Thus, adjusting it to the required parameters. However, the easiest way is to go to a mobile phone store, where they will change your SIM card and give you one that matches your device.
Video
Leading author of many columns on the website expertland.ru. Well versed in technology and electronics. Capable of solving any technical problem in a matter of hours, he loves to write about his experience and best practices.
- published articles - 94
- readers - 23 919
- on the website from September 25, 2021
Many who buy a new tablet are faced with one problem. It lies in the fact that not everyone knows how to correctly insert a SIM card into the device and, on the contrary, remove it from it. With all this, at first glance everything seems ordinary and natural. But that's not true. Inconvenient movement and you can even break your tablet computer. Therefore, it is not worth taking risks. Moreover, we will carefully tell you how the SIM card in the tablet changes.
First, let's look at one fundamental point. It concerns which specific SIM cards can be installed in the tablet. After all, each device has a special connector designed for a specific type of SIM card.
It turns out that there are accessories that only accept standard-sized SIMs. True, there are fewer and fewer of them. Similar devices include old tablet models from companies such as Prestige, Irbis, Digma and many others. etc.
With all this, the slots of many other devices are designed only for micro-sim. This is iPad 2, 3, 4 and most of the tablets on Android - Samsung Galaxy Tab, Asus Phonepad, in fact all models from Lenovo and many others. etc.
See also
Moreover, we should not forget that there are also tablets with slots for mini-sim and nano-sim. For example, these are the iPad Mini and Air devices, which are popular all over the world.
The tablet does not see the SIM card, what should I do? Do you have a problem too? Look.
Therefore, before connecting a SIM card, you need to study the properties of the tablet. They will certainly indicate which SIM standard the device supports. Also, this information may be contained next to the connector itself into which the SIM card is inserted.
How to remove a broken SIM card from a tablet.
Hello everyone. In today's video, a small life hack is a simple and quick way to remove a broken one.
We figured out that there are different SIM cards. So now let's move on to the next one. Let's talk about how to insert a SIM card into a tablet:
- First of all, turn off the device. Then place it on a flat surface with the display facing down. You can lay down a towel or some kind of fabric so as not to scratch the front of the gadget.
- Most tablet models have a SIM card slot on the side (sometimes on the back cover). It can be covered with a special flap, which needs to be moved or pulled out by prying it with a finger, nail or other thin object. On some devices, you can only get to the SIM card slot by pressing a paper clip into a special hole. There are also models where you just need to press the lid and release. After which the SIM tray protrudes outward from the connector
- If you can’t pull out the tray, you can use a needle or tweezers. Just be careful not to damage the device.
- When you get to the tray, you need to install a SIM card into it. This is done quite simply. Moreover, the holder itself has the shape of a SIM card with a beveled corner. You can only confuse the side. Therefore, make sure that the contact part of the SIM card is turned up and directed towards the back panel, and not towards the display. Sometimes there is a hint on the tray itself on how to correctly position the SIM card.
- Next, insert the SIM tray into a special slot. Most often, a little pressure is required to ensure that it locks securely. In this case, much effort is not required, otherwise the fasteners or the holder itself may break.
- We try to turn on the tablet. If everything was done correctly, the device will recognize the SIM card, and then give the user the ability to make calls and provide him with Internet access.
- However, it also happens that the tablet does not see the SIM card . Most often the reason for this is incorrect installation. Pull out the tray again and make sure that the SIM card is securely fixed and that it does not stick out or fall through. Pay attention to whether you placed it on the correct side in the holder.
Connection technology
Connection procedure
Connecting to the Internet via a SIM card is based on the same principle as when working with mobile phones. A SIM card of any telecom operator is inserted into the gadget into the appropriate slot.
It is important to make sure that mobile Internet is connected to the SIM card, and that your account is topped up. To check your account, you can call the call center of your mobile operator.
Next, turn on the tablet, and select “Data transfer” in the settings. Here you need to click “More” and then “Mobile network”.
Wireless network settings window
In the window that appears next, you need to check whether the “Data transfer” section is checked, and then select “Access points (APN)”.
Many telecom operators immediately send SMS messages with Internet settings. But, besides this, all these instructions can be found on the official websites of telecom operators. Almost all of them look the same - you need to register an access point. For example, it can be done like this:
- APN (access point): internet.life.com.by.
Setting up an access point
In the window you must enter the APN connection data; they depend on the operator the user has chosen. In this case, you can enter any name for the card. For example, this data must be entered for the most popular operators:
MTS:
- APN: internet.mts.ru
- Username: mts
- Password: mts
Beeline:
- APN: internet.beeline.ru
- Username: Ivan
- Password: 123456
Megaphone:
- APN: megafon
- Username: Supermen
- Password: Supermen123
Tele2:
- APN: internet.tele2.ru
- Username: Not needed
- Password: Not needed.
Possible connection problems
The first option that should immediately be considered is the correct operation of the SIM card itself. That is, the owner of the tablet device needs to make sure that the card works correctly and is active. To do this, you can do the following:
- Install a SIM card in some other device to check the location of the network
- If another device has mobile Internet, you need to track its operation with this particular card
- Check with your mobile operator that the Internet is actually connected to the card and there are funds in your account.
SIM cards from different mobile operators
If everything is in order with these points, then the user must make sure that he installed the card correctly in the slot. For successful installation you need to follow some rules:
- When installing the card, refer to the diagram located next to the slot or the instructions for the tablet
- It is important to keep in mind that on most tablets the SIM card is inserted all the way, and you can hear a soft click
- Regardless of the success of installing the card, be sure to restart your gadget, perhaps only then will it detect it.
Installing a SIM card in a tablet device
If these steps do not help, it’s a good idea to make sure that the device on which you need to configure Internet access has a built-in 3G module. After this, you can try the above settings again.
It is important to know that if you cannot set up the Internet after everything, then the owner of the device needs to seek help from a sales consultant who helped him in this choice.
Fast and expensive 3G
Using 3G communication is convenient, especially since the 3G network covers much more coverage than Wi-Fi, the use of which is not possible everywhere.
Regularly, all well-known mobile operators provide their customers with various convenient offers and tariffs for communication services, including wireless access to the Internet. even highlighted in a separate category. More and more users are choosing this particular Internet option for a tablet, because... it does not need constant contact with a power source. This means there is no need to constantly carry cords or cables to connect the tablet to the network.
Tariff plans for mobile devices
3G communication has recently enjoyed increasing success among users of tablet gadgets, due to the fact that it is capable of providing a stable connection and decent speed. 3G will work perfectly even in a moving car or train. On the territory of the Russian Federation, 3G coverage service is provided by Yota, a wireless Internet provider. A huge number of towers in all cities provide good coverage, but, unfortunately, only in cities and their closest suburbs. As soon as the user and his device travel several kilometers from the city, the connection may be interrupted.
To use 3G Internet, the tablet must have a specially built-in module for this purpose. Typically, all top configurations have two solutions - with and without 3G. The price difference between them can reach several thousand rubles, it depends on the developer. To this you can add communication costs, which can vary from several hundred to one and a half thousand rubles, depending on what tariff the user chooses for his device.
Mobile Internet
Most tablet models have a module for a SIM card, and you can use it for its intended purpose. In this situation, the tablet is used as a phone, but you can use the Internet service only with the help of one operator.
Using mobile internet on a tablet
It also has its positive and negative sides. The towers of the selected telecom operator will be located throughout the country and even in hard-to-reach places you can indulge in web surfing. But a lot of money can be spent on this pleasure. The main tariffs are reduced to the following figures: 1 Megabyte of traffic – 1 ruble. With such a pricing policy, it will be difficult for the user not to limit himself on the mobile Internet. But still, this is a good solution for a tablet gadget.
How to remove a SIM card from a tablet?
Sometimes it is necessary to carry out the reverse procedure. What should you know about her? Essentially, if the SIM card was installed correctly, then removing it from the tablet will not be difficult. You just need to repeat all the steps described above in reverse order. But if an error was made during installation of the SIM card into the tablet (for example, it was placed on the wrong side), then problems may arise.
In addition, sometimes the latches of the tray itself break. Or on some tablets, due to the rather large connector, the SIM card falls deep inside. What to do in this case? Try to carefully pry the SIM card or the part itself holding it with tweezers. If nothing works, then it is best to contact a service center.
Do not try to force the SIM card out of the tablet. Do not pick with a screwdriver or sharp object. So, you can cause mechanical damage to the device, which will put the gadget out of action for a long time.
Problems with the SIM card
What to do if the tablet does not see the SIM card? There may be several options in this situation.
- Hardware failure; the contacts in the socket are quite fragile and can be easily damaged if handled carelessly. If the device does not see the card, or simply cannot detect it upon purchase, although it, of course, works, then the problem is in the slot, you will need to contact a service center.
- The second logical option why the tablet does not see the SIM card is that it is broken. If the card has not been used for a long time or has been damaged in any way, it may simply stop working. An option to check is to insert it into another device, if this is the reason, then don’t be upset, you can get a new one with the same number and balance in the operator’s store.
- The third option is a problem with the system; first, check whether the device has an “air” mode, when all wireless modules stop working. If this is not the case, then you should try restoring the device to factory settings.
- Another likely problem that is causing the SIM card in your tablet to not work is that it was installed incorrectly. In this case, just check if everything is inserted correctly; users often confuse the SIM slot with the memory compartment.
So, to check all the reasons why the equipment does not read the SIM card, follow a simple sequence of actions:
- If all else fails, contact service.
- Perform a system reset;
- Check that the card is installed correctly;
- Check the SIM card in another device;
- If the Internet stops working after installing new software, uninstall it;
- Check the connector using another card;
- If only the Internet does not work, check the settings;
- Check if the “avia” mode is turned off;
Important point! There is no need to try to repair the SIM card or SIM slot yourself. Some users try to clean the chip and contacts with alcohol and a cotton swab and do other abnormal things. This will not help and will only worsen the problem. If none of the above helps, it is better to turn to professionals.
Sources
- https://tehnika.expert/cifrovaya/planshet/kak-vstavit-simku.html
- https://moscow-rostelecom.ru/rostelekom/ustanovka-sim-karty-v-planshet.html
- https://ExpertLand.ru/planshet/vstavit-simku
- https://4gltee.ru/kak-vstavit-sim-kartu-v-planshet/
- https://kingdia.com/instruktsii/rabota/61-kak-vstavit-sim-kartu-v-planshet.html
Install and connect the SIM card in the tablet
First, you need to determine which SIM card your device supports. Today, there are several types of SIM cards for tablets: regular SIM, miniSIM, microSIM and nanoSIM. They differ only in size, and are listed in order of decreasing dimensions. The most common today are microSIM.
Installing a SIM card is sometimes not so easy, in order to understand how to insert a SIM card into the tablet and avoid any problems, use the instructions:
1. Before installing the SIM card, turn off the device and (for convenience) place the tablet on a smooth surface with the display down. Make sure the surface is clean and will not scratch the screen.
2. As a rule, there is a SIM card slot on the bottom or side of the tablet (check the instructions), often it is located next to other slots or buttons. Pay attention to the design of the socket access system; you may need to use a special key-clip that comes with the tablet. How to insert a SIM card into a tablet using this key? There will be a small hole next to the socket; when you press the key into this hole, the SIM card slot will slide out, then you need to place the SIM in the special tray that slides out.
If there is no hole, it’s even clearer how to insert a SIM card into the tablet: just move the slot flap, pull out the SIM card holder, insert the SIM card from the holder up with the contacts.
3. Push in the tray or holder, put the flap in place (if it is not installed automatically when the holder is pushed in), turn on the tablet and check the connection.
If the SIM card was installed correctly, the question of how to remove the SIM card from the tablet should not arise - just perform all the above steps in reverse order. If something went wrong during installation, it will not be so easy to get the SIM; you will have to use tweezers to pick it up and pull it out.
A short video showing how to insert a SIM card into a Samsung GALAXY Tab
Sources used:
- https://4gltee.ru/kak-vstavit-sim-kartu-v-planshet/
- https://expertland.ru/planshet/vstavit-simku
- https://legnum.info/dostaem-zastryavshuyu-sim-kartu-iz-smartfona/
- https://net-gadget.ru/kak-izvlech-sim-kartu-iz-plansheta/
- https://androidtab.ru/kak-ustanovit-i-vyinut-sim-kartu-iz-plansheta/
SHARE Facebook
- tweet
Previous articleSearch by photo from your phone - how to do it in Yandex or Google using step-by-step instructions
Next articleVines - what they are and why they are popular, how to make short videos in the Vine program
How to remove SIM card from Galaxy Tab A 8.0 (2019)
Removing the SIM card is as easy as inserting it. Follow these steps to remove the SIM card from your device.
- Turn off Galaxy Tab A 8.0 (2019). It is important. Removing the SIM card while the device is turned on may cause data corruption.
- With the phone's screen facing you, remove the card tray. You can use the insertion/extraction tool (or a paper clip) to unlock the tray by inserting it into the slot provided. This small hole should be visible on the left side of your device.
- Remove the SIM card from the tray. The card can be raised from bottom to top. To help, use the hole on the opposite side of the tray to pull it out (using your fingernail or similar tool).
- Reinsert the card tray.
- Click on it. tray to secure it in place.
- That's all!
If you are one of the users who is having an issue with your device, please let us know. We offer free solutions to Android related problems, so if you are having a problem with your Android device, just fill out the short survey at this link
, and we will try to publish our answers in the next posts. We cannot guarantee a quick response, so if your issue is time sensitive, please find another way to resolve it.
If you find this post helpful, please help us by sharing it with your friends. TheDroidGuy is also present on social media, so you can interact with our community on our Facebook page.