What you can fix yourself
If you are reading this guide, then most likely you are not very knowledgeable about electronics. If this is the case, then do not try to be a hero and try to fix the failure of electronic components yourself. But there are some things you can fix yourself. What exactly?
- Change connectors and individual components. For example, your tablet has stopped charging and you need to replace the power socket. Or the headphones are acting up and you need to replace the audio input. If the battery starts to last very little time, you can try replacing it.
- The most popular reason why ordinary users want to disassemble a tablet is to replace the entire sensor or display. Most often this is caused by careless handling, when the tablet falls on the floor and the sensor cracks, or someone sits on the device lying on the sofa.
So, if you are sure that you really need this, let’s proceed to the guide on how to disassemble the tablet yourself. Reserve a few minutes of time and carefully read all the points.
Required set of tools
The first thing you need to do is stock up on the necessary set of tools. Without them, you will not be able to completely disassemble the device. Although some of the tools can be replaced with improvised materials, some are completely irreplaceable, since without them you will simply damage the device. So what will you need?
- Screwdrivers are one of the indispensable tools. You can, of course, try to open the screws with a knife or a single screwdriver, but depending on what screws the manufacturer of your tablet uses, you may need a Phillips, flat, multi-faceted or star screwdriver. Screwdrivers can be purchased as a set or one universal one with a set of interchangeable heads. Such a universal tool can be useful not only for disassembling tablets.
Screwdrivers are an indispensable tool - Plastic spatula. It is necessary to detach the back cover of the case or other parts. Also, using a plastic spatula, you can disconnect cables and connectors inside the case. If you don't have a plastic spatula, you can use another thin object, such as a bank card or a guitar pick. The main condition is the presence of a pointed end, so that it is convenient to insert into a narrow slot. Plastic spatula tool
- Thin knife. Its role is approximately the same as that of a plastic spatula - you will use it to pry off those components that the spatula could not handle. Its advantage is a narrow blade with a relatively long length. Very thin knife
- Soldering kit, hair dryer. Some manufacturers attach components of their devices using soldering or bond them at elevated temperatures. In order to remove them, you will need to unsolder the connector or heat the surface with a soldering hair dryer. High quality soldering iron
- Tweezers. An almost irreplaceable thing when you need to unhook a small part. It will be very difficult to do this with your fingers, no matter how thin they are. You will have to use them already at the stage of disabling various components. An irreplaceable item: tweezers
- Wire cutters. In very rare cases, when the manufacturer tightly fastens some elements of the tablet, you will have to cut them with wire cutters. But at the same time, be sure to think about whether you will be able to restore the device’s functionality later. Wire cutters if necessary
- Scotch tape, glue. They will be needed when assembling the tablet after replacing the necessary modules. Most often, various cables and small parts are attached using glue or double-sided tape. Accordingly, you will also have to use them so that the parts sit firmly in place. Scotch tape for tablet
Analysis of the algorithm
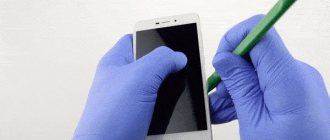
In the most general case, we simply find a place where we can insert a plastic card. Usually this place is located near the volume buttons. We need to carefully, prying up the edge, detach the front and back parts of the tablet, releasing the fastenings. Sometimes you can use a pick instead of a card.
With this method of opening the case, nothing will be damaged; feel free to move the card along the case and the latches will open
But you need to be very careful - in many models, especially those made in China, manufacturers love to hide the bolt fasteners. Before starting work, be sure to make sure that there are none. Moderate force should be used. If the latch does not budge, check additionally to see if there are any fasteners in this place. Sometimes they can be disguised as stickers or under places that imitate part of the touchpad.
It doesn’t matter which manufacturer your tablet is from - Asus, Samsung, Lenovo or Prestigio - in all cases the algorithm of actions will be the same.
After you have managed to walk around the entire perimeter, do not rush to pull off the lid. First, make sure that there are no cables going to it; if there are, disconnect them if necessary.
The tablet is open, and we can begin the work we need - replacing the battery or any other parts, cleaning the device from dust.
Disassembling the tablet
Component Mounting Options
Before proceeding directly to disassembling the tablet, it would not hurt to remind you what types of mounts are used by various manufacturers of mobile devices:
- Screws. The best option that makes your tablet highly repairable. You just need to have the appropriate set of screwdrivers and a little attention so as not to mix up the screws during assembly;
- Latches and cables. Very often used for fastening the case and some elements inside. The latches can be very tricky, and in some cases you won't be able to disassemble the device without breaking them. A cable is a flat ribbon of wires fastened together, through which a signal is transmitted to a controller or microcircuit. Usually it is enough to unfasten the cable fastener from the socket using a knife or plastic spatula;
- Adhesive backing or double-sided tape. Some inexpensive devices are held in place primarily by tape or an adhesive backing. In this case, to disassemble the tablet, you will have to make some effort, and in some cases even heat the case elements using a soldering hair dryer;
- Soldering. The most inconvenient type of fastening for repair. It’s okay if a small connector is soldered, but some manufacturers manage to solder entire large chips. In this case, we can sympathize with you. If you manage to cope on your own, it will be at the cost of great effort.
Removing the top plate
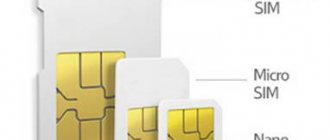
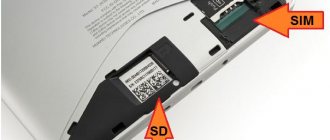
Many tablets have a small plate on the back surface near the top edge. Usually it hides connectors for a SIM card or flash drive. If your model has this cover, then first you need to remove it. To do this, you need to insert a plastic spatula or an object that replaces it into the narrow gap between the plate and the body and move it around the perimeter. Usually it lends itself quite easily and you don’t have to put in much effort. In some cases, the manufacturer stipulates that the lid opens even without foreign objects.
After this, be sure to remove the memory card and SIM card from the connectors, as certain difficulties may arise if they are present. Also check if there are any screws under the cover. Unscrew them, otherwise further procedure will be impossible.
Detach the top plate, if your tablet has one.
Removing the cover
After removing the top plate and unscrewing the screws underneath, check to see if there are any screws around the perimeter of the case. Usually there can be from 4 to 8, and they are located along the edges. If you do not have a top removable plate, check for screws under the slots for the SIM card flash drive, which are usually located on one of the side faces in this case.
Next, using a flat object - a plastic spatula, pick, card or thin knife - you need to disconnect all the latches around the perimeter of the case. In very rare cases, the back cover can only be held in place by screws. Be careful, in some places you need to make a lot of effort, be careful not to break anything. Unfortunately, in some cases it is impossible to remove the cover without breaking the latch.
In some cases, in order to disassemble the case, you will need to unfasten the latches located under the front glass. Apple suffers from this; iPad tablets are recognized by many experts as leaders in terms of repair complexity. Also, some Chinese companies, in order to save money, can place screws on the front panel and seal them with transparent plastic on top. In this case, you will need to immediately peel off the plastic, and only then unscrew the screws.
Carefully remove the cover, if necessary, unfasten the latches located under the front glass
Disabling loops and wires
After disconnecting the cover, do not rush to remove it. First of all, check whether various cables and wiring are attached to it. If so, the first thing you should do is disable them. To do this, you will need a plastic spatula or knife, and in some cases, perhaps a soldering iron.
Next, one by one, unhook all the cables and wires attached to the case and motherboard of the tablet. Usually, the vibration motor, SIM card and flash drive slot, camera, docking station and headphone connectors, micro-USB, microphone, and speakers can be disconnected without any problems.
In each tablet, the layout of the components may vary slightly, and they may also be attached differently, but the principle will be the same for each model. Be sure to take a close look at each component and how it is attached before removing it. This is simply necessary to ensure that disassembling the tablet does not cause damage.
Disconnecting the battery
Unlike phones, the battery on a tablet is non-removable and cannot be changed. It is usually attached to the case and connected to the motherboard via wiring or a cable. It can be attached to the body either with screws, double-sided tape or an adhesive base. In rare cases it may be soldered. Study carefully how it is attached, as well as where the wires go from it, and, having disconnected the necessary connectors, remove the battery.
Disconnect the device's battery after learning how it is attached first.
Removing the Motherboard
After disconnecting all wiring and connectors, it’s the motherboard’s turn. This is the main component of the tablet, since the processor, RAM, graphics accelerator and other equally important chips are attached to the motherboard. The most important parts are protected using special electromagnetic plates designed to protect them from the effects of electromagnetic waves, and given the presence of small holes and a thermal protective layer applied to the inside, also from overheating. Very often, manufacturers glue or solder these plates, making repairs extremely difficult. The situation is much simpler when using screws. So if you don’t need to change RAM or some kind of microcircuit on the motherboard, it’s better not to touch these plates in vain.
The motherboard is the main component of the device, all the microcircuits are attached to it
Detaching the display matrix from the sensor and protective glass
Since most users want to disassemble the tablet in order to replace the display sensor, let's take a closer look at this process. The screen itself is a module consisting of the display matrix itself, a sensor thanks to which the tablet can be controlled with your fingers, as well as protective glass. It is best when this entire structure can be disassembled and then, in case of damage to the protective glass or sensor, you will not need to change the entire module. This significantly reduces repair costs.
After disconnecting the sensor cable from the motherboard, then disconnect it from the display matrix
Disconnect the sensor cable from the tablet's motherboard. After this, try to disconnect it from the display matrix; to do this, use a soldering hair dryer to heat it around the perimeter at a temperature of about 100 degrees. This is necessary so that the adhesive base melts a little, and it is easier to separate them. After this, carefully wipe the surface from any glue residue, then apply a new sensor and connect its cable to the appropriate connector on the motherboard.
Removing the protective glass from the housing frame
If the protective glass was broken when the tablet was dropped, it can also be replaced. To do this, the first step is to detach it from the frame of the case. It can be attached to it using latches or adhesive tape, or both. Twist the glass in your hands and carefully examine the design so that you don’t break anything when you try to disassemble it. You may have to apply some physical effort, but do not overdo it so that the frame does not become deformed. Use a knife or plastic spatula to pry the protective glass along the entire perimeter, then carefully remove it and install a new one. You may have to break off some of the latches; in this case, compensate for their absence with double-sided tape or a drop of glue.
If the screen has been damaged, then the first thing to do is disconnect it from the case frame
Difficulty removing the cover
Devices that are difficult to open include Apple products. Tablets of this type are very difficult to disassemble, so think carefully before doing this. For some models, for additional fixation and protection from non-service maintenance, the back panel is glued on. This is where a hot air gun comes in handy:
- Turn it on and blow on the joints of the tablet.
- We try to remove the back cover, hooking it with picks.
- If the lid does not come off well, then as the work progresses, every 3-4 cm we leave a pick between the back wall and the screen. The main thing to remember is that you should work slowly and carefully. Then everything will work out.
Video: removing the cover and simple disassembly of the Samsung Galaxy Tab 3
There are often reasons why you need to disassemble your equipment. Most often, this procedure is carried out for internal cleaning. After it, your equipment begins to work more efficiently and faster, and the problems that previously drove you crazy disappear.
The procedure for disassembling the tablet can be carried out at home if you take full responsibility for the consequences. Some service centers will not undertake to repair your tablet even under warranty after you have disassembled it. This is worth taking into account, and if you doubt your abilities, it is better to contact a Samsung tablet repair service center.
Most often, when we need to disassemble a tablet, we are faced with the most ridiculous problems. The very first thing is usually to remove the tablet cover. Yes, you heard right, removing the cover is not always easy either. Difficulties opening the lid also occur on Apple tablets. The cover of the Samsung Galaxy Tab 3 tablet is also quite tightly and firmly attached to the body, and many are wondering how to remove it without damaging it.
Some Important Tips
- Record each stage. This is important so that when assembling the tablet, you assemble everything in the correct sequence. You can photograph each step, make schematic drawings, or even film your actions.
- Sign each item removed. In order not to forget which removed module is responsible for what, put it on a small piece of paper and be sure to sign it. Then you definitely won't forget.
- Install components only for your device model. Many online stores sell components for various tablet models. Install only those that are designed specifically for your tablet, or are fully compatible with it.
- Find the module layout on your device. If you have never repaired a device yourself before, this step is mandatory. It will greatly simplify your task, since you will not have to guess what each of the modules looks like. Search on special forums; usually specialists post photographs of the insides of the tablet, signing the name of the components.
Subtleties of the process
Typically, the process of disassembling such devices is not particularly difficult. You should arm yourself with a small screwdriver, find the bolts and get to work. Typically, a tablet consists of a cover and the tablet itself. After unscrewing the bolts, the cover is removed. Usually the clasps hold well enough that you have to work hard to get the cover off. You can use a plastic card that you insert into the slot and then slide it around the device, which will allow you to separate the cover quite easily.
You should be extremely careful, because the speaker may be attached to the cover, which can cause the wire to be torn off. In addition to the speaker, you should see a board in front of you, as well as a battery, which is traditionally mounted on the screen.


