Analysis of the algorithm
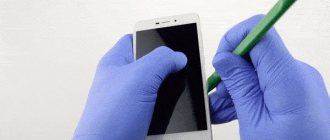
In the most general case, we simply find a place where we can insert a plastic card. Usually this place is located near the volume buttons. We need to carefully, prying up the edge, detach the front and back parts of the tablet, releasing the fastenings. Sometimes you can use a pick instead of a card.
With this method of opening the case, nothing will be damaged; feel free to move the card along the case and the latches will open
But you need to be very careful - in many models, especially those made in China, manufacturers love to hide the bolt fasteners. Before starting work, be sure to make sure that there are none. Moderate force should be used. If the latch does not budge, check additionally to see if there are any fasteners in this place. Sometimes they can be disguised as stickers or under places that imitate part of the touchpad.
It doesn’t matter which manufacturer your tablet is from - Asus, Samsung, Lenovo or Prestigio - in all cases the algorithm of actions will be the same.
After you have managed to walk around the entire perimeter, do not rush to pull off the lid. First, make sure that there are no cables going to it; if there are, disconnect them if necessary.
The tablet is open, and we can begin the work we need - replacing the battery or any other parts, cleaning the device from dust.
What you will need during disassembly
Screwdrivers
These are the most necessary things, since without them it is impossible to carefully open the tablet . You can, of course, use a knife. But then there is a high probability of damaging the screws. A set of screwdrivers is inexpensive. It can also be used to disassemble other devices.
Plastic spatula
It is required to detach the back cover and other elements . It is also convenient for disconnecting cables on the board.
If you don’t have such a spatula, it doesn’t matter.
Advice! An unnecessary plastic card can replace the spatula. It is advisable to grind one edge down on a whetstone. This will make it much more convenient to disassemble the tablet.
Soldering gun
This device is used for soldering small board components . It can also be used to separate the touch part of the screen, since in most cases it is glued with glue.
Thin knife
These tools are convenient for working with components that you could not separate with a regular knife. Its main advantage is its thin blade, because it can get to hard-to-reach places.
Wire cutters
When disassembling, you most likely will not need this tool. But in some cases, the manufacturer glues some parts so tightly that it is impossible to do without such a tool. Before using wire cutters, you should definitely think about whether you can later return the bitten off component to working condition.
Tweezers
We recommend picking up almost all small parts with tweezers , since, firstly, it is much more convenient than using your hands. Secondly, if you take the board components with your hands, sebum from your fingers will remain on them. Although this is not dangerous for all components, we still would not advise you to take risks.
Scotch
It will be useful to us already at the assembly stage, since some cables, microcontrollers, and touchscreens are glued with tape.
How to open the tablet
First of all, when disassembling the tablet, the back cover is removed. After this, the main parts will appear in front of you: board, battery, etc. Now we will tell you how to properly dismantle the back cover.
Removing the cover
Many tablets have slots on the side for SIM cards and a flash drive. They are closed with special caps; they should be disconnected first. This is done to make it easier for us to remove the cover.
Next, you should unscrew all the screws located along the edges that secure the cover. Be sure to check the slots for flash drives and SIM cards . Often additional fixing screws are located in these places.
Important! We recommend placing the screws for attaching the lid into a plastic bottle cap. When you unscrew the tablet board, these screws need to be placed in another cover.
This is done so as not to confuse them. Because if you tighten other screws, you can damage the threads.
Removing the cover
Next, using a plastic spatula or card, you need to pry off the latches of the rear wall. To do this, place the tablet with the screen facing you. Then carefully insert the spatula into the gap between the body and the cover . You need to insert the scapula until you hear a characteristic click.
How to disassemble Huawei Mediapad tablets
Disassembling a tablet is of interest to users not only out of curiosity. Most often, this request arises when a gadget needs to be repaired—when the battery or tablet screen needs to be repaired. It is rational to take the tablet to a service center, where specialists will accurately determine the cause of the breakdown and, with careful movements, disassemble the device and change what has stopped working correctly. But if you decide to do the repairs yourself, then follow the detailed instructions described below.
The main reasons for the need for analysis:
- repair;
- the need to replace certain parts;
- the need to dry the parts inside after liquid gets inside;
- internal cleaning from dust;
- personal interest.
Huawei and Honor screen lock: what is it, how to enable it
Keep in mind that if you break something during analysis, then:
- the warranty will no longer apply - this item is stated in the warranty card;
- there is a possibility of damage to other working parts;
- Possible incorrect assembly.
Before you begin, carefully inspect the device to make sure it can be opened manually. To work, find a thin plastic card for easy removal of the latches. If you hide the gadget yourself, then responsibility for the result lies entirely with the user.
MediaPad M3 Lite 10
To disassemble the MediaPad M3 Lite 10, follow these steps:
- using a plastic card or a special module, separate the cover from the main device;
- insert the master key between the screen and the body;
- gently press on the body and separate it with a smooth movement;
- after you remove the display, you will be able to examine the motherboard and other components in detail;
Do everything carefully so as not to lose important details.
GS l09
The disassembly algorithm is the same as with the MediaPad M3 Lite 10. Only there are more latches. This model has a larger diagonal than others.
Mediapad 10 Link
The Mediapad 10 Link has a non-removable cover, but at home you can try to remove it using tools such as screwdrivers and sharp objects. But there is a high probability that chips and scratches will remain.
- Start disassembling from the top edge. Then follow the instructions described below.
- Use a scalpel to pry up the lid and remove the latches.
- Lift the cover and remove it;
- Remove 5 screws.
- Using a thin scalpel, pry the lid off the front side as shown in the image.
- Afterwards the cover can be easily removed.
Huawei gadgets are often purchased on Aliexpress. The lack of a manufacturer's warranty motivates you to act carefully. If you are not confident in your abilities, then it is better to contact a professional repairman to repair your device. To simplify the task, watch the video online, which will clearly show what needs to be done. This will save time. Now you know how to open a Huawei tablet.
Disassembling the tablet
After removing the cover, further disassembly can be carried out. We will tell you how to disassemble the device.
Disabling loops and wires
- Carefully inspect all cables and connectors on the tablet’s motherboard. Pay special attention to the type of fastening, in this case, when disconnecting you will not damage the cable.
- Using tweezers, disconnect all cables from the motherboard. The easiest way to detach is the vibration motor, SIM card slots and flash drives, microphone, speakers, aux jack (for connecting headphones), and camera.
- If the cable is glued to the board, then first of all you need to warm it up with a soldering hair dryer so as not to damage it. A temperature of 60° will be sufficient . It is not necessary to warm it up too much, as some components are sensitive to high temperatures.
Attention! Be sure to record the order in which you disconnect components and cables. Then you can assemble the tablet in the correct order.
Disconnecting the battery
Unlike smartphones, the battery in tablets is almost always non-removable. It is connected using several wires. At the end there is usually a connector that connects to the motherboard.
- First, disconnect the battery connector from the motherboard. Only after this can you unscrew the battery mounting screws.
- If it is glued with double-sided tape, you will have to peel it off with your hands.
- The use of a soldering gun is not recommended. Since heating a battery is a rather dangerous activity.
Removing the motherboard
When you have disconnected all components and cables, then it is the turn of the main circuit - the motherboard. This is the main part, as it houses the processor, graphics accelerator, RAM and other important chips.
- Make sure all cables are disconnected. Then unscrew the screws securing the board. Now you can remove the motherboard.
- The main elements are protected by special steel plates. This is necessary to protect components from electromagnetic radiation. Some plates have heat-conducting paste applied on the reverse side. This is done to protect against overheating.
- Some manufacturers glue the plates with glue. This feature greatly complicates repairs. Therefore, if you do not need to replace the processor or RAM, then it is better to simply leave these plates alone .
Disconnecting the matrix and sensor
The tablet screen consists of a touch part, also called a touchscreen, and a matrix, thanks to which you see the image. These parts have to be changed most often. Since falling on the floor or careless handling causes cracks in these parts. The matrix and touch panel are removed as follows.
- Use a soldering hair dryer to heat the edges of the touchscreen to a temperature of approximately 80–90° to soften the glue.
- After this, slide a plastic card under the touch panel and carefully move it over the gluing areas. Now you can move the touchscreen to the side.
- Next, turn the tablet over and warm up the aluminum case where the matrix is attached.
- Use a plastic spatula to pry up the display and carefully remove it.
Attention! If the tablet's touchscreen or matrix is not damaged, then there is no need to disassemble them.
The fact is that when the touchscreen comes off, it will most likely crack. Plus, the glue that has melted from the temperature will spread across the panel, and you will have to clean it.
We hope that our article will help you when disassembling your tablet. We wish you success and may your tablet never break!
How to remove the back cover of a Huawei tablet
The method for removing the cover depends on the specific gadget. Be careful not to touch the USB port. The difficulty is that the new models do not have a back cover. Manufacturers decided to make one-piece structures. This is not entirely convenient when you need to repair a gadget, replace the battery, or simply clean the elements of the device. But if you wish, you can remove this cover.
Below we provide specific examples. Before you begin, turn off the gadget. Clean your hands and tools that you will use for work. Ideally, it is better to use a set of special screwdrivers for repairing gadgets. If this is not available, then a regular plastic card will do. I