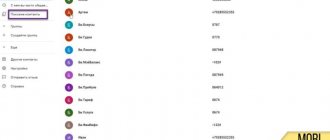
There may be several reasons for duplicate numbers in a phone book equipped with the Android operating system. These failures may be due to firmware changes in the operating system, during backups, or when resynchronizing contacts from a SIM card or other sources. For example, very often duplicates appear when installing WhatsApp and other applications where you can add subscribers. Sometimes the problem lies in the fact that the user has several SIM cards in his phone, and therefore they are copied from several sources at once into the device’s memory.
Problems and solutions
Unfortunately, users are not always able to quickly delete contacts from their phone, especially if there are a lot of them. As a rule, sometimes problems occur that are common on most devices.
Deleted entries are restored
If, for example, you deleted certain contacts, but after a certain time they still appeared in your phone book, it means they were restored automatically after synchronization. In this case, you can disable it (but it is not recommended).
- To do this, go to “Settings” and find the “Synchronization” tab;
- Select the accounts from which you want to disable it. Most likely, this is a Google account, which is why you choose it;
- And in the additional menu that appears, select what exactly you need to disable in synchronization. In our case, this is “Contacts”.
I don't see all the contacts that need to be deleted
Often certain recordings are saved on the SIM card rather than on your device, but they are duplicated with copies that are stored in the phone's memory. As a result, there are duplicates, but in fact you don’t see them, because display from other sources is not enabled. All this can be adjusted in “Contacts”.
- Go to the “Contacts” tab and go to advanced settings;
- Activate the “SIM Card Contacts” item here, and also click on “Contact Filter” and select all. Only in this case will you be able to see all the records that are loaded on your phone, not only from the SIM card, but also from different accounts, for example, WhatsApp and others.
Android Questions
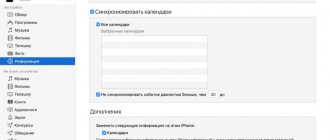
How do I configure settings for syncing and displaying my account on a mobile device?The Android operating system is designed in such a way that you can configure synchronization settings for all applications on your phone. It is also possible to configure the types of data that need to be synchronized for each account, and some applications (for example, Gmail, Calendar) have their own synchronization settings, and can also synchronize data from different applications.
Some, on the contrary, synchronize data only with the primary Google account. Some accounts have support for two-way data synchronization i.e. changes made to account information on a mobile device are automatically reflected in a copy of the same information on the Internet. For example, this is exactly how a Google account works.
To define synchronization settings you need to:
1. Go to Menu -> Settings -> Setting up accounts and synchronization
2. Depending on the type of account, a certain set of parameters will be displayed on its settings screen. Check or clear the checkbox next to the “Background data usage” parameter to specify permissions for data transfer in the background. For example, if you remove this flag from your Google account, the system will stop receiving information about new mail, Calendar will not be able to synchronize events and meetings, etc., until the data is manually updated.
3. Check/uncheck the “Auto-sync” box to enable/disable automatic synchronization of information located on the mobile device with information located on the Internet.
Manual synchronization:
1. Go to Menu -> Settings -> Setting up accounts and synchronization
2. Select the account whose data you want to synchronize, and then click “Menu” -> Synchronize
It is also possible to edit account synchronization settings. To do this, you also need to go to Menu -> Settings -> Account and synchronization settings, then select the account whose settings you want to edit. This will open the “Data and Synchronization” screen with a list of data to be synchronized. Accordingly, the marked elements will be synchronized.
3. Set the set of items you want to sync and disable the ones you don't want.
Note:
Unchecking the checkbox will not delete data from your mobile device: it will simply no longer be synchronized with the Internet version of this account. To delete information associated with this account, you will simply need to delete this account from your mobile device.
Top
Conclusion
As you can see, there are a lot of options for managing your phone book entries. In some cases, you have to combine records, in others you have to delete duplicates, and thirdly, you have to edit them manually. But at the same time, do not forget about the filters that we talked about earlier, so that the system actually displays to you the entire list of subscribers recorded in the phone book.
It is also worth considering that some models from different manufacturers, for example, HTC, Nexus, have their own built-in tools that combine contacts from different accounts, including Facebook, Skype and others.
18.09.2019
Repeated contacts are not a problem. The main thing is to be able to deal with them
Duplicate contacts can occur for several reasons. The most commonplace is the format of the numbers. Some smartphones still don’t understand that numbers that start with “8” and “+7” are the same numbers. Therefore, when you maintain contact, you most likely use the “eight”, and when you receive a call from him, it comes through the “seven”. As a result, both are stored in the device’s memory, taking up extra space.
Contacts + Features
The messaging and call log sections are quite basic and you can't compare them to dedicated SMS management apps like Go SMS and Evolve SMS. However, the app does show pop-ups on the screen to directly read and respond to incoming messages.
Link accounts and view social media updates in one place
The fun begins when you open the contact information in the app. Contact+ will display all related contacts for a person from their social media accounts and you can directly see all the updates from the user without having to open the relevant apps for them. The first time you use any of the services, you will need to log into your account and link a contact if it is not automatically identified. The app also syncs contact information, including their profile pictures as display images.
Merge duplicates and birthday reminders
Additionally, the app helps you merge duplicate contacts from different accounts. In the application settings, select the Merge duplicates option and the application will do the rest for you. The app also reminds you of upcoming birthdays right in your Android notification bar.
How to quickly clear duplicate contacts
Although there are a large number of ways to merge duplicate contacts, we will tell you about the most preferable ones. They all operate automatically, so you don’t have to delete or overwrite anything manually.
Many smartphones have a built-in duplicate contact cleaning tool. It itself identifies those contacts that are duplicated and simply merges them.
- To merge contacts, go to the “Phone” application - “Contacts” - “Settings” - “Manage contacts”;
Merging Contacts on Huawei
- Here, select the “Merge contacts” option and confirm the action;
- Check the list of contacts that the smartphone has identified as duplicates, and if everything is correct, confirm the merging procedure.
How to use Google Contacts
If your smartphone does not have this option, the Google Contacts service will come in handy.
- Open “Google Contacts” and go to the “Similar Contacts” section;
- Select them all and click on the merge button;
How to Merge Contacts Using Google Contacts
- If your account is configured to synchronize contacts with Google Contacts, the numbers will be exchanged automatically.
Subscribe to our channel in Yandex.Zen to read materials daily that are not on the site.
Initially, this material was supposed to be entirely dedicated to “Google Contacts”. However, in the process of preparing it, I discovered that I did not have synchronization with the service enabled, which means I could not merge contacts using it. Then I started looking for alternative methods and found the one I described first. However, even if it works for you, I strongly recommend turning on synchronization, because storing data in the cloud guarantees that you can always restore it on any smartphone.
Using a computer
Any smartphone running on Google's operating system is tightly integrated with their cloud. Google has implemented a web version of some mobile applications, such as:
- Contacts;
- Google Keep Notes;
- Calendar;
- Photo;
- Messages;
These are full-fledged versions of services that can be launched from any smartphone or computer. All changes made in the web version will be automatically transferred to the phone the next time it synchronizes with cloud services. To work, you will need an Internet connection and a Google account. We go to the official website of the search engine and enter the profile to which the smartphone is connected. In the pop-up window, enter your email address and password.
Important: this method only works if synchronization is enabled on your smartphone. Don't know how to combine your smartphone with your computer? Read the article: “How to synchronize Android with a computer”
Open the panel with services using the icon marked in the screenshot. An express panel will appear for quick access to frequently used products. If there is no “Contacts” item among them, click on “More”.
On the new page, go down to the “All Products” section. To speed up the search, press the key combination “Ctrl+F” and enter “Contacts” in the text field. Let's open it.
This is a complete phone book with all the numbers saved on the phone during the last data synchronization. Let's go to "Similar". The algorithm analyzes all numbers in advance and offers options for action. Records with similar names will be offered to be combined, and identical numbers will be deleted.
We recommend: How to copy text on your phone
Changes will be automatically made the next time you synchronize with the database. To speed this up, we recommend restarting your phone or turning the Internet on and off.
How to Delete Duplicate Contacts Using Google Contacts
Google offers two quick ways to remove duplicate contacts. Whichever you choose, the result will be the same: if the system finds entries with the same name in the phone book, it will combine them into a single contact. Moreover, if different phone numbers are indicated in duplicates, they will all be linked to a generalized contact.
Please note: these methods only work with contacts stored in your Google Account.
Merging Contacts on an Android Device
This option is suitable for devices from the Pixel, Nexus, Android One and Google Play Edition lines. If your gadget is not one of them, go straight to the “Merging contacts on the Google website” item.
Launch the Contacts application from Google (if it is not installed on your smartphone, download it from Google Play).
Contact Developer: Google LLC Price: Free
Open the program menu and select "Offers".
Click "Check duplicate contacts" and then "Merge" under the found duplicates.
Merging contacts on the Google website
Open your browser and sign in to Gmail using the account associated with your smartphone. Click Gmail → “Contacts”.
In the left panel, select “Similar contacts” and click “Merge” under the found duplicates.
After this, duplicate contacts will be deleted from the server, and if synchronization between devices is configured in your account, then from the smartphone.
For older smartphones (using an external application)
Since older versions do not have a built-in system function for clearing duplicates, the best option is to use applications from third-party developers. They are optimized for old and new systems, which makes this method universal. Cleaner is a time-tested app with a user rating of 4.7 out of 5.
Recommended: Fastboot Mode on Android
Go to the Play Store and enter “Duplicate contacts” in the search bar. In the first place upon request, the desired application will be. Download it using the green “Install” button.
For information: do not try to enter the phrase Cleaner into the search. Applications for cleaning your smartphone from debris and speeding up work will be shown. To learn how to make your smartphone work faster, read the material: “CCleaner Pro for Android”
We turn on the program. At the beginning, they will show 3 informational images telling about the functionality of the product, skip them. We give permission to access contacts.
With Cleaner you can back up your contacts. To do this, the program will ask you to register using Google or the social network Facebook. Click on one of the options and accept the license agreement.
Duplicates are divided into 2 sections:
- Contacts – entries with the same name;
- Phones – records that contain the same mobile numbers;
You can clear them manually, or click on the section highlighted in the screenshot below. It is responsible for automatic actions on entries stored in the phone book.
Click on the big blue button with connecting arrows. In the pop-up menu, select which data will be affected and tap on the “Merge” button at the bottom of the screen.
How to delete duplicate contacts using third-party applications
If your phone book contains duplicate contacts that are linked not to Google, but to other accounts (Viber, Telegram, etc.), these duplicates will have to be deleted manually or using third-party programs like Contacts Optimizer. Just select the desired account in it, click Tap to find duplicates, mark the duplicates and confirm their deletion.
Contacts Optimizer Developer: Compelson Labs Price: Free
Today, every smartphone owner has dozens, if not hundreds or even thousands of phones of a variety of people in his phone book. And among so many contacts there are bound to be duplicates.
There can be a lot of reasons for their appearance - you wrote down one number under different names, changed the SIM card, incorrectly configured the function for saving contacts, or you were “helped” by applications that have synchronization active. Be that as it may, you need to deal with duplicates and you don’t have to do it manually.
1. Using Google. Contacts"
If synchronization of contacts with your Google account is enabled on your smartphone, then you can simply go to the Google website. Contacts" and select the "Similar contacts" section. In it you will already see duplicates that can be combined with one click. And then the smartphone, if automatic synchronization is enabled, will independently update the phone book and delete duplicates. If synchronization is not enabled, then it will be possible to bring the entries on the website and in the smartphone to a common denominator using manual synchronization.
2. Using the function built into the smartphone
The vast majority of modern Android smartphones have a standard option for searching for identical contacts. It is usually located in the contacts section of the settings item, where it is possible to find and combine entries with identical phone numbers or email addresses. Therefore, if duplicates are bothering you, it’s worth spending a couple of minutes studying the phone book menu to solve the problem once and for all.
3. Using third party apps
If for some reason you are not ready to use standard tools or resort to the help of Google. Contacts”, at your service on Google. Play a lot of third-party applications for searching and merging duplicate contacts. In fact, this method cannot be recommended with a clear conscience, because no one can guarantee the safety of such software. But if you are not afraid of the prospect of giving access to your contacts to an unknown application, then, of course, you can use this method of clearing the phone book of identical entries.
4. Manually
When there are not many identical contacts or you are not ready to entrust such an important task to programs, you can get rid of duplicates in the phone book manually. To do this, you just need to independently select those records that you want to turn into one, and then select the function of combining several items together.
5. Disable the ability to display/create duplicates
A less radical way to deal with duplicate contacts is to simply disable the display of entries in the phone book, for example, from a SIM card or instant messengers, which often cause duplicates to appear. If this doesn’t seem enough to you, then the same messengers can generally be prohibited from synchronizing contacts in the settings.
As you can see, there are a lot of reasons for the appearance of duplicates in the phone book, but there are no less opportunities to combat this scourge. But there’s nothing complicated about it - just choose a method you like and spend a few minutes to get rid of identical contacts on your smartphone.
Want to know how to make anything from anything? Useful life hacks and fun DIY projects are waiting for you! Thank you. We have sent a confirmation email to your email.
Sometimes the phone creates two or more than two copies of the same contact. This happens mainly when you restart your device, synchronize contacts or change your SIM card and randomly sync all contacts.
This can be very cluttered and difficult to navigate through your contacts. If you have duplicate contacts on your Android smartphone, you may get confused as to which one is correct. You might even be able to message a legacy number.
Are you looking for an easy way to merge duplicate contacts? Don't worry, in my tips and tricks section I will show you several ways to remove duplicates.
How to delete contacts from an Android phone
How to delete contacts from an Android phone. There are situations in which you need to delete personal data from your phone. This could be a sale, transfer of the phone to other hands, or simply a desire to free the device from unnecessary information. Today we will figure out how to delete contacts from your phone.
We can delete contacts from our phone in different ways. The first is the simplest method, suitable when you need to delete one specific or several entries from the contact book:
- Open your phone book
- Use the search and find the entry you need
- Press and hold it
- In the menu that opens, click “Delete” and confirm your choice
Some firmware provides a tool to simultaneously delete contacts on Android. For example, in MIUI firmware this mechanism is organized like this:
- Open your phone book
- Go to its settings
- Go to the "Advanced" section
- Open "Batch Uninstall"
- Check the boxes for contacts to delete or click Select All
- Click "Delete"
If your firmware does not provide this feature, use the Contact Remover utility. The application takes up less than 1 MB, and its only task is to batch or completely delete contacts from the phone:
- If you want to select all contacts, then click “Select all”
- Click "Delete" and confirm deleting contacts
Disable synchronization with contacts
During synchronization with communication applications, contacts from them are added to the phone book. You can remove them like this:
- Open your phone settings
- Go to the "Other Accounts" section
- Select the application whose contacts you do not want to see in the phone book
- Turn off contact syncing for this app
Some applications do not have the ability to disable synchronization only with contacts, in which case you can completely exclude it from the list of synchronized applications. You can also not delete such contacts, but configure the display of contact sources. For this:
- Open your phone book settings
- Go to the "Display" section
- Open Contact Filter
- Select from which sources you want to see contacts
Remove contacts from Google
When you Sync with Google, your contacts are saved in your account. They can be viewed and edited through the browser of your phone or PC, and they can also be deleted:
- Go to Google Contacts
- Check the boxes next to contacts to delete
- Click the "Delete" button
To hide contacts that you don’t currently need, but may need in the future, click “Do not show in contacts.”
What to do if you deleted the wrong contact?
If you deleted the wrong contact from your phone by mistake, there is still a way to restore it. Try this:
- Turn off the Internet or synchronization as quickly as possible
- Go to Google Contacts
- Find an entry that was mistakenly deleted from your phone
- Copy the number somewhere
- Re-enter the contact into your phone
There are several reasons why duplicate numbers appear in the phone book on iPhone X/8/7/7 Plus/7/SE/6s/6/5c/5s/5/4s/4. The most common of them are that you recorded something twice, or duplicates appear as a result of using iCloud cloud storage for data storage. Agree, this is very inconvenient when your address book is in disarray. In any case, the user can always merge iPhone contacts with iCloud.
Unfortunately, the iOS platform does not provide a separate function for this; the user can only delete duplicates manually. Therefore, you simply cannot do without special software. The Tenorshare iCareFone utility has this function in its arsenal. With its help, you can not only manage your contacts on iPhone, but also quickly clear the telephone directory of identical numbers.
How to merge iPhone and iCloud contacts?
1. Download the Tenorshare iCareFone program from the official developer website and install it on your computer. Next, launch.
2. Connect your iPhone to your work machine using a USB cable. The program will automatically recognize your device: you will see your device name, type, amount of internal memory, installed software version and serial number.
3. Select the "File Manager" function. The option is located in the lower left part of the window. Then click on the “Contacts” section. (Please note that the program allows you to manage other types of files: photos, videos, music, applications, notes, etc.).
4. Using the “Add” button, you can add new contacts, indicating the first name, last name, contact phone number, and a note if necessary. As soon as you click the “Refresh” button, the contacts are automatically synchronized with your device (the button is located in the panel where the “Add” button is).
5. To remove duplicates, you must click on the “Duplicated” button. The program will automatically recognize repeating numbers and display them on your screen in a separate window. We mark the necessary duplicates with ticks. You can choose which name the contact should be kept under, and then click on the "Merge" button to merge the duplicates.
6. Now click on the “Refresh” button again to refresh the data on your iPhone. Ready! Now there are no duplicate contacts on your smartphone - the program has automatically merged them.
Tenorshare iCareFone is available in two versions - free (trial) and paid. The latter has advanced functionality. By the way, you can use this tool on both Windows and Mac. To install, select the desired version.
You use Android, you have a lot of friends, and your address book looks like just a chaotic list. You downloaded and installed your contacts in the account settings, indicated the address of Facebook, Twitter and Skype, and they all appeared in the address book: Petro, Petro, Petya and stuff like that. You see that the same contact is represented differently. Do you want to know what your contact is writing to you from all accounts at the same time - for example, a message via Facebook or a call on Skype.
By merging contacts, you can bring order to your address book
We collect all contacts.
For those who don't know how to collect contacts on your Android smartphone, you need to follow a series of simple steps.
The first step is you activate your Google account
. You do this the first time you turn on your phone's Internet services, Google Talk is automatically activated. Note, you can use multiple Google accounts, for example personal Gmail and work Google Apps with your domain. To enter your Google Apps account, you indicate your full Email.
Many people have a VKontakte profile. This is the number one social network for all users of the CIS - Ukraine, Russia and neighboring countries. To work in it you need to download a small program VKontakte SYNC, link to download the program download VKontakte Sync. After installing the program, go to Settings
Select
Accounts and synchronization
and enter your VKontakte credentials.
We set automatic background synchronization
and update accounts.
This profile is the default. You can enter your Facebook information or you can skip it. If activated, you will receive updates among your friends, in particular photos, status updates and comments on news and links. This function is available for each contact in the Events and Media sections. And in all kinds of widgets you will see generalized information. To be able to respond, you must install the Facebook application.
a little popular but rapidly gaining client that integrates with many news services and allows you to quickly share news and read news from news portals that interest you in one click. Each subscriber receives a so-called feed of short messages and headlines. You can add Twitter accounts with the built-in client by default
Skype
a program known as a unique way to make online voice calls and video calls without paying for call time between subscribers of the same program. You only use the Internet of your smartphone - Wi-Fi, or EDGE/3G. When you turn on the program, you can synchronize accounts directly from Skype. GPRS channel is not enough to make calls
You can also find third-party synchronization clients and other services.
In total, we get a whole bunch of contacts that you will have in your address book.
We unite all contacts.
Please note that each contact is assigned a last name and a first name. It is picked up from both VKontakte and Facebook, and they cannot be changed. Identical full names will be automatically combined, which somewhat simplifies our task. But if the contact is written in Latin and another in Cyrillic, auto-selection may fail. The second reason for auto-merging failure may be variations of Slavic names - Sasha and Alexander, Vasya and Vasily, etc. Such names will not merge.
- To connect one contact to another, select it and click on the Linked contacts field.
- Then select similar contacts in the dialog box.
- If the fields do not match - Last name, first name, email, numbers - click below All contacts and scroll through to find the one you need
- Click on a similar contact
- That's it, you've linked your account.
You can link up to 5 accounts into one contact
Sometimes the phone creates two or more than two copies of the same contact. This happens mainly when you restart your device, synchronize contacts or change your SIM card and randomly sync all contacts.
This can be very cluttered and difficult to navigate through your contacts. If you have duplicate contacts on your Android smartphone, you may get confused as to which one is correct. You might even be able to message a legacy number.
Are you looking for an easy way to merge duplicate contacts? Don't worry, in my tips and tricks section I will show you several ways to remove duplicates.
Merging contacts on your phone
Most Android phones have a built-in contact merging feature. The phone scans all contacts and deletes all duplicates with similar numbers and email addresses. On MIUI, you will find this option in the Contacts application.
To do this, open Contacts → Long press on the menu button → More → Merge duplicates
.
Contact + for Android
Once you install Contact+ and open it, a few welcome images later, you'll see all your contacts in a grid in the middle contacts tab. You can swipe left to open the messaging module, and on the right is the call log section. If you have assigned photos to your contacts manually or using any Facebook contact sync app, the grid will look really good. But if photos are missing for most of your contacts, you can switch to list view in the app settings.
Contacts are not arranged alphabetically, unlike most Android contact management apps, and the app's algorithm automatically sorts them based on call frequency.
However, you can always change it to AZ order in the settings. Long pressing on any of the contacts will give you the option to call, send SMS or email the contact. Each section has a small dialer icon at the bottom of the screen that, when clicked, opens the phone dialer for making calls.
You can also search for contacts using the T9 keyboard and its smart search will return matching contacts to you.
Merging contacts with third-party applications
The two above-mentioned methods are simple and accessible, one of them is in smartphones by default, and the second is Google. If you don't have thousands of contacts and hundreds of duplicates, these are perfect for you.
But there is another way - these are third-party applications; in the Play Store you will find a huge number of free applications for merging contacts.
How do you find and remove duplicate contacts?
Friends, have you used one of these methods to merge duplicate contacts on your Android phone? If not, try them and let us know if you encounter any problems. If you know of another alternative, you can leave them in the comments below.
Every year our phone books in smartphones are only replenished with contacts; the question of a limited number of entries has long disappeared. But over time, duplicate contacts may appear due to the fact that we add one person several times or after synchronizing contacts with different applications. In this article we will look at how to delete duplicate contacts.
How to Remove Duplicate Contacts Using Duplicate Contacts
If you haven’t cleared your phone book of repetitions for a long period of time, a decent amount of them could have accumulated. They can be signed differently, and this makes it difficult to remove duplicates manually. Therefore, to remove duplicate contacts, it is easier to use a third-party application.
How to merge contacts on your phone using Drupe and Google
But deleting duplicate contacts is not always the best solution. Different records about the same person may contain different information about him: additional phone numbers, date of birth, photos, addresses, and so on. In this case, it would be more correct not to delete duplicates, but to merge them.
The procedure for finding and merging duplicate contacts is as follows:
- Open your phone book settings
- Go to the " Advanced
" - «Merging duplicates
»
After checking your phone book, you will see contacts that are supposed to be duplicates and can merge them.
There are applications to replace the stock phone book that expand its functionality. An example of such an application is Drupe. You just use your phone as normal, and when the app sees that you can merge duplicate contacts, it simply prompts you to do so. All you have to do is confirm the merger.
If you are already, then you can merge duplicates directly from your PC. To do this, go to Google Contacts and go to the “Similar Contacts” tab. If there are duplicates in your contacts, you will see an offer to merge them. Click Merge All
» and sync your phone.
How do I configure settings for syncing and displaying my account on a mobile device?
Some, on the contrary, synchronize data only with the primary Google account. Some accounts have support for two-way data synchronization i.e. changes made to account information on a mobile device are automatically reflected in a copy of the same information on the Internet. For example, this is exactly how a Google account works.
To define synchronization settings you need to:
1. Go to Menu -> Settings ->
2. Depending on the type of account, a certain set of parameters will be displayed on its settings screen. Check or clear the checkbox next to the “Background data usage” parameter to specify permissions for data transfer in the background. For example, if you remove this flag from your Google account, the system will stop receiving information about new mail, Calendar will not be able to synchronize events and meetings, etc., until the data is manually updated.
3. Check/uncheck the “Auto-sync” box to enable/disable automatic synchronization of information located on the mobile device with information located on the Internet.
Manual synchronization:
1. Go to Menu -> Settings -> Setting up accounts and synchronization
2. Select the account whose data you want to synchronize, and then click “Menu” -> Synchronize
It is also possible to edit account synchronization settings. To do this, you also need to go to Menu -> Settings -> Account and synchronization settings, then select the account whose settings you want to edit. This will open the “Data and Synchronization” screen with a list of data to be synchronized. Accordingly, the marked elements will be synchronized.
3. Set the set of items you want to sync and disable the ones you don't want.
Note:
Unchecking the checkbox will not delete data from your mobile device: it will simply no longer be synchronized with the Internet version of this account. To delete information associated with this account, you will simply need to delete this account from your mobile device.
The Android operating system, like any other, is not perfect. Therefore, users may experience various problems, including with saved numbers. In this guide, we will tell you how to delete contacts on Android, how to get rid of double contacts and fix other address book problems.
Removing a contact from your phone book is easy. To do this, follow these steps:
Step 1
.
Launch the Contacts
(may also be called
People
depending on the OS version)
Step 2
. Touch and hold on the contact you want to delete until the context menu appears.
Step 3
.
Click the " Delete
" button and then confirm your selection.
Website from scratch
You can store an address book of names, email addresses, phone numbers, and other information from your Gmail account in Google Contacts.
Adding, editing and deleting contacts
If your interface differs from what's described here, you're most likely using an older version of Contacts.
In this case, use these instructions. How to add a contact
- Open Google Contacts.
- In the lower right corner, click Create Contact.
- Enter the contact's name.
- Click Create .
- Add contact information.
- Click Save .
How to change a contact
- Open Google Contacts.
- Click on the contact's name.
- In the top right corner, click Edit.
- Click Save .
You may not be able to change some contact information. Non-editable information is automatically added from:
- Google profile;
- corporate address book (in organizations and educational institutions);
- Google Maps (if this is company data).
How to delete a contact
- Open Google Contacts.
- Hover over your profile photo or icon and select the checkbox.
- If necessary, select several contacts at once this way.
- In the upper right corner, click on the icon.
- Click Remove .
Merge, restore and backup contacts
How to merge contacts
If you have multiple entries for the same contact in Google Contacts, you can merge them.
- Open Google Contacts.
- From the menu on the left, click Find similar contacts . If there is no such item, merge contacts in the old version of the service.
- In the top right corner, click Merge or Merge All .
How to restore contacts
If you deleted, synced, imported, or merged contacts, you have 30 days to undo any of these actions.
- Open Google Contacts.
- Click More Recover contacts .
- Specify the state at which time you want to restore contacts.
- Click the Restore .
Export and backup contacts
If you want to back up your Google Contacts or import them into another account, export them to a CSV or vCard file.
- Open an older version of Google Contacts.
- Click More Export .
- Select contacts to export.
- Select a format. To save a backup, click Google CSV .
- Click Export to save the file.
Automatically save contacts
Every recipient you've ever sent an email to is automatically added to the Other Contacts group, and their address may appear in the auto-substitution list when you enter a recipient for a new email.
How to prevent autosaving of contacts
- Open Gmail on your computer.
- In the top right corner, click on the Settings .
- Under Autofill Contacts, select Don't add contacts automatically .
- Click Save Changes at the bottom of the page.
How to open "Other contacts"
- Open an older version of Google Contacts.
- At the bottom left, click More contacts .
On Apple devices, the Other Contacts group does not appear.
You can view them on your Android device after adding your Google account. They will also be visible in apps that you allow access to Contacts. How to delete “Other contacts ”
- Open an older version of Google Contacts.
- At the bottom left, click More contacts .
- Select the contacts you want to delete.
- In the top bar, select More Delete contacts .
How to delete contacts from a SIM card
To delete contacts from a SIM card, you must first configure their display. The sequence of actions is as follows:
Step 1
.
Launch the Contacts
.
Step 2
.
Press the " Menu
" button of your smartphone.
Step 3
.
The application settings will open, click the " Display
" button.
Step 4
.
Set the “ SIM Card Contacts
” checkbox to the “
Enabled
” position.
Step 5
.
Return to the Contacts
, find the SIM card contacts that have appeared in the list of numbers (they will be displayed with the appropriate mark), select and delete them at your discretion.
Batch deleting contacts
Selecting and deleting each contact from the Android phone book individually is a rather labor-intensive and boring task if there are several hundred numbers on the phone. Therefore, you can use the batch uninstall function:
Step 1
.
Launch the Contacts
.
Step 2
.
Press the " Menu
" button of your smartphone.
Step 3
.
Click the " Advanced
" button.
Step 4
.
Click the " Batch Uninstall
" button.
Step 5
.
You will be returned to the Contacts
, where you can check the boxes next to the numbers you need and delete them with one click of a button.
Why do double contacts appear?
Installing different firmware on a smartphone and then synchronizing the data can lead to the appearance of double contacts on Android. As a result, the book of numbers can grow to indecent sizes, and the user will have to constantly wade through the jungle of identical contacts. This problem can be partially solved using the function of merging duplicates:
Step 1
.
Launch the Contacts
.
Step 2
.
Press the " Menu
" button of your smartphone.
Step 3
.
Click the " Advanced
" button.
Step 4
.
Click the " Merge Duplicates
" button.
Step 5
.
The OS will offer to find duplicate contacts and merge them. Click the " Merge
" button to start this operation.
How to Delete Duplicate Contacts on Android
Google tools
or third-party applications, such as
Duplicate Contacts
. Let's consider both options.
Google Contacts
Step 1: Launch your browser and go to google.com/contacts
.
Google account information
.
Step 3: Click the Find Similar Contacts
».
Step 4: Select duplicate contacts and delete them.
Duplicate Contacts
Step 1: Install and launch Duplicate Contacts
.
Step 2. The program will scan your contact list and show if there are duplicate numbers on your smartphone.
Step 3: Select and remove duplicate contacts.
Part 1. Merge Android contacts in one click
- Detects duplicate contacts and merges them.
- Deleting identical contacts entered several times.
- Move individual or multiple contacts from different accounts.
- Removes empty fields from saved contacts.
Easier merge of duplicates (star rating: 4.4/5)
Even simpler, Merge Duplicates is another Android app for merging duplicate contacts on your phone in a few simple steps. The program is available in multiple languages and can be downloaded directly from the Google Play Store by following the link below:
Some key features that the optimizer pins include:
- Simple and straightforward user interface.
- Scans and quickly merges duplicate contacts.
- Available in 15 languages.
- Easily manages your entire address book.
Merger + (star rating: 3.7/5)
Merge+ is another Android app to find and merge duplicate contacts in your phone's contact list in a few simple steps, even with your voice command. In addition to this, the app has several decent features that many of its competitors don't. The program is free and can be downloaded from the Google Play Store by following the link below:
Some key features that the + has combined include:
- Supports voice commands to merge duplicate contacts.
- Support for Android Wear, which means you can merge duplicate contacts from your Android smartwatch.
- The combined offer can be viewed directly on your Android smartwatch.
- Accepts voice commands even on your Android smartwatch and executes them efficiently.