Intro
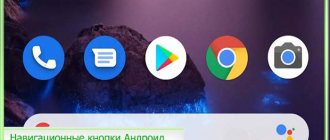
Let me be clear: I'm a big fan of the idea of on-screen navigation keys. All these houses, arrows and squares drawn right at the bottom of the screen. Yes, they take up some space (which, however, in most cases is not really needed), yes, perhaps they spoil the appearance of applications, but damn it, they are dynamic.
On-screen navigation buttons rotate with the screen, disappear when not needed, change color, and integrate seamlessly into the home screen interface. If we discard the very idea of the uselessness of the existence of three buttons at once (after all, Apple users make do with one and do not feel disadvantaged) and quite convenient navigation systems like PIE or the “MIUI navigation bubble”, then on-screen buttons are the best that has been invented before so far.
So here it is. For some reason, my wonderful, wonderful idea that there is nothing better than on-screen buttons is not shared by very many smartphone manufacturers. And they don’t even just not separate, but they don’t separate in a completely monstrous way, forcing you to use a smartphone with touch buttons (AAA!), equipped with dynamic backlighting (AAA-2!) and a “Back” button on the right side of the screen (AAA-3: decisive blow ).
The situation is extremely unacceptable, and given that the kind firmware developer did not provide any settings for activating on-screen keys and settings for controlling touch buttons, I had to make do on my own. There were two options for further action:
- bring the touch buttons to the desired state, namely turn off the backlight and move the “Back” key to the left side (even if it looks like a “square”, it’s even more interesting);
- disable touch buttons completely and activate on-screen buttons.
I don’t like third-party tools, so the decision to do everything myself came naturally.
GMD Auto Hide Soft Keys
A utility similar in function to Fulscrn Free. Allows you to hide the navigation and status bars. There is a panel in the notification shade in which you can select different combinations of hiding/showing panels in one click. Requires root rights and is not very stable on Android 6.
Possibilities:
- displays small triggers in full screen mode instead of panels;
- has a large “arsenal” of settings: you can change the size of the control panel in the notification shade, configure the location and size of the trigger, add an application to startup, and more;
- very similar to GMD Full Screen Immersive Mode in terms of functions, only it works more stable;
- In the paid version, you can disable the display of the trigger and the panel in the notification shade.
Advantages:
- flexible settings, especially in the full version;
- a functional panel in the notification shade, which allows you to select one of 4 display modes (for Fulscrn Free, only an on/off switch is available there);
- minimal restrictions in the free version compared to the paid version.
Flaws:
- poor performance with Android 6 Marshmallow;
- To work, you must have root rights;
- mandatory display of the trigger in the free version;
- lack of updates from the manufacturer after 2015.
First start:
After installing the application and launching it, you need to enable full-screen mode, then the display option can be configured through the notification shade.
GMD Full Screen Immersive Mode
A simple utility that can be configured in a few clicks. Allows you to hide the navigation bar, freeing up space on the gadget display for the user’s needs. It does not require root rights, unlike most others, but it does not always work stably.
Possibilities:
- hides the navigation bar as well as the status bar at the top of the display;
- can be adjusted to each specific application, providing full-screen mode in any program;
- the panels are “hidden” under the corresponding edge of the display, and their trigger can be configured by the user at his discretion;
- Display settings for each application can be adjusted through the panel in the notification shade.
Advantages:
- does not require root rights;
- installs the basic Android OS navigation bar, due to which the system performance does not deteriorate;
- is individually configured for each application installed on the system in the paid version.
Flaws:
- does not always work stably, in some applications it blocks the touchscreen;
- does not allow you to use the keyboard to enter in full screen mode.
First start:
After installing and launching the application, select “General” from the menu, then enable “Start on Boot” (to launch when the system boots) and “Notification” (to display the panel in the notification shade);
Launch a third-party application, open the curtain and select the operating mode in the GMD panel.
https://play.google.com/store/apps/details?id=com.gmd.immersive
How to remove the home button on the screen
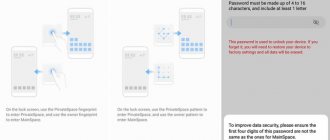
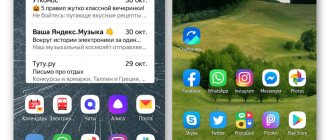
Huawei smartphones allow you to remove the Home button using a gesture-based navigation system and/or by removing the white dot associated with the Quick Menu from the screen.
Either way, all you need to do is launch the application. configuration (gear icon on the main screen) and first select the element System and then it is System navigation . All navigation systems compatible with the smartphone you are using will appear on the screen.
To remove three virtual buttons , click on the white ball which is located in the upper right corner (next to the inscription gesture ) And that is. The new navigation system will be immediately enabled and the Home button will disappear from the bottom of the screen.
If, on the other hand, by the term "start button" you mean a white dot that appears on the screen, all you have to do is click on the element. en is placed next to the Quick Menu , located in the System Navigation from the configuration .
After this, you need to move the Palanca connected to the Quick Menu en OFF and the white button will disappear from the screen.
If you have root access, you need to install any file manager that supports root access. For example, ES File Explorer, Root Explorer, etc. You will also need a Button remapper application to reassign the functions of hardware keys.
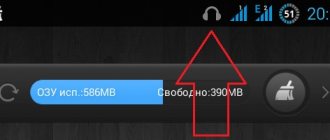
The screen is very often activated by accidental presses, the battery drains much faster
First you need to become the owner of your device, for which you need to get root access. It allows you to change system files that are locked for the standard disenfranchised user by default. Since Google and smartphone manufacturers are against root access, obtaining it is an individual process for each mobile phone model. Instructions for rooting your phone can be found on 4pda.ru.
If you have root access, you need to install any file manager that supports root access. For example, ES File Explorer, Root Explorer, etc. You will also need a Button remapper application to reassign the functions of hardware keys.
Go to /system/usr/keylayout in your file manager and make a backup copy of the Generic.kl file.
Open the original Generic.kl file as text in your file manager and find the line with the name key 172 and the value HOME. Replace HOME with APP_SWITCH. Thus, the “Recent Apps” function was assigned to the physical “Home” button. Find the line key 254 and replace APP_SWITCH with HOME. This assigns the Home button function to the Recent Apps touch button.
Restart your smartphone. Now, when you press the Home button, a list of recently launched programs will be shown. You can return to the Home screen by pressing the former Recent Apps button.
Because the Recent Apps button is a touch button, it does not work when the screen is off. Now pressing the physical Home button will not activate the display. If you are satisfied with this layout, you can leave it.
In order for the physical Home button to continue to return home, you need to reassign its function in Android. To do this, you will need the Button remapper application, which uses the standard OS “Accessibility” option.
Once you install Button remapper, give it access to the accessibility feature. To do this, when you first launch the program, you will be prompted to go to the appropriate smartphone settings menu, where you need to enable “Button reassignment”.
In Button remapper, click “+”, select the “Recent_Apps” button and set its action to “Home”. Press “+” again, select the “Home” button and set its action to “Recent applications”. Make sure that in both cases the "Replace system value" checkbox is selected.
When you click the first button, the navigation bar and status bar will darken, and when you click the second button they will appear again.
First, let's create the application markup with a large image. It would probably be convenient if the navigation bar was not displayed immediately upon startup, so that you could look at the picture better.
As a result, the panel will be hidden at startup, the panel will appear when you click on the screen, and the panel will become less visible when you click the button.
Speaking of dimming, it dims not only the navigation bar, but also the status bar above the header to sharpen the focus on the app itself. Let's rewrite the code to turn the effect on/off
First we find out the current settings using the getSystemUiVisibility()
, and then set new settings.
By the way, did you notice that there are two cats in the picture? Eh, you. (source)
When dimming and hiding, we used the ImageView element as the component that controls the visibility flags. Now the official documentation uses a different example where a View
, obtained through the
getWindow().getDecorView()
, although the comments say that the old way can also be used. Now we will look at this example, at the same time I will show how to reset all flags. For example, two buttons are enough.
When you click the first button, the navigation bar and status bar will darken, and when you click the second button they will appear again.
Users of modern smartphones today have a lot of options for managing their gadgets. At the same time, few people realize that a huge part of them is located literally at hand. Take, for example, the Home button. As a rule, we find one, or at most two, uses for it. But this key is much more functional than it might seem at first glance. And today we will find out all its capabilities!
Summing up
Manufacturers of Android OS smartphones are planning to use different navigation panels. Some of them are based on gestures. It is not worth switching completely to this control option. Virtual buttons, with certain settings, are capable of not only performing the required main options. They can be enabled, hidden, and configured to perform additional actions.
Content:
Today, many Android smartphones lack hardware navigation buttons and instead offer the user control of the device through a bottom panel with virtual buttons. This solution, of course, has its advantages: the devices are smaller in size and the ability to customize the sequence of virtual buttons on some devices. However, this solution also has disadvantages, and the main one is the reduction of the actual working space of the screen due to the navigation bar.
Google engineers have long found a way to compensate for this nuance by introducing into Android 4.4 “KitKat” the ability to run applications in full screen. However, not all developers have yet taken advantage of this opportunity, and many old games still run without hiding the bottom panel. But we are not only interested in games or videos. For example, it would be much more useful to use the entire screen to surf an Internet browser or social network clients.
Well, fortunately, Android is quite a flexible system, and in this article, I will tell you how to hide the navigation bar in any application using third-party applications.
Method number 1. GMD Full Screen Immersive Mode
This method is the simplest, because... does not require Root rights, but at the same time it requires Android version no lower than 4.4, and in general it does not always work correctly. However, it is worth trying it before taking on more serious tools - perhaps it will completely satisfy you.
- Download and install the GMD Full Screen Immersive Mode app
- After launching the application, go to the “General” section and check the “Start on Boot” checkbox so that the application starts when Android boots
- In the same section, check the “Notification” box so that the application buttons are displayed in the notification panel
- You can leave the Trigger section as default for the first few steps; you can change it at any time.
- Now, having launched any of the applications, swipe the notification shade and by clicking on one of the GMD Immersive icons, select what you want to hide: the bottom panel or the bottom panel together in the top.
- To exit full screen mode, swipe up on the trigger at the bottom of the screen.
Significant disadvantages of this application include the inability to call up the keyboard in full-screen mode, as well as incorrect operation in some applications. For example, TapTalk in full-screen mode did not respond to screen taps at all for me, but GMD Immersive performed well in most games.
Method number 2. Xposed + Ultimate Dynamic Navbar
This method is the most convenient, reliable and flexible, but requires Root and uses two different applications at once. Follow the instructions carefully and you will succeed.
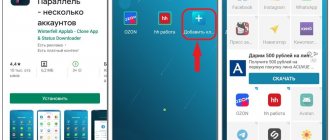
First we need the Ultimate Dynamic Navbar application
- Download and install the Ultimate Dynamic Navbar app
- Launch it and go to settings
- Place the top switch in the “On” position and check the box for “Autostart when turned on”
- You can adjust the rest of the settings to your taste later.
As you can see, we now have a “floating” navigation bar, but the standard fixed panel has not disappeared anywhere; to hide it, we need the Xposed Framework tool. I will tell you what this is in more detail in one of the following articles.
- Download Xposed installer and run it
- Go to the “Framework” section and select “Install/Update”
- Reboot your device and run Xposed installer again. The “Framework” section should now display the current version of the application
- Now go to the “Modules” section and check the Ultimate Dynamic Navbar module
- Now restart your smartphone - the old panel should disappear, and in its place a new floating navigation panel will appear, which can be called up by pulling the triangular trigger at the bottom of the screen.
2 2
I have the following code:
getWindow ().getDecorView () SYSTEM_UI_FLAG_IMMERSIVE_STICKY);
This code worked great for Android Lollipop, hiding the navigation bar in sticky dive mode. But now when I test it on my Android 6.0 phone, the navigation bar disappears and the black rectangle where the navigation bar used to be is blocking part of the screen.
2 answers
1 1
I'd like to add a solution that I use now that hasn't failed me since, I don't remember if I saw it somewhere else or came up with it myself, but I'm glad it works.
public static void activateFullscreen(Activity activity){ View decorView = activity.getWindow().getDecorView(); int uiOptions = View.SYSTEM_UI_FLAG_HIDE_NAVIGATION; if (Build.VERSION.SDK_INT >= 17) { uiOptions ^= View.SYSTEM_UI_FLAG_LAYOUT_STABLE | View.SYSTEM_UI_FLAG_LAYOUT_HIDE_NAVIGATION | View.SYSTEM_UI_FLAG_LAYOUT_FULLSCREEN | View.SYSTEM_UI_FLAG_FULLSCREEN |View.SYSTEM_UI_FLAG_LOW_PROFILE; } if (Build.VERSION.SDK_INT >= 19) { uiOptions ^= View.SYSTEM_UI_FLAG_IMMERSIVE_STICKY; } decorView.setSystemUiVisibility(uiOptions); }
Hope this helps someone!
which seems to have solved this problem. I support portrait and landscape orientation and noticed that the black rectangle disappeared if I rotated to landscape or launched the app in landscape. Adding the following code to the onCreate() method of my main activity (after setting the immersive flags) solved the problem:
if (Build.VERSION.SDK_INT >= 23) { setRequestedOrientation(ActivityInfo.SCREEN_ORIENTATION_SENSOR_LANDSCAPE); setRequestedOrientation(ActivityInfo.SCREEN_ORIENTATION_FULL_SENSOR); }
Similar questions
The best employers in IT
Hot vacancies
Team Lead .NET FullStack JB-233AllStars-IT Ukraine,Kyiv Senior JavaScript Engineer #6823Lohika,Kiev Head of Accounts ReceivableIdeals solutions,Kiev QA - Strong Middle/SeniorVimeo,Kyiv, Zaporozhye
Upcoming events
September 30 - October 11, KharkovJava Hiring Week October 2, KievOpen day / Open Day at QA START UP September 30 - October 11, KharkovJava Hiring Week
Many gadgets running Android OS today lack hardware navigation buttons. Device developers strive to increase the display diagonal, but at the same time maintain the small size of the gadget itself, which is why the navigation bar in many smartphones and tablets is implemented in software. It takes up part of the display, which could be used for games or viewing information, but it can be easily removed - more on that later.