Reasons for the microphone not working on the phone and how to fix it
The reasons for the breakdown may be different. Most often, a microphone may break due to mechanical damage or software failure. Also, the speaker may malfunction when running a certain application - Skype, Viber, Vk or any other that uses a microphone. Let's look at all the possible reasons in more detail.
Ingress of dust and dirt
When using the phone for a long time, dust and dirt can get into the small holes in its body. Gradually accumulating, they create mud plugs. A speaker that is dirty in this way may not transmit sound. To fix the problem, clean the device or entrust it to professionals.
Why doesn't my Samsung phone see an SD or microSD memory card?
The cable comes off (poor contact)
Another common reason is damage to the cable connecting the microphone to the motherboard. You can fix it yourself, using a soldering iron, if you have experience working with microcircuits. If you do not have such experience, we recommend that you contact a specialist.
Moisture ingress
If you associate the breakdown with your smartphone recently getting into water, try drying it. Disassemble the case and remove the battery, carefully lay it on a moisture-absorbing cloth in a dry room. If the phone gets very wet, dry all parts except the battery with warm air from a hairdryer.
If the back cover on your smartphone cannot be removed, turn off the device and place it in dry rice. The cereal will absorb excess moisture, drying the device.
Software glitch
Program malfunctions are also often the cause of a broken microphone. First, try simply rebooting your device - this may immediately fix the problem. When rebooting, remove the battery for a few minutes. After starting the smartphone, check the system operation. If the problem remains, we move on.
Check if your device needs an operating system update - downloading and installing a new version can fix many problems.
Connect the device to your computer via a USB cable. Check the operation of the sound driver.
Possible problems
The assistant stubbornly refuses to enter into dialogue - a sure sign that the operating system is not working properly or the microphone is damaged. Click on the purple search bar icon and try to access it “ manually ”. Try using a similar Google Assistant or other applications that use a microphone.
If, after all the above steps, Alice (like other assistants) does not respond, and regular phone calls are made without problems, then we recommend resetting your smartphone to factory settings.
Huawei microphone setup
To increase the microphone on your phone, you need to use a special menu for fine-tuning the device. The engineering menu or EngineerMode allows you to access manual adjustment and configuration of all parameters of the mobile device. To enter the menu, enter the code on the digital field and press the call button. Huawei smartphones use the following codes:
- *#*# 2846579 #*#*
- *#*# 2846579159 #*#*
In the engineering menu window, select Hardware Testing.
Here you can find the settings for the main modes of your smartphone’s service devices. The micro volume is adjusted through the Android engineering menu in the Audio item. Volume levels can be set within the specified values. After changing the volume level, you need to save the new data with the Set button. In some smartphone models, the engineering menu, after fine adjustments, is completely blocked and the user cannot make his own changes. In this case, you need to download one of the following utilities from the Play Market application:
- Mobileuncle Tools
- Shortcut Master
With their help, you can enter hidden settings and manage Android system tools.
Managing chat participants
The conference organizer can manually mute or unmute a participant's microphone, eliminating outside noise during the lecture. To do this in the program:
When it is necessary to prohibit turning on the microphone so as not to interrupt the conference organizer:
Now no one who entered the chat will be able to transmit a voice signal until the organizer allows it. The program does not provide for simultaneous disabling of video, but the webcam can be blocked for newly arrived chat members.
On smartphones, muting the sound for all users is the same as on a computer:
- Expand the “Participants” tab;
- tap on the person's name;
- In the menu that opens, select “Mute Sound.”
When the organizer needs to stop audio from all sources:
- open “Participants”;
- At the bottom, click on “Mute everyone.”
How to block unauthorized video recording and listening on Android
In this article we will tell you how to avoid tracking your personal data through your smartphone or tablet. We will do this by forcibly disabling access to the microphone and camera for applications, as well as resetting the advertising identifier and geolocation: it is no secret that the Internet actively “monitors” users, after which they offer advertising relevant to your requests. You yourself have encountered this more than once, but did you know that Android devices “listen” to all your conversations, even those in blocking and low-power mode. Then these records are sent to no one knows where, what your Internet traffic is spent on (how to control traffic).
How to block unauthorized video recording and listening on Android
Contents - How to block unauthorized video recording and listening on Android
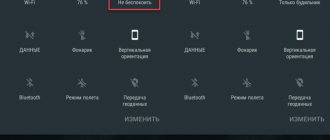
- Disabling microphone access on Android
- Disable access to the Android camera
- Reset advertising identifier and block geolocation
Simply put, your device automatically turns on the microphone (sometimes even the camera) during a conversation and after that can show contextual advertising on the topic you discussed. This applies not only to Internet sites, but also to advertising on social networks and applications.
You can find a huge number of stories with evidence of surveillance by applications, for example: a person never looked for hammer drills on the Internet, did not look at pictures on a similar topic, but only discussed it live with a colleague. After some time, contextual advertising on all sites and applications offered “profitable” offers from online stores. Coincidence? Don't think!
In the fight to protect your personal data, two wonderful applications will help you, which will block access to the microphone and camera to absolutely all programs and services, and they will also show the applications that tried to gain access. Of course, this will require Root rights.
If you want to independently control access to your microphone, then you should use the “Mic Lock - Antispy & Spy Protection” application. In the instructions below we will tell you how to set up this program and thereby protect yourself from possible eavesdropping.
Disabling microphone access on Android
- We launch the application, view information from the developers and get to the main menu.
- Before blocking access to the microphone for absolutely all programs, you can see which applications have access to the microphone. To do this, click on the ellipsis in the upper right corner, go to settings and select “ Applications that allow the use of a microphone .”
- In the settings, you can also create a widget for the desktop that launches an application in which the microphone blocking is automatically removed.
- The spy detector allows you to identify spyware that can collect and then transmit data to third parties, putting you at risk.
- Changing the blocking mode allows you to either save battery power, thereby weakening the protection, or, on the contrary, get maximum protection while consuming more power.
- To turn off the microphone in all applications, just click on the red icon with an open lock on the main page of the program, after which it will turn green.
If you read the news about a vulnerability found in Android, which allows you to create photos and videos without your knowledge and then send them to an attacker, then you can protect yourself with the “ Camera Lock - Antispy & Spy Protection ” program.
Disable access to the Android camera
- After launching the application, we get to the main menu, where a lock with a yellow camera will be displayed. This means that the device is not protected and absolutely all applications can use the camera.
- To activate the blocking function, you need to click on the icon and then select “ Activate ”. The icon will change color to blue and you can feel more secure.
- In the settings, you can also view the list of applications that have access to the camera with the ability to immediately remove questionable ones.
- There is also the ability to create a widget for quick access to the program/game you need without restrictions on access to the camera.
When the camera or microphone is locked, you will not be able to delete applications using the standard method. You will see the message “ Deletion failed ” - this is a simple protection against unauthorized deletion. Uninstall application there . Using these programs significantly increases battery consumption. But if you don’t want to be wiretapped, much less someone knowing about your personal life, then we advise you to use one of these applications. It's easier to charge your device than to delete information from the Internet.
Reset advertising identifier and block geolocation
As an additional measure, you can clear the advertising identifier and block Google apps and any other apps from accessing Geolocation. To do this, use the gif with instructions below:
As an equally useful measure for blocking tracking, we recommend instructions for blocking ads on Android devices
How to turn off your camera and microphone in Zoom
From the app's home screen, tap the Settings button at the bottom of the navigation bar.
You will be redirected to a page where you need to select the “Conference” option. Here we need to make only two touches. Activate the following options:
- “Always mute my microphone”;
- “Always turn off my video.”
When you need to directly participate in the conference, i.e. to show your face or say anything, click on these icons. Their status will change to active and your phone's audio and video devices will automatically be activated.
That's all the settings we can change. Now the question of how to turn off the camera and microphone in Zoom should no longer bother you. Each time you log into the application, they will be disabled permanently. Thank you for your attention!
Changing the volume through the engineering menu
To change microphone settings, you can use the engineering menu. You will need a special code specifically for your smartphone model. You can find it in the instructions for the device or on the manufacturer’s website. It looks like *#*#******#*#*, where the asterisks are the code for your smartphone.
How to reset a Samsung tablet to factory settings
To enter the engineering menu, go to the call menu and enter your code in the field for entering the subscriber number. Press the call button. A list of system settings will appear on the smartphone screen.
We need the “Audio” item. Depending on the smartphone model and Android version, the menu may contain different items. From the general ones we highlight:
- Normal Mode – standard speaker sound, without a connected headset.
- Headset – sound level in headphones.
- Headset Loud Speaker – sound level during a conversation through a headset.
- Debug Info – button to reset settings to factory defaults.
- Loud Speaker – sound level during speakerphone.
Opposite each line you will see two columns of numbers - with the current value and the maximum. You can increase each parameter to its maximum value. To adjust the numbers, press the Set key.
The necessary conditions
- Zoom client for PC
- Zoom mobile app
Windows | Mac
Screen demonstration
Screen sharing menu
Once you start screen sharing, the conference controls move to a menu that you can drag anywhere on the screen.
Using two monitors
If you're using a dual-monitor setup, you can enable the Use Dual Monitors to view your screen share on one monitor and your participants on the other.
Linux
Screen demonstration
- Click the Screen Share located on the conference toolbar.
- Select the screen to show. You can also select a separate application that is already open on your computer, the desktop, or a message board.
- Click "Screen demonstration".
- The Zoom app will automatically switch to full screen mode to optimize screen sharing. To exit full screen mode, click "Exit Full Screen Mode" in the top right corner or press the Esc .
- To disable automatic entry into full screen mode when viewing a screen share, disable this setting in the PC client settings: Automatically enter full screen mode when viewing a screen share .
Screen sharing menu
Once you start screen sharing, the conference controls move to a menu that you can drag anywhere on the screen.
Using two monitors
If you're using a dual-monitor setup, you can enable the Use Dual Monitors to view your screen share on one monitor and your participants on the other.
Android
On the Android operating system, you can stream content or share your screen.
Note.
Content Showcase
Screen demonstration
An Android device allows you to share your entire screen, including all applications installed on the device. To share the screen of a device running Android 5.0 or higher, follow these steps:
iOS
iOS allows you to demonstrate the following.
Please note that some of these settings may be disabled in your Account Settings under Integrations.
If you want to share your full screen in an older version of Zoom, see the iOS app demo.
Did you know?! How to change the background in Zoom on your phone
Content Showcase
- Click Share Content in the meeting controls.
- Select the content type to showcase.
- For example, selecting Google Drive will display a number of documents that you can share. Select the documents to show, and then click Show in the top right corner.
- After this, the content in the conference begins to be demonstrated.
Note. On an iOS device, you cannot use comments while sharing your entire screen in a meeting. If you want to use comments when sharing your entire screen in iOS, see Share iOS Apps.