(28 Votes) In any case, the standard font on an Android smartphone or tablet satisfies the user's needs. It has a nice look and is usually a comfortable size. But there are always users who don’t like something, or want to change something, or just want to stand out from the crowd. And there is always that small group of people who constantly tinker with Android fonts for their own satisfaction.
If you belong to one of these groups, or to two at once, then you are on the right page. What Android can always be praised for is its flexibility in settings; it even allows you to change the font that is used in the user interface. But this does not mean that changing the font is so easy; in some cases, doing this requires a little more knowledge than that of an ordinary user.
In this article, we will describe a guide on how to change the default Android OS font using two different methods: one does not require rooting the device, the second requires rooting.
We do without rooting (no Root)
We use EOM skins
The original Android firmware does not have the ability to change fonts. You won't be able to change the Nexus font of your smartphone or tablet that easily - although it is possible. Not even all AOSP firmwares, like CyanogenMod or AOKP, have this feature.
But when EOM giants like Samsung and LG got their hands on the AOSP code, they added to their skins the ability to easily change the font through normal device settings. For example, Galaxy S2, Galaxy S3, Galaxy Note, Galaxy, Galaxy Note 10.1, and even Galaxy Camera have several types of fonts, in addition to the standard one, but if you want more, then go to the Google Play Store.
Some LG smartphones also have similar functionality, but instead of Google Play Store, you will be redirected to LG Smart World.
In order to change the font on these devices, you need to perform a few simple steps: Settings->Display->Font Style ( Settings>Display>Font Style
). Then select the appropriate font and click on the “Confirm” button. The new font will be applied instantly, you don’t even need to restart your device.
Using the popular GO Launcher EX
Another method that does not require rooting the device is using different launcher applications. Some of them have the function of changing the font, but many do not.
One of the most popular launchers that supports the font changing function is . Its only drawback is that it does not change the font in applications and the Android system menu. Other fonts apply only to certain parts of the launcher interface, but not to the entire system.
And so, we perform the following actions:
- Copy the TTF font file to the directory: .. /sdcard/GOLauncherEX/fonts
; - Open GO Launcher EX;
- On the home screen, press the “Menu” button (represented as 3 dots) or drag the screen up;
- Now click the “Preferences” button to
go to the GO Launcher settings page; - Now select “Visual Settings ”
; - And select the “Font” tab on
the left; - Click on the “Scan Font” button so
that the application can find the available fonts that you copied to the folder: ..
/sdcard/GOLauncherEX/fonts; - After scanning, select the font that suits you best.
The changes will take effect immediately. No reboot needed.
iFont (Samsung devices only)
The popular iFont application can also be used to change the font, but only for Samsung devices. Although sometimes it happens that this application even works on some MANUAL non-Samsung devices.
We repeat the steps again:
- Allow installation of applications from “Unknown sources”, usually this function is enabled
- Settings->Security;
- Load iFont and click on the Online tab;
- Now click on the name of the font that you want to install;
- Click on the Download button;
- Next, click on the Set button, or go: Settings->Display->Font Style (Settings>Display>Font Style) and select the downloaded font.
The font will be applied immediately. No reboot required. The iFont application is distributed free of charge.
Methods requiring rooting (Root)
Important
: having root rights, you can change system files, and in case of an error, you can turn your smartphone into either a completely unnecessary thing or a keychain, so be careful!
This instruction is written for educational purposes, so there is no guarantee that it will work correctly in your individual case.
By following these instructions, you act at your own peril and risk, and we do not bear any responsibility for the consequences.
We use special applications
For manual Android devices, there are many applications that allow you to change the font. You can download all of them from the Google Play Store, but the most popular are Font Installer and iFont.
For manual Android devices, it is perfect for this task. It even has a built-in font preview feature. Therefore, when choosing a font, you can always see how it looks before installing it.
The application is distributed free of charge. To install the TTF font that you saved on your device :
- Copy the TTF file to the device, preferably to the directory: /sdcard
; - Download Font Installer;
- Before installing a new font, make a backup copy of the default font: select Menu->Backup/Restore.
Click
Backup.
If Superuser or SuperSU asks for permission and rights, provide them; - Now go to the Local tab and find the copied TTF file;
- Click on the font file, the “Install” command will appear in the pop-up menu, select it;
- If Superuser or SuperSU asks for permissions again, provide them.
- After installation, Installer will ask you to reboot your device, answer “Yes”.
iFont
Unlike Font Installer, iFont can even work with non-Samsung devices. But to use this application not only on Samsung devices, you must root it.
Download, install and apply the font from the Online tab:
- Select the font;
- Click the Download button;
- Now click the Set button;
- If a pop-up window appears asking you to set the mode, click System Mode;
- Now the device will reboot to apply the new font.
You can also install the copied local font (TTF file) to the /sdcard/ifont/custom directory. To do this you need:
- In the main iFont window, press the Menu button;
- Now select Settings -> Change Font Mode .
If you are using a manual non-Samsung device, then press: System Mode, and if a manual Samsung device, then Samsung Mode; - Go to the Custom tab;
- Select our font and click the “Set” button;
- If you are asked to set the mode again, select System Mode.
Manual method using ADB
Up to this point, everything was very simple and it was not necessary to have root rights, but in this method, these rights are necessary, since we will be dealing with files in the protected / system/fonts directory.
One such font installation method is using Android Debug Bridge (ADB). To use it we need:
- Handmade Android device;
- Computer with Android Software Development Kit (SDK) installed;
- If the computer is running Windows, then all the necessary drivers are needed to recognize our Android device;
- ADB must recognize our device;
- USB cable;
- TTF files of the required fonts.
In this example we are using the font Times_New_Roman.ttf,
which should replace the standard
Roboto-Regular.ttf.
Let's get started:
On your computer, rename Times_New_Roman.ttf
in
Roboto-Regular.ttf
;
Now copy the so-called Roboto-Regular.ttf
file to the device directory
/sdcard;
Launch the command line on your computer;
Run the command:
- adb shell
This is how we humans are designed, that we want to do everything for ourselves so that it differs from others and stands out from the general “gray” mass. Smartphones are no exception to this either. In addition to external changes and decorations, you can also change the internal interface of the device. In this post I will tell you how you can change the font on Android, one of the most popular operating systems for tablets and phones. Today there are two ways to change the font: 1. With normal user rights 2. With superuser rights - root.
The easiest way
- first. You can easily change the font in Android (including 5.0 and 5.1) without having a lot of problems. But with this option, a lot depends on your device. Firstly, some versions of Android have a built-in tool for changing fonts. To use it, go to the settings of your smartphone and open the “Screen” or “Display” section, and in it - the “Font” or “Font Style” item:
Click on this button and you will get a window with a selection of available fonts, allowing you to use the built-in options or download new ones from Google Play.
But again, this functionality is not available on all phone models. In this case, you can use the so-called launcher - this is a special shell for Android that changes the appearance of the usual system interface to another, more interesting and beautiful one. For example, GoLauncher. As a rule, such programs have many themes that allow you to customize the appearance as you please.
You just need to install it through the Play Store and configure it the way you want. Some mobile phone manufacturers already install their own launcher from the very beginning - for example, Asus, Samsung, LG, Lenovo or Huawei. Then it’s even simpler: you don’t need to install anything - just go to the settings of the installed launcher and change it the way you need! Another option is to install programs that allow you to change fonts in Android.
Second way
works only after obtaining superuser rights - root in the system.
Without them nothing can be done. After this, you will need to install a special program that can change fonts. For example, HiFont
is an excellent free program that supports a large number of devices, including the Samsung Galaxy.
The HiFont application has hundreds of different fonts in its library, supports downloading from the Internet and creating your own style. In addition, you can always return the standard one back without any problems. The second excellent, stable and simple program is Font Installer
, which has no less rich capabilities than HiFont. It also requires RUT rights to work. When working, it allows you to make a backup copy of standard Android fonts and you always have the opportunity to return everything back if necessary.
The only negative is that not all fonts offered by the application support Cyrillic. The operation of Font Installer is incredibly simple - we launch the program, select a font, and view the result using the “Preview” button. If you like it, install it by clicking “Install”.
For most users, the default font on your Android phone or tablet is sufficient. It's nice and usually the right size for comfort. But there will always be Android users who want to change the font and stand out from the crowd. And there is always that small category of people who love to customize their device and will tinker with fonts, themes, etc., just for their own pleasure.
If you belong to one of these groups, you have come to the right page. The biggest advantage of Android is its customization capabilities, it even allows you to change the default UI fonts. However, changing the font is not always easy. In many cases, changing the font will require technical know-how.
This guide will show you how to change the font on Android. We will look at two methods: one without root rights, and the second with .
Changing the font on Samsung phones and installing your own fonts
Samsung phones, as well as some LG and HTC models, have an option to change the font in the settings.
To change the font on Samsung Galaxy easily, you can follow these steps
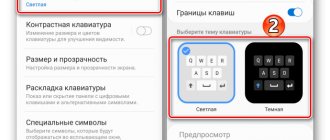
1. Go to Settings - Display .
2. Select the “ Font and screen scale ” item.
3. At the bottom, select a font, and then click “ Done ” to apply it.
There is also a “ Download fonts ” item, which allows you to install additional fonts, but all of them (except Samsung Sans) are paid. However, you can bypass this and install your own fonts, including from ttf font files.
There are several approaches to installing your own fonts on Samsung Galaxy phones: before Android 8.0 Oreo, FlipFont fonts (these are the ones used on Samsung) could be found on the Internet and downloaded as an APK and they were immediately available in the settings; fonts installed also worked properly using the iFont application (discussed further in the section about “ other Android phones ”).
If your smartphone is running Android 7 or older, you can still use these methods. If you have a new smartphone with Android 8 or 9, you will have to look for workarounds to install your fonts.
One of them, the simplest and currently working (tested on Galaxy Note 9) is using the ThemeGalaxy application.
First, about the free option of using this application to change fonts:
1. After installing the application, two icons will appear in your list: to launch Theme Galaxy and a separate one - “ Themes ”. First, launch the Theme Galaxy app itself, give the necessary permissions, and then launch “ Themes ”.
2. Select the “ Fonts ” tab, and in the corner, instead of “ All ”, select “ Cyrillic ” so that only Russian fonts are displayed. Free fonts from Google Fonts are available in the list.
3. Click “ Download ”, and after downloading - “ Install font ”.
4. Reboot your phone (required for Samsung with Android Oreo and newer systems).
5. The font will appear in the phone settings ( Settings - Display - Font and screen scale ).
The same application allows you to install your own TTF font (which are available in abundance for download on the Internet), but the function is paid (minimum 99 cents, one-time). The path will be as follows:
1. Launch the Theme Galaxy application, open the menu (swipe from the left edge of the screen).
2. In the menu under “ Advanced ”, select “ Create your font from .ttf ”. The first time you try to use a feature, you will be asked to purchase it.
3. Specify the name of the font (as it will be displayed in the list in the settings), and specify the location where the font file is stored on the phone (you can also put the font files in the folder themeGalaxy/fonts/custom/ and about.
4. Click " Create ". Immediately after creation, the font will be installed.
5. Reboot your phone (new Android versions only).
6. The font will appear in the settings and will be available for installation in the interface of your Samsung.
Another application that can install fonts on Samsung is AFonts. On Oreo it also requires a reboot, creating your own fonts requires purchasing a function, and there are no Russian fonts in the catalog.
Additional methods for installing fonts on Samsung Galaxy with new versions of Android are available here: https://w3bsit3-dns.com (see section Fonts for Samsung on Android 8.0 Oreo ).
Change font on Android without root (root)
Despite the fact that Android itself does not have the ability to change the system font, many manufacturers have added such a feature to their smartphones, which makes it easy to change the font on Android of these smartphones. These manufacturers include large companies such as Samsung, HTC and LG.
The process may vary depending on the specific phone, but you can find this option in the settings. It is usually located in the "Screen" section. In this section you can change the font size, and on some phones, the style.
For example, some Android devices from Samsung have several default fonts that can be changed at any time. If they are not enough, you can download more from the Play Store.
To change the font on Samsung, HTC and LG phones, follow these steps:
1: Go to Settings
your device.
2: In the “Screen”
, select
Font Style
.
3: Tap a font
that you want to install.
4: Changing the font happens instantly
and there is no need to reboot.
The selected font will change throughout the interface of your device, including: status bar, system menu, messages, applications, and so on.
Applications from the Play Store
The manufacturer of your smartphone didn’t make it possible to change the font, but you don’t want to do the routine? Dont be upset! There is another way to change the font on Android without root access - this is the Launcher. Some launchers have a feature to change the font without installing themes.
GO Launcher
One of these launchers is the popular launcher - GO Launcher. To change the font in GO Launcher, follow these steps:
- Copy
your
TTF font files to your phone
(to any folder). - Open GO Launcher.
- Find the Tools
and open it. - Click the Launcher Settings
. - Find and click on the " Font
" button. - Click " Choose a font
". - Click on the font
you want to install.
Changes to the system will occur instantly, without the need to reboot. Advice, if you download fonts from the Internet, make sure that they support Cyrillic.
One of the most is Apex Launcher. With it you can set your favorite font. You mean that it only changes the font in the launcher itself and that the application is quite expensive.
- Select Home Screen
. - Click Layout & Style
. - Finally, choose the font you want to use for your home screen.
If you want to change the font on retired apps, there is a way to do it using Apex Launcher:
- Go to Apex Launcher settings.
- Click on App Drawer
. - Click on Layout and Application Icons
. - Finally, scroll down and then tap Fonts
and choose which font you want to use in the app.
Finally, you can change the font for folders in phones by following the steps:
- Go to Apex Launcher settings.
- Select Folders
. - Finally, scroll down and then click on Font
and select what font you want to use for the folder.
iFont app is designed to change fonts on Android. Previously, the application only supported Samsung devices, and not all of them. But today the developer says that iFont supports Samsung, Xiaomi (MIUI), Meizu, Huawei (Emotion UI) and HTC, Sony and Motolora (root required).
iFont is distributed free of charge and has unobtrusive advertising. The application works quite well on several smartphones that I tested (including Xiaomi Redmi Note 4, Huawei Nova 2).
Changing the font on a Huawei phone
The design of the text on Huawei can be changed in the settings. The result is a phone with large font, standard or smaller. If you want to change more than just the letter size, you will need to install a font replacement application. Phones from the manufacturer Huawei support the FontFix program if the gadget has an Android version no older than 4.1. FontFix contains a menu of 4 thousand fonts, which, unfortunately, are not sorted by input language. To find a convenient Cyrillic font you will have to work hard.
Change font on Android with root (root)
Attention!
If you have root access to your phone or tablet, you can change , but in doing so you may harm your device. So be careful.
- The information in this manual is provided for educational and educational purposes only. There is no guarantee that these instructions will work on your device.
- Use these instructions at your own risk. I do not take any responsibility for what happens to your device as a result of your use of the information in this guide.
- Please read all instructions carefully before following them.
Applications from the Play Store
An easy way to change fonts on rooted Android devices is to use font changing apps. There are several such applications on the Play Store. Most of them offer the opportunity to preview how the device will look after installing a new font.
In this section, we'll look at two font changing apps: FontFix and iFont.
FontFix
FontFix is a great free app for changing system fonts on rooted phones. It has a built-in font preview feature, so you'll know exactly what your fonts will look like before you install them.
To change the system font on Android, follow these steps:
1: Save the file of the desired font (TTF extension) to your device, preferably in /sdcard
.
2: Before replacing your system fonts, create a default font for your existing ones. Go to “Menu” (three dots) -> Settings and select Backup/Restore
. If Superuser or SupereerSU asks for permission, give it.
the circle with a plus (+) in the lower right corner
, File Explorer will open, find your TTF file.
4: Click on TTF file
, a preview window will open, click on the circle with a plus (+) again.
In the pop-up window, click INSTALL
.
5: If Superuser or SupereerSU asks for permission, grant it.
6: The application will prompt you to restart your device. Click Yes.
Conclusion
Changing fonts on Android is not an everyday task that most people do on their phones and smartphones. Among those who really need to change the fonts on their devices: can this be done or not, and if so, in what way.
What font is currently installed on your Android device? Have you ever changed it? If yes, have you used the methods described in this guide? If not, how did you change your system font? Tell us your method.
The Android operating system is one of the most flexible, convenient, and user-friendly. It offers ample opportunities for customization, but, unfortunately, its basic functionality does not include the ability to change an important visual element of the system - its font
.
In an effort to add the option to change the font, some developers independently add this feature to their gadgets, while users of other devices are recommended to use third-party applications that must be installed on their phone. In this material I will tell you how to change the font on Android, what tools will help us with this, and how to use them. Changing the font on Android OS
How to change italic color
Before you change the font color on Android, you need to open the “Settings” on the device. Then you must follow the following procedure:
- Find the "Font" .
- Click on the line “Display scale” . There are several options here that control the font, color, and size. You should select “Color” , then find the one you like or create a new one using the color ring.
- After all the steps, click “Done” .
If this option does not suit you for some reason, then you can root the device, and then modify anything in the interface.
May be interesting : How to install a font in Word
How to change the font on Android - implementation features
As I noted above, the initial functionality of the Android OS does not require the user to change the system font. To eliminate this drawback, a number of developers (in particular, Samsung, HTC and LG) have built several fonts into the operating system of their gadgets, giving the device owner the opportunity to choose the font they like from the presented options.
Owners of smartphones from other developers need to use third-party software tools (for example, “GO Launcher”, “iFont”, “Font Installer”, etc.) that allow you to change the base font on your gadget (in most cases, such changes require root). rights).
Selecting a base font on a Samsung phone
How to change the font on Android gadgets
Let's move on to a description of ways to change the font on Android. As I mentioned above, some of them require root access, while others work just fine without them.
Method number 1. Use the built-in capabilities of your smartphones
Row, HTC and LG kindly provided the opportunity for the owners of their smartphones to choose a font convenient for them. Typically, the functionality of such gadgets has several fonts to choose from, and Samsung users can also download additional fonts to their smartphones (both paid and free).
https://youtu.be/VKPb_x_IOf8
Other fonts from the Samsung store can be installed by following the path described above and clicking on the “Download fonts” button (the price for paid fonts usually ranges from 1 to 3 US dollars).
Method number 2. Use third party apps
This method involves installing a number of applications on your smartphone that allow you to change the font on your device. Let's move on to consider them.
FontFix application
It is one of the best applications for changing the font on Android, but only if you do not own a Samsung device (devices from the specified developer often block the normal operation of FontFix).
As for root rights, gadgets that support FlipFont technology (for example, HTC Sense) do not need to obtain these rights for FontFix to work properly. For other cases, the presence of root rights on your gadget is mandatory.
- All you need is to launch this application, select the font you like and click on the “Install” button.
- At the same time, for comfortable operation of the application, you must allow installation from unverified sources in your phone settings (“Settings” - “Security”, check the box next to the “Unknown sources” option).
At the same time, the functionality of the application allows you to get fairly complete information about the selected font, including its dimensions in memory, a basic description, and so on.
Use FontFix to change font
iFont app
- another popular application for installing fonts on your Android OS. Like FontFix, this application does not work well with Samsung phones (for example, it does not work at all on the S7 Edge).
In the settings menu of this application, you will need to indicate the manufacturer of your gadget, and the program will try to bypass restrictions that block the installation of new fonts without root rights (which greatly simplifies working with the application).
The advantages of iFont include its high capabilities for working with fonts of languages other than English (in particular, Russian, Arabic, Spanish, etc.).
The algorithm is standard for programs of this type: launch the program, click on the “Ru” (Russian) icon, select a font, then click on “Download” - “Install”.
HiFront app
The “HiFront” application has many different fonts for every taste, new fonts can be easily installed on a smartphone, and at the same time are independent of “HiFront” itself - even if you delete the specified application, the fonts installed using it will remain.
When working with Samsung mobile devices, root rights are not required; for other gadgets, root rights are required on the device.
HiFront - change the font, change the feeling
Launchers
Various launchers (programs that allow you to change the appearance of the desktop, icons, application menus, and so on) will also help you change the font of your gadget. In particular, we can note the functionality of “GO Launcher EX”, “Action Launcher”, “Holo Launcher”, which can change the font on your device.
- For example, the first of the launchers mentioned, “Go Launcher,” can change the base font of the device to another one found on your device.
- All you need to do is download a new font to your phone's memory.
- And then in the launcher, click on “Select font” - “Search”, the new font will be found, and you will only have to install it on your smartphone.
In the phone settings
Through the phone settings, you can perform various manipulations with the font, in particular, change its size. To do this you need to do the following:
- Open the settings and go to the “Display” section.
- Go to the “Text Size” section.
- Select the appropriate text size that will be displayed in the interface.
Unfortunately, you will need to use third-party applications to change the style and font itself. In the smartphone settings, you can only change the size of the current font. By the way, it will be applied to the entire system, including program icons.
Replacing the font without root rights
Some companies allow you to change the font on your devices without having to go through various steps, including rooting the device. For example, this includes Samsung. To change the font on your phone, go to settings and select the “Device” tab. Here you will see an item called “Font”. Let's open it.
Here we see two items: “Font Style” and “Font Size”.
In the first case, we can change the font itself.
And the second is its size.
Everything is logical and very simple. Alas, there is no such option on bare Android firmware. However, here you can increase the font size. Go to settings and select "Accessibility".
Once on the page, check the box next to “Large Text.” The font will increase.
Why do this
Surely many will pay attention to the fact that on their Android devices, replacing the font is extremely simple and fast. Just go to the settings and select the appropriate design option there. This is true.
Some manufacturers of smartphones and tablets that use the Android mobile platform to equip their devices have their own proprietary shell. Thanks to it, you can make visual changes by simply digging into the settings. Good examples are phones from Samsung. These devices provide functions for replacing a font from an available list, as well as the ability to download other fonts.
If the device does not have a proprietary shell with such capabilities, that is, the phone or tablet runs on the stock Android operating system, then you will have to look for alternative ways to change the font.
As for the reasons why this is done, everyone has their own. In fact, users can be divided into 2 categories. These are those users who simply want to change the appearance of the system, or such a replacement is necessary due to vision problems.
It’s just important to understand that any changes are made under the full responsibility of the owner of the gadget. In order not to risk the warranty and integrity of the device itself, it is better not to get into the brains of the phone, but to use the simplest option.