Build from source
One of the most correct ways is to use the source code published by the Google or Cyanogenmod development teams. But at the same time, this method is the most difficult, because in order to assemble Android firmware from source code, optimize it and make it work on a specific device, you need to have fairly deep programming skills and understand all the intricacies of the mobile operating system and device hardware. This knowledge is not acquired in a day, so in this article we will not describe this method in detail.
Editing using a computer
Required Software
We will need a computer, a device, a firmware file and a special program called Android Kitchen (also known as kitchen). The firmware file can be found on specialized forums, the most famous are the English-language XDA Developers and the Russian-language w3bsit3-dns.com. In the section for your device model, you can find links to the most popular and proven firmware, both official stock and unofficial custom ones.
Next you need to install the kitchen on your computer. It is best to work under Linux, but the necessary libraries can also be installed on Windows. In this case, you can get out of the situation by installing Cygwin. Download the archive and follow the step-by-step instructions included in the archive. Before this, you will also need to install the Java Platform (JDK) from the official website (https://www.oracle.com/technetwork/java/javase/downloads/index.html for Windows) or find and download OpenJDK Java 6 in the Ubuntu Application Center Runtime or similar (for Linux). The second use case is to install Linux on a virtual machine and manage the process through it.
Firmware modification
Firmware is most often distributed as a file with the .img extension, less often as a ZIP archive. In both cases, you will need to move the firmware file to the installed kitchen folder so that it can import it and start working with it. Kitchen should be installed to the path c:/cygwin/home/user/ (when installing via Cygwin) or Filesystem/home/user/ (when installing via Linux).
- Start the kitchen via Cygwin or Linux terminal using the command cd kitchen, then ./menu.
- Unpack the archive into the kitchen, as described above.
- After the program menu appears, go to section 0. Advanced Options.
- After this, a list of commands for modifying the firmware will be presented. Choose exactly the one you need. You can add Busy Box, Root, Apps2SD, replace stock applications, various animations, free up device memory and much more.
- After completing the manipulations, run command 99. Build ROM from working folder in the main menu and take the ZIP archive from OUTPUT_ZIP.
Device firmware
You can flash the device either through a computer or without it. In the first case, you need to download the firmware program, usually Flash Tool or Odin, drivers for your device model and prepare an already corrected archive.
When flashing firmware via Recovery, you will need to copy the file to the root of the memory card, boot the device in Recovery mode, format the device and cache, and then install the firmware from the archive. After the reboot, you will have the firmware that you personally modified.
Unpacking Android firmware in ZIP format
Any ZIP folders are unpacked with a familiar archiver, such as WinZip. Moreover, the unpacking process takes only a few minutes, since the volume of compressed files does not exceed 500 MB. You can download and install the program on any computer.
To unpack Android firmware, you need to find the archive on your PC, right-click on it, select unpack and specify the directory to transfer all files. When deciding how to unpack Android ZIP firmware or any other archive in this format, you can use archivers such as WinRAR, 7-Zip, PeaZip or IZArc.
Editing on device
The simplest way of all. No additional devices or manipulations are needed. All you need is a rooted device, an application for creating backup copies (Nandroid backup is best) and a file manager with the function of changing the system partition.
Changing your own firmware
- If your device is not yet rooted, get it. You can read how to do this on specialized forums in the section dedicated specifically to your device. The fact is that universal methods are supported by a small number of devices and most of them have an individual procedure.
- Install Nandro >
- Install a file manager that works with the system partition to remove unnecessary software and add your own applications. The gold standard is Titanium Backup.
- Select the apps you want to remove and remove them through the file manager.
- Install the applications you want to replace the deleted ones with, and use Titanium Backup to make them system applications.
- Reboot your device and enjoy your progress.
Changing third-party firmware in a ZIP archive
- Download the firmware file you are interested in in .zip format.
- Install a file manager that can work with archives, for example, ES Explorer or Total Commander, and unpack the contents of the archive.
- Remove unnecessary or add missing applications, then pack the archive back and move it to the root of the flash card.
- With help from Nandro >
How to flash and get root on Xiaomi Mi4i
As I promised earlier, I am posting my instructions and the necessary files for flashing the firmware and obtaining superuser rights for the Xiaomi Mi4i smartphone. There are two firmware options for the Xiaomi Mi4i smartphone: in .zip format for flashing via original recovery and in .tgz format for flashing via fastboot. Let's look at both methods and everyone will choose the best option for themselves.
Warning! Since flashing a phone is a fairly energy-intensive process, you must make sure that the battery level is more than 50% before performing any manipulations with the smartphone. Ideally, the phone should be fully charged so that the battery charge is sufficient for unexpected situations. You perform all operations at your own peril and risk.
Firmware file type .zip
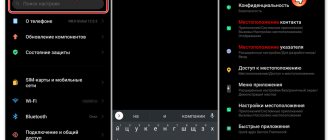
To flash the phone using this method, we do not need a desktop PC or laptop. Is it just to download the firmware and transfer it to the phone. Download the firmware in .zip format to your smartphone and remember which folder we put it in. Go to the Settings menu, then About phone. At the bottom, click System Update. The phone may ask about automatic updating, confirm or reject this request. If you already have automatic updates installed, you will immediately be taken to the Updates section.
Since our firmware is pre-saved on the phone, there is no need to check for updates. Click on the three dots in the upper right corner and select Select firmware file. Explorer will open and you will need to point to the firmware file. The system will check the firmware and reboot into recovery mode. The phone display will display the entire firmware process. When finished, the smartphone will reboot and initialization of installed programs will begin.
This process takes a long time, depending on the number of installed programs, it can reach 20-30 minutes. That's it, the software update is complete.
If you change the firmware version, I advise you to reset to factory settings. In the Settings menu, find the Advanced item, then at the very bottom there will be the Recovery and reset item. In this window, select Reset settings. In the new window, select what you want to delete and click on the Reset phone settings button, which is located at the very bottom of the screen. The phone will reboot and all data and settings will return to the factory state. This process also takes a long time. On average this takes up to 10 minutes. There will be a MI logo and a progress bar on the screen.
Firmware file type .tgz
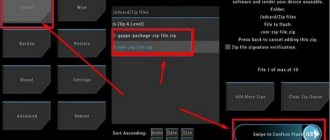
For this type of firmware we need a computer. Download and install the necessary drivers and the ADB driver installer. Download and unzip the firmware to the C:\adb folder. The adb folder will look like this.
Now the phone needs to be put into Fastboot mode. To do this, you need to turn off the phone, then press the volume down button and the power button simultaneously. After turning on the phone, the screen will show Fastboot and a funny picture. You don't have to put your phone into Fastboot mode, but rather enable USB debugging mode. To do this, click 7 times on the MIUI Version item, which is located in the Settings menu, item About phone. Thus, we unlocked Developer Mode. Now go to the Advanced section, then For Developers and enable USB Debugging.
The preparatory work is over, now we connect the phone. If all drivers are installed correctly, the computer will correctly detect the phone. In the device manager we should have a CMCC Composite ADB Interface device or something related to ADB, depends on the installed drivers. Now click on the file in the c:\adb\flash_all.bat folder. If the phone is connected in Fastboot mode, the firmware will begin.
If not, it should automatically reboot into Fastboot mode, unless you forgot to enable USB debugging mode. We observe the firmware on the phone screen. After the firmware is finished, it is recommended to disconnect the USB cable. Upon completion of the firmware, the smartphone will reboot and initialization of installed programs will begin.
This process takes a long time, depending on the number of installed programs, it can reach 20-30 minutes. That's it, the software update is complete.
Obtaining superuser rights (root)
To obtain superuser rights, you will need Mi4i Toolkit. Unzip the downloaded archive to your disk. Preferably at the root of the disk. Connect your phone with USB debugging mode enabled or in Fastboot mode. Run the Start.bat file as administrator from the folder where we unzipped Mi4i Toolkit.
In the program window that opens, select the required item. To obtain superuser rights, this is step 1. Confirm your choice and the boot area firmware will begin. After the firmware is completed, after 10 seconds the script for installing superuser rights will be executed and the phone will automatically reboot in normal mode.
Now we have a new SuperSU program on our desktop.
The Mi4i Toolkit utility also allows you to install a custom recovery, make a backup of the EFS area (IMEI), restore a backup of the EFS area (IMEI) and restore the standard recovery.
If you have any questions, I will be happy to answer them. Stay tuned for a full review of the Xiaomi Mi4i.
The phone for review and testing was provided by the online store IDagadget. The store has a large selection of smartphones, tablets and gadgets from well-known Chinese manufacturers. Free delivery throughout Russia.
Structure of a ZIP file with firmware
After downloading, unpack the archive using any archiver. Inside there will be the following set of files and folders:
- META-INF - a folder with meta-information about the firmware (author's certificate, manifest with a list of files, their checksums), an update script (updater-script) and an installer (update-binary), which executes script commands for mounting partitions, copying files and others actions with NAND memory;
- boot.img - an image with a kernel and a RAM disk (it is flashed into the boot partition);
- system.new.dat - this, roughly speaking, is the firmware itself, or rather an image of the system partition containing the Andro operating system >
Contents of LineageOS Firmware ZIP File for Nexus 5
Xakep #246. Study, study, study!
Unpacking IMG firmware
A popular extension for archives with installation files and other firmware data is .img. This is a special subtype of archives that cannot be disassembled into its components using conventional methods.
If you don’t know how to open Android IMG firmware on Huawei, you will need to perform a number of specific steps and download additional software. To work with this type of firmware, you will need the EXT4 Unpacker and EXT2 Explore utilities. After downloading them, you can begin the process of extracting files, which follows this scheme:
- Unpack the IMG firmware archive to any directory on your computer.
- Launch the EXT4 Unpacker program and use it to find the system.img file.
- Save the system.img file with the .ext4 extension using the "Save As" button.
- After unpacking, run the EXT2 Explore software as an administrator. In the “File” tab, select “Open Image”, specify the location of the previously created system.ext4.
- On the right side of the EXT2 Explore program window, right-click on the hard drive icon and select the “Save” option from the drop-down menu. A directory for extraction will be suggested; specify any convenient folder and wait for the process to complete.
This is how the Android IMG firmware is unpacked in order to extract useful data and installers from it.
Unpack system.new.dat
The files system.new.dat and system.transfer.list are of greatest interest to us. More precisely, not they, but the system contained in them. But getting to it is not so easy.
Script
The laziest can disassemble the firmware using the System_Extractor-Linux script.
- Unpack the archive with the firmware into any folder.
- Download the script from the link and unzip it into any folder.
- We launch the ext file (if it complains about the lack of Java, just skip by pressing y; Java is only needed for packaging).
- Now select unpacking by pressing button 1 and then Enter.
- A new folder named extract_* will appear next to the ext file and the tools folder. Copy the files system.new.dat and system.transfer.list into it.
- After copying the files, press Enter and wait. After a while, you will need to press Enter again, enter the administrator password and press Enter again.
- Ready. The contents of system are in the extract_*/output folder.
Script for unpacking system.new.dat in Linux
Manual method
Unpack the archive with the firmware into any folder (for example, rom):
Download the tools we need into this folder:
It converts the system.new.dat file into a raw image called system.img . Mount the image to the mnt subfolder:
System image contents
Do I need to unzip the Android firmware? Methods for flashing Android firmware without a PC
Is it worth unpacking the firmware?
Unpacking the firmware is a complex process that requires time and appropriate skills, but is very relevant and useful.
By unpacking, the user can make adjustments to the operation of various elements of the installed software, thereby eliminating the possibility of errors, freezes and many other unpleasant moments without flashing or replacing the software.
When you think about the question of whether you need to unpack the Android firmware, you will probably find a couple of additional advantages. You can extract apk files from the unpacked firmware or integrate installers for other programs.
Types of firmware and methods of installing them
Installing Android firmware at home differs in many ways from installing other software. This process is more labor-intensive and associated with many risks. If you select the wrong software version or violate the update process, there is a possibility that your phone or tablet will become useless. However, having learned how much reflashing costs from professionals, many still decide to change the software version themselves.
For flashing Android, there is no single instruction that would fit all models of mobile devices. It all depends on the manufacturer of the device and what software you plan to install.
All Android firmware is divided into two types:
- Official. Supplied directly by smartphone manufacturers and usually only suitable for a specific brand. Such programs are considered the most reliable, so they should be used whenever possible.
- Unofficial (custom). Developed by Android device users and small companies. They are used when reinstalling Android on Chinese devices (for example, Lenovo, Meizu, Xiaomi, etc.).
When using custom software, there is a possibility of installing a low-quality update, as a result of which the gadget will begin to slow down even more. Therefore, you need to download the executable file only after reading its description in detail and reading user reviews.
There are several ways to change the firmware on Android:
How to flash an Android phone using TWRP Recovery
For those who prefer working with the utility in the form of TWRP Recovery, we offer the following step-by-step instructions for installing the update in the form of a ZIP archive:
- Upload the file with the firmware image to the device memory.
- Go to TWRP recovery. This is done by analogy with CWM.
- Perform a factory reset by clicking on the “Wipe” option in the main menu. Drag the lever to the right. When you finish cleaning the gadget, return to the original lobby by pressing the “Back” button.
- In the main lobby, select “Install” and find the previously downloaded image in the file system tree. Click on it by dragging the slider to the side.
- After this, the firmware process will start. According to the standard, it does not exceed 2-3 minutes.
- Upon completion, the utility will automatically display a message indicating successful flashing. By clicking on the “Reboot System” item, reboot the device.
Flashing Android via computer
For example, let's take the firmware of smartphones from LG, while the program for flashing Android firmware via a PC will be Mobile Support Tool. It is located on the official website of the manufacturer. It is recommended to download only from there to avoid additional problems with your computer.
Then the device is connected
via USB cable. Turns on via the power button and volume rocker at the same time. The device is displayed on the screen.
Now the owner of the gadget will have to open the “Additional Features” tab. Then it is recommended to click on the button “ Recover from update error”
" Next, the application will begin executing the specified program. It fixes all problems that occurred during use.
If this does not help or there is no such button, then it is recommended to use custom firmware made by other users. Or use official firmware versions that can be found on the Internet.
Each smartphone has its own program for flashing Android firmware via a computer, which can usually be downloaded from the manufacturer’s website. For Samsung - One, for Lenovo - SP Flash Tools. For LG, in addition to the utility described above, KDZ Updater is suitable.
It is worth noting that using the FlashTools and ADBRun programs you can install Android via a computer on a phone of almost any brand and model.
They are all used the same way. That is, the application is downloaded, installed, the phone is connected, and it is reflashed. The result is a smartphone with updated firmware.
Android Directory Structure
After unpacking system, the following directory structure will appear:
- app - pre-installed applications with standard privileges;
- priv-app - pre-installed applications with elevated privileges, including some system components;
- bin - ELF binary files, analogous to the /bin and /usr/bin directories in Linux. Contains various system components used by higher-level system components;
- etc - settings files. A complete analogue of /etc in Linux, used, however, only by those same system components. Android applications store individual settings in the /data/data/ directories;
- fonts - fonts. By default, it contains only Roboto branded fonts;
- framework - libraries of Java classes used by the system and applications. There is also a file framework-res.apk containing a complete description of the operating system interface, including all graphic files;
- lib and lib64 are Linux libraries used by low-level system components. An analogue of the /lib and /usr/lib directories in Linux, including standard libraries such as libc, libz, libssl. On devices with ARMv7 architecture and lower, the lib64 directory will be missing;
- media - media files: ringtones, notification sounds, interface sounds and OS boot animation;
- tts - files needed by the speech synthesizer;
- usr is a directory that typically contains files needed to run applications from the bin directory. Essentially an analogue of /usr/share ;
- vendor - files supplied by the device manufacturer. Usually contains binary firmware for various hardware components, for example a Wi-Fi module;
- xbin - optional directory; custom firmwares use it to store things like the bash interpreter, SSH, PowerTOP, BusyBox, and other useful tools;
- build.prop - a file containing information about the assembly, as well as various low-level settings;
- addon.d - contains scripts that are launched after installing the firmware. GApps also write their script here, thanks to which they are revived after reinstalling the firmware.
Now that we're familiar with the basic structure of Android, let's start making changes.
View and Modify
Let's say you found a package that interests you, downloaded it, unpacked it... and when you tried to view some XML file, you were surprised to discover that the file was not text. How to decompile it and how to work with packages in general? Is it really necessary to install the SDK? No, it is not necessary to install the SDK at all. In fact, all the steps to extract, modify and package APK packages require the following tools:
- ZIP archiver
for unpacking and packing; - smali
- Dalvik virtual machine bytecode assembler/disassembler (code.google.com/p/smali); - aapt
is a tool for packaging resources (by default, resources are stored in binary form to optimize application performance). Included in the Android SDK, but can be obtained separately; - signer
- a tool for digitally signing a modified package (bit.ly/Rmrv4M).
You can use all these tools separately, but this is inconvenient, so it is better to use higher-level software built on their basis. If you work on Linux or Mac OS X, there is a tool called apktool. It allows you to unpack resources in their original form (including binary XML and arsc files), rebuild a package with changed resources, but it does not know how to sign packages, so you will have to run the signer utility manually. Despite the fact that the utility is written in Java, its installation is quite non-standard. First you need to get the jar file itself:
$ cd /tmp $ wget https://bit.ly/WC3OCz $ tar -xjf apktool1.5.1.tar.bz2
$ wget https://bit.ly/WRjEc7 $ tar -xjf apktool-install-linux-r05-ibot.tar.bz2
$ mv apktool.jar ~/bin $ mv apktool-install-linux-r05-ibot/* ~/bin $ export PATH=~/bin:$PATH
If you work on Windows, then there is an excellent tool for it called Virtuous Ten Studio, which also accumulates all these tools (including apktool itself), but instead of a CLI interface it provides the user with an intuitive graphical interface with which you can perform operations for unpacking, disassembling and decompiling in a few clicks. This tool is Donation-ware, that is, sometimes windows appear asking you to get a license, but in the end this can be tolerated. There is no point in describing it, because you can understand the interface in a few minutes. But apktool, due to its console nature, should be discussed in more detail.
Let's look at the apktool options. In short, there are three basic commands: d (decode), b (build) and if (install framework). If everything is clear with the first two commands, then what does the third, conditional statement, do? It unpacks the specified UI framework, which is necessary in cases where you dissect any system package.
Let's look at the most interesting options of the first command:
- -s
- do not disassemble dex files; - -r
- do not unpack resources; - -b
- do not insert debugging information into the results of disassembling the dex file; - --frame-path
- use the specified UI framework instead of the one built into apktool. Now let's look at a couple of options for the b command: - -f
- forced build without checking changes; - -a
— specify the path to aapt (a tool for building an APK archive), if for some reason you want to use it from another source.
Using apktool is very simple; to do this, just specify one of the commands and the path to the APK, for example:
$ apktool d mail.apk
After this, all extracted and disassembled files of the package will appear in the mail directory.
Removing and adding applications
All pre-installed programs can be found in two folders:
They differ from each other in access privileges. If programs from the app have the same permissions as third-party programs (for example, installed from the Play Store), then applications from the priv-app can use privileged APIs (privileged rights). You can learn more about this from our article.
To preinstall an application into the firmware, simply drop its APK file into /system/app/ . You can, of course, create a separate folder, but in our case this makes no sense, because the folder is used to store libraries and odex files, which we simply do not have. To remove it, simply delete the folder with it.
You can go further and replace stock applications with analogues. For example, to replace the calendar, delete the Calendar folder and copy our favorite com.rpagyc.simplecalendar.apk to /system/app. And you don’t have to copy it. Then the firmware will be without a calendar.
The main thing to remember is that stock programs can be related to each other. Therefore, deleting one program may well lead to the complete inoperability of another (for example, CalendarProvider and Calendar: by deleting the first, you will make not only the stock calendar inoperable, but also any other calendar). Fortunately, in pure AOSP firmware there are not many interconnections.
Introduction.
1.1. Purpose.
The MTwinTools tool is intended for disassembling/assembling images of devices based on MT chips.
It is built for use on the command line based on the RKwinTools tool, designed to work with devices on RK29xx-RK31xx chips, and some freely distributed programs.
It only works under Windows 7 and higher without installing CYGWIN, and also does not require any additional entries of paths in OS environment variables.
The tool allows you to:
- unpack and pack the Boot.img image;
- unpack and pack the Recovery.img image;
- unpack and pack the Kernel.img image;
- unpack and pack the System.img image, both yaffs type and ext2-ext4;
- convert a sparse file of type sparse into an image of type ext4;
- calculate the checksum of a file in md5 format;
- initiate SuperUser.
1.2. Installing MTwinTools. Installation of the tool is carried out by unpacking the archive in any place convenient for you. This will create an MTwinTools folder containing:
- folders _In/, App/ and Cygwin/;
- as well as Readme.txt and menu.bat files.
The _In folder is empty and is intended to contain source images for processing. The App/ folder contains a set of command files that process images. The Cygwin/ folder contains freely redistributable utility libraries and files. The Readme.txt file contains user instructions, i.e. the text you are currently reading. The menu.bat file is used to create the menu for the MTwinTools tool.
ATTENTION. There is NO REQUIRED for specifying access paths to service files in Windows OS environment variables.
As you work, other necessary folders will appear:
- Pack, which will contain the Boot, Recovery and System files after packaging, the md5 folder containing files with a checksum, as well as the Firmware folder, the Image subfolder of which will contain the assembled Boot, Recovery and System files;
- Unpack, in which FULLY unpacked Boot, Recovery and System files will be located in the Firmware folder, in the Image subfolder.
1.3. Uninstalling MTwinTools.
The tool is uninstalled by deleting the root folder of the tool, i.e. MTwinTools folders.
Changing the loading animation
The animation is stored as PNG images, packed into the archive /system/media/bootanimation.zip without compression. Inside the archive there are:
- desc.txt - file describing the animation;
- part0 - folder with animation files that are played first;
- part1 - folder with animation files that are played second;
- .
- part? — the outermost folder, the images from which are played back at the end.
The desc.txt file might contain something like
The purpose of these lines is intuitive: 1920 × 1080 is the image resolution, 60 is the number of frames per second. Part0 and part1 indicate the folders from which the animation will be played and the playback sequence. In general, there can be either one part or several (three or more).
Images located in the part folders are numbered with five numbers in playback order: 00000.png, 00001.png, 00002.png. These images can be replaced with your own, thereby creating an original animation. Or you can simply delete the bootanimation.zip file. Then the device will show animation from standard Android. Or use a ready-made collection of animations on w3bsit3-dns.com.
Four parts in bootanimation.zip for LineageOS
List of programs for firmware
Let's leave a list of programs for flashing Android, with an active download link:
- ABD tools,
- Odin,
- SP FlashTool,
- Lenovo Downloader
- KDZ Updater,
- LG Flash Tool,
- Sony PC Companion,
- MiFlashPro,
- ASUS Flash Tool
- Qualcomm Flash Image Loader,
- QPST Flash Tool,
- Wileyfox Flash Tool,
- Qualcomm Smartphone Multi-Port Software Upgrade Tool,
- Smart Phone Upgrade Tool,
- FastbootFlasher
- Firmware Factory Tool
- Infinix Flash Tool.
Changing the sound design
In fact, all the sounds that the system plays are stored in the /system/media/audio folder. Inside it you will find the following folders:
- alarms — alarm ringtones;
- notifications - notification sounds;
- ringtones - ringtones;
- ui - system sounds, for example, low battery, camera focusing, selection of interface elements.
In alarms, notifications, ringtones you can add as many melodies as you like. You can take them, for example, here:
And a little life hack: deleting files from the ui folder will not lead to crashes and errors, but to the disappearance of system sounds. Therefore, you can easily turn off the sound of taking a picture from the camera, taking a screenshot, simply by erasing the files containing these sounds (their names are intuitive).
Changing system settings (build.prop)
The system image contains an interesting build.prop file containing a lot of useful information about the device hardware and default settings for various stock applications. To be fair, I note that this is not always the case. For example, in Gigaset ME and ME Pro build.prop is divided into two parts. One part contains settings for Gigaset ME, and for ME Pro some lines are duplicated, but the keys (smartphone name, etc.) are different. This was done to ensure more or less correct operation of the same firmware on different devices.
Additional file for Gigaset ME and ME Pro
Build.prop contains (or can contain) a huge number of settings. Some of them do not change anything, some improve one thing at the expense of another, but there are those that are really useful:
- ro.product.model and ro.product.manufacturer - smartphone model and manufacturer name. By replacing these lines, you can make the Play Store think that you have a different smartphone, which will open access to more software. For any little-known Chinese smartphones, these lines can be life-saving;
- hw.qemu.mainkeys - accepts only two values: 0 - show on-screen navigation keys, 1 - do not show buttons. The absence of a line corresponds to 0;
- debug.sf.nobootanimation - value 1 disables the boot animation, which slightly increases its speed. Setting it to 0 or deleting the line returns the animation to its place;
- ro.telephony.default_network - tells the system what mode the mobile network should be switched to upon boot;
- ro.sf.lcd_density - display DPI, the most accurate value for the display can be calculated through a convenient website. But no one forbids you to set a higher or lower value to your liking: higher values make the interface elements larger, lower values make the interface elements smaller;
- ro.config.vc_call_vol_steps — number of volume steps during a call (default 8);
- ro.config.media_vol_steps - number of media volume steps (default 15).
Bootloader check
The first thing you need to do before flashing Android is to make sure that the problem is of a software nature. Press the Power button: if the phone shows at least some signs of life (clicks, the logo is on, the robot is frozen, an exclamation mark), then the bootloader is working. This means you can flash your smartphone, and it will continue to work.
p, blockquote 5,0,0,0,0 —>
p, blockquote 6,0,0,0,0 —>
Even if nothing happens when you press the power button, it’s too early to panic. Connect the device to your computer via USB and press the power button or the combination of “Power” and volume down keys.
p, blockquote 7,1,0,0,0 —>
If the computer sees the connected phone, it means it can be flashed - the main thing is to know how to do it yourself. If your smartphone does not show any signs of life, take it to a service center. The device probably does not turn on due to hardware problems, the elimination of which requires the intervention of a competent specialist.
p, blockquote 8,0,0,0,0 —>
If there is new firmware for the device, you will be prompted to download it.
If there is new firmware for the device, you will be prompted to download it.
If there is no new firmware yet, a message will appear on the screen: “The latest updates have already been installed.”
If the device has been rooted or the firmware has been changed, the message “Device has been changed” will appear. To update the firmware on such a device, contact a Samsung service center.
When all actions are completed, the gadget reboots and reflashes. This usually takes 10 minutes, but may take longer or less depending on the brand of device.
We implement Google Apps in the firmware
Almost always, custom firmware is delivered without Google services and the application store. The developers suggest that we install them separately using the GApps package. However, it can be integrated directly into the firmware.
First you need to download the GApps package. I recommend taking the Open GApps archives. You select the Android version, processor architecture and configuration option (Pico, Nano, Stock.), which determines how many different Google applications the archive contains. I recommend downloading the Pico version. It contains only the Play Store and a set of libraries necessary for its operation.
Integrating GApps into the firmware is done like this:
- Unpack the GApps ZIP archive using any archiver.
- Go to the Core folder.
- We see many archives with the extension .tar.lz. Extract using lzip.
- After unpacking, copy the files from the folders to the corresponding folders in the system. It’s easy to guess what to throw where from the directory structure in the archive. For example, configupdater (from the screenshot) needs to be placed in the priv-app folder.
- Go to the GApps folder (located next to Core) and follow steps 3 and 4 for the files in it.
- That's it, we have integrated GApps into our firmware!
Directory structure configupdater-all.tar.lz
Free place
It is necessary to understand that the space for installing firmware is limited. You cannot install firmware whose size exceeds the size of the system partition of the device. You can view its value using ADB:
Information about the system partition
Second option: put a terminal on the device and type the command
You can find out the partition size in bytes by installing BusyBox on your smartphone and running the command in the terminal
Or the same with ADB:
The space occupied by the firmware will be approximately equal to the size of the system when unpacked. In general, when creating firmware, it is necessary to take into account that the user can also flash various modifications on top of it (SuperSU, Xposed) or transfer applications to the system section. For example, Google's minimum application package (Pico) requires a minimum of 150 MB of additional installation space.
If necessary, the size of the firmware file can be reduced by removing not only unnecessary programs from /system/app ( /system/priv-app ) and call sounds from system/media/audio and bootanimation.zip , but also:
- /system/tts/lang_pico - languages of the primitive voice engine Pico TTS, Google voice engine will not be affected;
- /system/usr/srec/config/ - offline languages. You can download it online later if needed.
Possible problems after updating Android
Android updates do not always improve the life of the device owner
Not to say that an Android upgrade will completely ruin the life of the device owner, but it is guaranteed to cause moments of headache.
After the update, some shortcuts periodically disappear from the desktop, and along with them, programs.
In other cases, after modifying the system, the user discovers new, completely unnecessary programs that cannot be removed.
Let's look at applications for removing root rights in more detail. As already mentioned, the SuperSU application will help if the device does not have third-party firmware. After launching SuperSU, open the “settings” tab and, after reading the detailed window that appears, click “continue”. After the root removal process, reboot your device. The second application, Universal Unroot, works on the same principle, but is more effective.
Next, we will discuss in detail how to remove root rights on Android. There are several removal methods. Let's look at each of them. The first method: manual removal or using a file manager. A file manager is required to access the root system of an Android device. The most famous of them are: Root Browser, X-Plore File Manager and ES File Explorer. In addition to the file manager, you will need the Root Checker application. All this can be downloaded for free from the Play Market.
If even after such a radical method of removing root rights, some “glitches” remain, you need to perform a full factory reset, which is present in every model with Android OS.
Can root harm the device? Yes. However, don't be scared. This is only possible in cases where the owner of the device obtains rights using virus software. Consequently, the phone becomes infected from the inside. Therefore, you should be careful.
Assembly
After making changes, you need to put everything back together. First, let's pack the system section into system.new.dat . Download the tools we need:
Let's convert our folder back to a RAW image. Let's call it system_new.img :
1073741824 is changed to the size of the system partition in bytes. It would be advisable to even make it a little smaller. We make a sparse image from the RAW image:
Let's convert our image into system.transfer.list and system.new.dat, which should be thrown into the archive with the firmware, but first we'll delete the old files:
Let's separate the firmware files from the excess husk (files that we downloaded for work. For this it is convenient to use the archive with the firmware). Deleted? Now you need to pack the firmware into a ZIP archive (with any archiver).
All that remains is to sign the archive. This can be done both on Android itself using ZipSigner, and on a PC (you will need Java installed):
Underwater rocks
While building system.new.dat, you may encounter several problems caused by constant changes in the mechanisms for generating Android firmware. The method described above should work well in the case of firmware based on Android 5.1; newer ones may have difficulties, so you will need to use other versions of the build tools. Unfortunately, we cannot describe all the nuances of the assembly, so you may have to Google it.
IMG as a hardware firmware file
The IMG format is also used by many manufacturers of various hardware to distribute firmware updates. If your IMG file is small and you have reason to believe that it is not a floppy image, then this is the case. In this case, information on how to open the IMG firmware file for each specific case should be found on the official website of the equipment manufacturer.
When updating IMG firmware of equipment, you should strictly adhere to the official instructions of the manufacturer - in the worst case, if they are not followed, you will have to go to a service center. Therefore, you should not trust instructions on hardware firmware on third-party sites.
conclusions
This article describes only the tip of a huge iceberg called “firmware modification”. “Serious” firmware not only complements the kernel and the firmware itself with stock applications with many functions (which are often taken from other kernels and firmware), organizing or even changing the principles of their interaction, but can also radically change the operating principles of the OS. True, such a hack is no longer Android, but a separate OS, even if Play services can be installed there (by the way, such actions, to put it mildly, are not encouraged by Google). Well, don’t forget: all shells from manufacturers - TouchWiz, ZenUI, HTC Sense and so on - are just ordinary custom ones, maximally tied to the hardware of the device and to each other.