Why update the firmware on Android
Everyone's motives are different, but mostly to eradicate some problems with the phone.
- There is a problem with the front or rear camera.
- There is a problem with the display response, or more specifically, with the response speed.
- I would like to see the new Android Pie 9.0.
- I'm tired of the old version of Android and want new features and capabilities.
- The phone doesn't turn on.
- The phone stopped charging.
Honor 7A (DUA-L22) - “Your device has failed verification and may not work properly.”
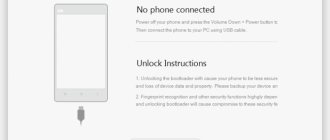
I came across a device Honor 7A Model: DUA-L22 with a problem - when turned on, the message “Your device has failed verification and may not work properly.” is displayed on the screen. Then the smartphone does not boot; when it reboots, it goes to the specified screen.
According to the owner of the device, after lengthy inquiries, it was established that they tried to reset the forgotten pattern key on their own by resetting the device to factory settings. Then it turned out that the Google account data was forgotten, and accordingly they received an FRP block. We tried to reset the device via Recovery and received the described error screen.
From this warning menu you can get into the eRecovery mode, the device tries to get the firmware or update via WiFi, but the attempt ends with the error “Getting package info failed”.
An attempt to enter Fastboot mode from standard Recovery ends with the green message FRP Lock!!!
It was not possible to flash the device via SPFlashtool, FlashTool displays various errors when connecting the device, and it was not possible to get the process started.
It was possible to flash the device through the standard firmware procedure. To do this, download the firmware for this device to update from the card. The firmware for Huawei Honor 7A DUA-L22 hw eu normal ru HLRCF Dura-L22 1.0.0.139(C10) Firmware 8.1.0 r1 was found.
After unpacking the archive onto the TF card, you need to copy the dload directory. We insert the card into the phone. With the device turned off, press the three keys “Volume+”, “Volume-” and “Power”. We must be patient, after some time the firmware process should begin. The firmware takes a significant amount of time, and the device may reboot several times during the process.
After the firmware was installed, the smartphone turned on and booted. But then, as was already clear, the phone requires entering a Google account.
To reset the FRP, many methods have been tried for this device and for all Honor devices, including the stated 100% methods. Only the next one helped.
We set up the device, connect to WiFi, select “Set up as a new device” and when we reach the Google account confirmation screen, we return to the language selection screen. Next, enter TalkBack mode. Only it was not possible to log in using the described method - placing two fingers on the screen. Press and hold two keys “Volume+” and “Volume-” for 3 seconds. we enter this mode.
Next, draw the letter L on the screen and get to the TalkBack settings menu. Select the “Talkback Settings” item. Turn off the “Explore by touch” setting. Swipe down the screen with two fingers and select “Help” or “Help&Feed back”.
In the “Help” window that opens, turn off Talkback mode by holding down the volume keys. Select “About Switch Access for Android”. In the window that opens, click on “Video” and start playing. The page with the video will open in the browser. Stop playback. In the upper right corner, click the Account icon and in the window that opens, select “Terms and Privacy Policy”. We indicate what to open through the Chrome browser.
In the address bar of the browser that opens, you must enter the addresses of links to applications: Apex Launcher 3.X Bypass_FRP_Android_6_&_Android_8.apk Bypass_FRP-1.0.apk
We find it in the Download folder of the browser, find Apex Launcher and install it. There will be a request for permission to install from this source - we allow it. After installation, launch Launcher “Open”.
In Launcher, find the file manager and install first Bypass_FRP_Android_6_&_Android_8.apk, and then Bypass_FRP-1.0.apk.
After installing and launching Bypass_FRP-1.0.apk, in the window that opens, select the “Points” menu and select a single item. Next, in the window that opens, enter a valid Google account to which you have access. After logging into your account, the device can be rebooted. Next, delete the account through the phone menu and perform a reset to factory settings. After rebooting the device, we set it up as new.
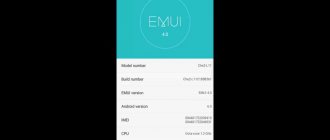
After loading in the device properties: Device name: DRA-LX2 Model: DRA-LX2 (on DUA-L22 body) Build number: DRA-LX2 1.0.0.139(C10) Android version: 8.1.0 Processor: MT6739 Latest security update: 5 April 2021.
By the way, Google’s security system identified this device as Huawei Y5 Prime 2021.
How to flash Honor 7A
Installation and updating can be done with your own hands using programs for firmware, free of charge, the links contain both original, that is, stock, official (not modified), and custom firmware, that is, alternative, all with instructions.
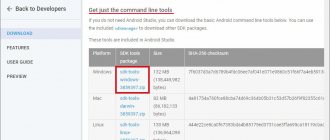
- First you need to download the firmware by selecting one of the options below. Along with it in the archive is the necessary set of programs (TWRP and others).
- Then extract the file “instructions_rootgadget.txt” from the archive. Using the archiver program...
- The firmware file contained in the zip archive must be downloaded to a memory card or smartphone memory.
- For other information and sequence of actions, see the text instructions.
Honor 7A firmware
Choose what you like, we would recommend upgrading to the latest versions of Android.
- Android Pie 9.0 is a flagship OS, one might say, but still a little unfinished. URL: yourtopfile.info/android9pie
- 8.0 Oreo is an excellent option, with a minimum of bugs and rich functionality, but version 9 is certainly better. URL: yourtopfile.info/android8oreo
- 7.0 Nougat is a stable version in all respects, it works even on low-power hardware. URL: yourtopfile.info/android7nougat
- 6.0 Marshmallow - versions 5 and 6 are already really old, although they were once the pinnacle of progress. But if you switch to them from versions 3 or 4, then of course the difference is very noticeable. URL: yourtopfile.info/android6
- Android 10 URL: yourtopfile.info/android10
- Android 11 URL: yourtopfile.info/android11
Unlocking the bootloader of Honor 7X
Get an unlock code on the Huawei website or for a fee on other resources.
We go to the official website using the link. In the upper right corner click on Unlock
ON the next page you need to go through the registration procedure. Fill in all fields and click Register.
Then it’s more interesting. Many people simply press next and follow the instructions, but here you must first select Register Email Address, because By default, registration via phone is selected (Asian numbers only). We select and see the human account registration window. Enter all the data, as in the picture below.
After successful registration, you are automatically authorized on the site and transferred to the agreement page.
Next, according to the scenario, there is a page where you need to enter your phone data: – In the first field, select the EMUI version that is currently relevant for your honor 7X – In the second field, do not touch anything – In the third field, Product Model – In the phone, go to Settings – Scroll to the most bottom - About the phone. The very first item Model is AL(TL)-10. I believe that the Chinese firmware says something completely different, you can of course enter what is written there, but if it doesn’t work, then we write it in the version like here. - In the fourth field. Serial Number - in the About phone settings menu. On the left is S/N:R8Q...... Let's rewrite this. – In the fifth field: Again, under the cover, or in the settings menu About phone – IMEI. But the case is already open anyway, so from here we take IMEI1:866...... If it doesn’t fit, we take IMEI2. – Sixth field: Product ID. Open the native dialer on your phone. Type the command *#*#1357946#*#* . We receive the code and enter it
Seventh field: Code from the picture. Let's check. And click COMMIT. If everything is correct, your treasured honor 7X bootloader unlock code will appear on the next page.
Enable “factory unlocked” (FRP unlocked) in the settings for developers or disable the PHONE SEARCH function from Huawei on Chinese firmware.
Download and install the minimum version of ADB-setup on your PC. Open CMD in the ADB (command prompt) folder by pressing Shift + right click, from the options select “Open command window”.
Put your smartphone into Fastboot/Rescue mode and connect it to your PC. To do this, turn off the phone, hold down the volume down button and connect the USB cable.
On a PC, in the command prompt window, enter the command
fastboot
and then
fastboot oem unlock {your received code}
without {} signs.
Root rights
If you want to get root access, you can use the universal program Rookthp Pro 3.2 , download here . Instructions for using the program can be found here. We can also recommend ZYKUroot version 2.2 among the universal ones. You can find out information about it at zykuroot.info We won’t talk about more popular programs, the same Kingo and Framaroot are always popular, although they are losing ground a little
Review of Huawei Honor 7A Pro
Defective model, it is written loudly, they say “Pro”, yeah, right now. 2 GB of RAM, just like in 2013. Use it, don't choke! Some games won't even start! The processor, yes, is good and fast, but there is not enough RAM. The display is disgusting, the resolution is lower than FHD, slightly more than regular HD. For such a price it's just tough. The design was completely stolen from the iPhone 7 and 8, the Chinese, what do you take? The camera is neither fish nor fowl, you can’t say it’s too bad, but there’s nothing good to say either, disappointment. Otherwise, everything is ok, although there are already so many disappointments here that, overall, it’s not ok at all. I don't recommend taking it. — Another review from the owner — Hello. My review of this phone. In general, everything is fine, the fingerprint works very quickly. Camera: The main one is excellent, the front one, to be honest, not so much, although it is stated to be 8MP. RAM: 2GB, well, that’s just very little, to put it mildly. On stock, it has almost no multitasking. RUTH IS RIGHT: You can get it, but it’s very, very difficult. Well, in general, for my own (I bought it for 7500 rubles) it’s not even a bad phone. I need the firmware to revive the phone, I wanted to install XPosed, the phone went into bootlap, I mistakenly made a full wipe in TWRP, there is no Backup...
Smartphone catalog » Huawei
Installing custom firmware on Honor 10
Installing custom firmware on honor 10 via TWRP recovery To install the firmware using this method, your honor 10 must have TWRP recovery installed, if this is not done, you can install the recovery according to the instructions above.
Download any custom non-official firmware for honor 10 in *.zip format, for example:
lineage-15.1-UNOFFICIAL-berkeley-8.1 or any other one you like.
and copy it to the internal memory of the smartphone in the root folder.
We reboot the smartphone into TWRP recovery (Turn off the device. Press the volume up and power keys until they vibrate, release and wait for entry.), and there we go to the Advance Wipe menu, change the Data file system to EXT4. We go back and do Wipe, partitions - cache, data, dalvik and system
After wiping the device, go to the “install” menu, select the ZIP file of custom firmware for honor 8 lite in the submenu, and swipe to the right to start the firmware process.
The firmware installation process usually lasts a couple of minutes (the time depends on the size of the firmware); when the firmware is finished, reboot the phone.
That's it, good luck.
Share link:
- Click to share on Twitter (Opens in new window)
- Click here to share content on Facebook. (Opens in a new window)
- Click to share on Telegram (Opens in new window)
- Click to share on WhatsApp (Opens in new window)
- Click to share on Pinterest (Opens in new window)
- Click to share posts on Tumblr (Opens in new window)
- Click to share on Reddit (Opens in new window)
- Click to share on LinkedIn (Opens in new window)
- Click to share on liveinternet (Opens in new window)
- Click to share on Livejournal (Opens in new window)
- Click to share on Webmoney (Opens in new window)
Changing the location and updating the HwOTA smartphone firmware
This method will help you update to firmware that is not yet available for installation, or roll back to the previous firmware if the update turns out to be more buggy than the previous build (Android 8 over Android 8 with both an upgrade of the firmware build and a downgrade of the build).
To change the location on your smartphone and flash it using the HwOTA method, you must have:
- An unlocked bootloader or a code to unlock it (which will help unlock it);
- Enable the factory unlock feature in the developer menu (for all regions except China). It is not available on Chinese phones until the location has been changed;
- Enable the USB DEBUGGING function in the developers menu (a controversial point, just like the body in TvRP);
- SD card at least 4 GB;
- Stock recovery.
Download the HWOTA_WAS archive and unpack it on your computer. You will end up with a folder “HWOTA8_WAS”;
On your phone, make a “everything of everything” backup if you can (since the update process will erase all data). These are the conditions, so be prepared;
In the “for developer” settings, check “factory unlocking” (there is no such item in China, but it will appear as soon as you change the location) and enable “USB debugging”;
Download three zip archives with the full “Full OTA” firmware you want to flash. You can download the firmware via Firmware Finder (link to the program above), there are 4 archives for China and 3 for any other location. You need to download for the version of what model and location you will have after the firmware;
Place the downloaded files in the “HWOTA\Update” folder; the script will automatically rename them according to the template: update_data_full_public.zip to update_data_public.zip
update_full_….zip in update_all_hw.zip
update.zip remains as is
This method is hard-coded - therefore, all the variety of files eu, cn, meanhaf, specseas... must be brought into a single form. The installation script will remind you at the very beginning of what to put where, rename it itself (you don’t need to rename) and patch the firmware files! In Recovery, checking for update packages is disabled, so we can install any firmware (Android of my device, and I also rewrote the script: added automatic renaming of firmware files to the desired template, added auto-patching, corrected copy blocks and much more;
Run the universal bat file update.bat in the “HWOTA” folder, which will provide the opportunity to select the work option we need (firmware change/rebranding (location change)); At the beginning it will ask “to patch the files or not” (if you patched them, then you don’t need to patch them again)
Next, follow the detailed instructions on the screen. Once the process is complete everything should work...
Changing the location occurs by selecting a specific item and selecting the oem-info file from the list (14 types of locations are available, all DS). After changing the location, you need to boot into the recovery stock and make wipes. If you are making an international version of a purely Chinese model, then be prepared that after changing the location you will have an fpr lock item in your fastboot. Therefore, after you have changed the location, you need to boot into the recovery stock and make wipes from it. Accordingly, it must be in its place before starting all manipulations to change the location and firmware. Another reason why you need to install TVRP in the recovery section, because... After changing the location, the phone should automatically reset. After the reset, it will boot into the system and the factory unlock option will already be available there. Turn on factory unlocking and unlock the bootloader again. After that, launch the new batch file and flash the required firmware.