Directions
1 You can’t hear your interlocutor well, although he can hear you perfectly
2 You can’t hear him at all, but he also has excellent audibility
3 The interlocutor can hear you only on speakerphone
4 Recently there have been extraneous noises and interference during conversations
No sound on Iphone: I can’t hear the other person. Hands-free operation only
IngredientsDirections
[adace-ad id=”5714"]
We do not recommend getting into the inside of the device yourself, as it is easier to break cables, delaminate the display module, screw screws into the wrong place, or chip SMD elements than snap your finger. We do not recommend carrying out any work without relevant experience. Repeat everything described below only at your own peril and risk.
Disclaimer:
Please note: This article discusses the solution to the problem using the iPhone 5S as an example.
The most common reasons for a broken microphone on a phone
At the first sign of a malfunction of the microphone on your phone, it is recommended to contact specialists who can find out the problem that caused the breakdown. The most common causes of problems with speakers and microphones on modern smartphones are:
- Mechanical damage to the microphone as a result of the device falling or other external influence, such as an impact. In this case, you will need to disassemble the phone to assess the extent of the damage and the possibility of restoring the microphone.
- A glitch in the smartphone software. If new software updates are automatically downloaded to your phone, various problems with the microphone, speakers, and applications may appear before the device restarts. In this case, it is enough to reboot the device.
- Moisture gets inside the device. Exposure to moisture can cause corrosion of the elements responsible for the functionality of the microphone. Here the solution to the problem is to replace the problematic contacts.
- Exposure to dust on the microphone contacts, which could result in a short circuit and, as a consequence, burnout of the contacts.
- The phone's internal board is faulty. In this case, a complete replacement of the board will be required.
In most cases, to diagnose and determine the exact causes of the speaker malfunction, you will have to contact a specialist phone repair service. If this option is not yet available for some reason, then you can disassemble the smartphone and thoroughly clean all the contacts inside it using a cotton swab. If this measure does not help, and you still cannot hear a sound from the microphone or only extraneous wheezing is heard, then qualified technicians will be able to fix this problem.
Microphone failure is a fairly common problem faced by owners of smartphones and mobile phones, the solution to which depends solely on the causes of the failure. In some cases, the microphone cannot be restored, and therefore the only option to solve the problem with voice communication is to purchase a new device.
In this article, we will dwell in detail on the reasons why the microphone on your Android phone does not work during a call, video recording and other situations. This can also happen when talking on Skype, Viber, Telegram and other instant messengers that support voice calls.
This article is suitable for phones and tablets of all Android device manufacturers: Samsung, LG, Sony, Huawei, Xiaomi, HTC, ZTE, Fly, Alcatel and others. We are not responsible for your actions.
First, we should delve a little deeper into the technological area of the problem. A microphone is an electromechanical device that converts sound waves into an electrical signal. It turns out that at least two conditions must be met for it to function.
Firstly, it is necessary to ensure the unimpeded passage of sound to the installed sensitive element. Secondly, the microphone should not be damaged.
When these conditions are met, digital correct data is sent to the processor, and nothing else depends on the microphone. Here it is necessary to expand the formulation of the question. The problem due to which the interlocutor can no longer hear your voice does not always depend on the performance of the microphone. There may be no sound due to a malfunction of the gadget’s speaker, errors in the Android operating system, or application settings.
The most common situations:
Glitch with headset
When working only on speakerphone, it happens that the phone freezes in the “connected” headset position. This situation is very easy to imagine if there is a huge amount of debris or moisture in the headphone jack. Try blowing the contacts well - maybe this will help (the phone should make the sound of the headset being disconnected).
By the way, the charging socket also contains contacts that transmit sound - so the advice is relevant for this connector too.
Turn on speakerphone on your smartphone step by step
Using the speakerphone function on a telephone is convenient in cases where several people are participating in a conversation, the subscriber is uncomfortable holding the handset to his ear, or he consciously does not want to do this.
Through the standard menu
How to turn on the speaker:
- From the list of contacts in the phone book, select the person you are going to call.
- Click on the call button. Once connected, a menu of options will appear on the screen that you can use during the audio call.
- In the lower right corner, tap on the speaker image. If the icon changes color, the speakerphone feature is enabled.
On an incoming call, switching the speaker to loud mode occurs in a similar way. After swiping the handset to the right, a grid of available options will appear on the screen. Click on the speaker image and continue communicating in a comfortable environment.
Setting the speakerphone to turn on automatically
You can have incoming phone calls automatically put on speakerphone. Then you won’t have to turn it on manually every time.
Algorithm of actions:
- Enter the Settings menu.
- Open the "General" section.
- Select "Universal Access". Find the “Audio call source” column. In most cases, the “bird” is opposite the “Auto” mode. Move the checkbox and place it in the “Speaker” section.
- Exit settings mode.
To make sure everything went smoothly and the feature will turn on automatically, ask a relative to call you back.
Using third party programs
If the device is not equipped with speakerphone settings, or for some reason it does not work, the user can use third-party resources. What to do:
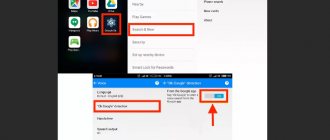
- Log in to the Play Market application.
- Enter “Contacts and phone book” in the search bar.
- From the proposed programs, choose the one that has the largest number of positive user reviews. Install it on your phone.
- Launch the program on your device. Activate the speaker by checking the box next to the “At the beginning of every call” section.
When there are incoming calls, the program will start automatically.
The top cable is faulty
The top cable on the iPhone (in 5S/5SE models) is responsible for the front (main, not front) camera, light sensor and earpiece. This means that if you cannot hear the interlocutor during a conversation or hear with great interference, there is a possibility of problems with the upper cable (the display does not go off during a conversation - from the same song). There is a replacement below in the text.
Important: If the phone has already been repaired, then you should pay attention to the cable gasket - is it in place? Unscrupulous servicemen do not put it in its place - without it, the iPhone begins to foul
Entering the settings menu and adjusting microphone parameters
To enter the engineering settings menu, you need to enter a code or use a special program. The code is more difficult, since each manufacturer has its own. The most typical login option is to enter the code *#*#3646633#*#* into the phone line. On some versions of Android, the codes *#15963#* and *#*#4636#*#* may work.
If you have not coped with this point, then you should download the Mobileuncle MTK Tools program, which will allow your device to open its engineering menu. There are a lot of settings you can configure in this menu, but don't overdo it. Before changing parameters, write down their factory digital values on a sheet of paper. In the event of a tablet failure or negative manifestations, all settings can be returned to their original state.
So, you have entered the engineering menu and the setup continues. To increase the microphone in conversation mode over telephone networks, select the sub-items “Audio”, “Normal Mode”, and then “Mic” in the menu. To adjust the microphone in recording mode, instead of “Normal Mode”, select “LoudSpeaker Mode”. Next, seven sensitivity levels will be displayed, which are adjusted by the controls on the tablet. These levels vary from the quietest level 0 to the loudest level 6.
Each level can be adjusted individually and assigned a numerical value from 0 to 255. The higher the digital value, the higher the microphone's sensitivity threshold. Having set, for example, all levels to the maximum, on the tablet it will not be possible to adjust this parameter with the keys - it will always be maximum. To change the parameter, erase the old value, which is located in the “Value is 0...255” column, set the desired value and press the “Set” button.
It is also worth remembering that maximum parameter values can lead not only to distorted microphone operation and extraneous exciting effects, but also to damage the electronics. Therefore, the increase must be done smoothly, gradually. In this simple way you can achieve the most optimal parameters without damaging the tablet.
Very often, smartphone owners encounter a problem when the microphone on the phone does not work or works very poorly. There are actually several reasons why this happens, ranging from a banal software failure to a hardware failure. Actually, this is what our article will discuss. We will also additionally consider the question of why the microphone on the headphones does not work, which is also a fairly common problem. In general, it will be interesting!
The speaking (hearing) speaker is faulty
[a[adace-ad id=»5228"]p>
The speaker itself, if the phone has not been thrown or drowned, rarely fails. Usually it dies slowly - extraneous noise begins or it works too quietly (this could also be an audio codec - more on that below). The speaker looks like this:
It is located on the display module, next to the proximity sensor and front camera - its replacement must be done very carefully so as not to damage the parts. As we wrote above, the speaker is a simple element, and therefore a relatively reliable element in the iPhone. But there are problems with it too - defects, ingress of water, mechanical damage.
Let's take a closer look at the latter: inside the speaker there is a permanent magnet, an inductive coil on which a thin copper wire is wound, and a diffuser is attached to it, current is supplied to the coil and it is either attracted or repelled from the magnet, while the diffuser pushes the air and thereby creates sound waves - this is how we hear sound from a speaker
When struck, it happens that this wire breaks, the current stops passing and the speaker stops working. And if moisture gets in, the audio coil can oxidize, the contacts can rot, and the current simply won’t reach the coil. The fact is that the diffuser is made of thin flexible material, most often from pressed paper, but there are diffusers made of plastic and metallized paper, so this is a very fragile element - it is easy to damage
Moisture and dust getting inside the case
Water getting into the case often leads to a decrease in the performance of phones of any type.
However, it is impossible to immediately determine whether a part has completely or partially failed.
The sound disappears when the wet board oxidizes, when the cable malfunctions, or when liquid gets on the speaker.
Rice. 5. Water getting inside the housing.
To identify and fix the problem, you will have to contact the service.
But before taking the phone to the experts, it is advisable to carefully disassemble the case into individual parts and dry it.
It is not recommended to turn on the mobile device before checking its functionality in the service - especially if the water that got inside was seawater.
Replacing the cable and speaker
Purchase
In order to disassemble the phone you need a special tool, a little skill and, in fact, the spare parts themselves - a cable and a speaker. We decided to order them from the popular online store Mobiround.ru. The delivery was fast, and a small and pleasant surprise awaited us in the parcel:
The parts are packed well and tightly:
All the fun cost 339 rubles (+delivery).
It is worth noting that in specialized stores in our city, only one train cost ~600 rubles
Phone analysis
Our photos are of poor quality and not very informative. Two excellent disassembly instructions with detailed pictures can be found here and here
First, unscrew the two Pentalobe screws with a diameter of 3.9 mm (“stars”) near the charging connector:
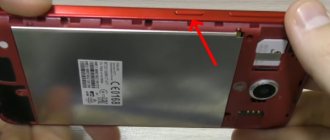
Next, disconnect the housing from the display. It is better to use a suction cup for this. Please note that you need to disconnect the screen at the bottom of the case: at the top there is a cable for the speaker and camera and it is very easy to break. In turn, act extremely carefully in the lower part so as not to break the TOUCH ID cable (you must remove the retainer of this cable and carefully disconnect:
We open the phone. We see our speaker and cable - they are located on the display module. Do not bend the display module more than 90 degrees:
Before you begin to release the cable and speaker, you must disconnect the battery from the system board. In principle, it needs to be turned off for any type of repair work - it’s worth remembering. To do this, we will unscrew the protective plate (two 1.6 mm Phillips screws) and disconnect the cable:
Next, we disconnect the plate that holds the upper cable and disconnect the front camera cable with the proximity sensor, the LCD screen cable and the touch screen cable from the body. Only 4 screws:
- red 1.7mm Phillips screw
- red Phillips screw 1.2 mm
- yellow 1.3mm Phillips screw
- green 1.7mm Phillips screw
Be sure to remember which one was screwed in where. If you mix up the seats during reassembly, you may damage the board.
Then you need to remove the protective plate from the top ear speaker (two Phillips screws 4.1mm and 2.2mm):
Finally, carefully remove the speaker. It does not have any connectors, and works by simply pressing it against the panel using a plate:
... and all other components that are on the same cable:
This completes the dismantling of the speaker and cable:
Causes of microphone malfunction
A device for recording and playing back sound may fail as a result of:
- water or dust getting under the body of the gadget;
- mechanical damage (contact with sharp objects, falls);
- software failure;
- incorrect setting.
You may not be able to use voice communication if your headphones are broken. After changing the headset, the sound often returns. Another common cause of problems is damage to the headphone jack. The broken part should be replaced with a new one. Diagnostics are included in the list of services of many specialized service centers. Using special equipment, the technician can test the gadget, determine the essence and cause of the breakdown, and quickly and efficiently fix the malfunction. Diagnosis of broken tablets in most service centers is a free service; you only have to pay for the repair. Most often, an acoustic device built into a device fails as a result of clogging (dust, sand). You can clean the device yourself using a miniature brush; using water or alcohol is prohibited. It is also not recommended to perform the procedure with a pin or needle, since a sharp object can damage the microphone membrane.
Audio codec or amplifier is faulty
A chip called an audio codec (U21) is responsible for the sound during a conversation on the iPhone. If you buy it, it will be designated as “large” in stores. Costs no more than 100 rubles - replacement will cost much more
The amplifier, also known as the sound controller (U22), forms the signal lines to the speakers. It must be checked for power and short circuit:
Very often during local repairs they get caught, torn off, damaged or overheated. In this case, it is necessary to replace it or reball (as professionals also say, “rolling”) the chip. It involves removing the old, existing solder balls from the chip and the board itself on which the chip is to be soldered, then cleaning the contacts (nickels) and applying new balls.
The contact between the modem and the audio codec is faulty
Quite a rare problem, but also relevant to our scenario. It is usually diagnosed by pressing (press firmly) the upper right corner, where the modem is located - the sound from it begins to reach the audio codec. The BB_I2S_RXD (i2s1) bus is responsible for this signal. It is necessary to check and, if necessary, restore tracks bb_i2s_clk, bb_i2s_rxd, bb_i2s_txd, bb_i2s_ws (chain from the modem to the central processor)
Ways to adjust microphone sensitivity on your phone
If you decide to configure the microphone yourself, it is worth learning about the various methods. Currently, there are several options for formatting and managing software settings for various mobile devices. To configure the microphone, you can use the following options:
- Main menu. Usually on the main screen there is a gear icon, through which you can enter the menu responsible for the system’s operating parameters. Some models have a sensitivity increase function.
- Using the appropriate program in the phone's operating system.
- Engineering menu. With its help, you can adjust the necessary values for high-quality work. To enter this section, you need to know the encoding - it can be found on the Internet. After gaining access to the engineering menu, go to the Audio tab, select Normal Mode. Open the Type section to configure the microphone, click on the Mic icon and increase the sensitivity level from 0 to 6. After that, save the changes and reboot the system.
For additional settings, there are a number of special programs that can be downloaded from the Internet. Use only trusted sites and download files with antivirus enabled. One of the most convenient options is MTK Mobile Uncle Tools Pro. After installing the program, perform all the manipulations described in the previous paragraph.
Select one of the possible options that suits your Android smartphone model to adjust the microphone performance. If necessary, you can contact the service center for help.
(
1 ratings, average: 1.00 out of 5)
Damage to the capacitor and/or filter
This usually happens, again, due to low-quality repairs - you yourself are unlikely to be able to break the capacitor (FL49) or “tear down” the filter (C215). This is easy to do - with the usual disconnection of the coaxial wires inside the phone, it is very easy to damage them (they are located nearby)
Here is the FL49 filter in another diagram (from the video below)
On the phone itself it looks like this. The photo shows that there are not enough components on the board:
In order for the sound to appear again, it is necessary to restore these elements - tin these places with solder and install these components from another board.