Home / Phones / Android / Android Repair
Back
Published: 09/23/2021
Reading time: 8 min
This article will tell you about the reasons why a phone or tablet running Android OS does not save applications, games, photos, music, etc. to a microSD memory card.
This article is suitable for phones and tablets of all Android device manufacturers: Samsung, LG, Sony, Huawei, Xiaomi, HTC, ZTE, Fly, Alcatel and others. We are not responsible for your actions.
The built-in memory of Android gadgets very often runs out, which is why users have to write large amounts of information to microSD. What then should you do when Android does not save downloaded content to the memory card - music, photos, applications and other files? Let's figure out how to solve the problem when Android does not save files to the memory card.
- Problems with the memory card
- Wrong folder in browser
- Cannot transfer file to memory card
- The settings for transferring data to microSD have gone wrong
- When there is no setting
- Android does not see the memory card
Solution for Android versions 4.0 6.0
The sequence for solving this issue is different for certain operating systems. So today, a large number of mid-segment smartphones run on Android from version 4, as well as Android 5.1 and 6.0.
Android 4.0, 4.1 and 4.2 allow you to configure saving files to an SD card without having superuser rights. You just need to go to “Settings”, enter the “Memory” submenu and specify there the installed memory card as the default resource for saving data.
To carry out the task, go to “Applications”, select the one you need and indicate the path each time - “Transfer to SD”. But not all applications, especially system ones, will “listen” to you, because to transfer data to Android from 4.4 and higher you will need to obtain Root rights.
The most famous of them are Framaroot and Kingo Android Root. But with full access to your files, you suffer some costs when obtaining Root rights: you lose your rights to warranty service for the device, updates do not come by themselves over the air, and unknowingly you can damage the system by accidentally deleting important files.
Automatically save files to a memory card
In order for files downloaded from the Internet to be placed directly on the memory card, you need to go to the phone settings and change the location where they are saved. The instructions should work regardless of the installed Android OS version.
- Go to “ Settings ” and select the “ Memory ” section;
- At the top of the window, pay attention to the “ Save data as default ” item;
- Check the box next to “ SD card ”.
- The download location will be changed.
The path to the save settings may vary. In other versions of the operating system there will be a sub-item “Storage Settings” (or similar), and in it – “Default storage location”. Tap on it and select “SD card”.
If this method does not help, use the ones described below one by one. Remember that neither option will work unless you have installed an SD card and are trying to change the settings.
How to install applications on a memory card for Android 4.4.2 KitKat
Due to the fact that Google, the developer of the Android OS, has changed the application protection algorithms in the new version of its Android 4.4.2 operating system, some device models may experience problems transferring installed applications to a flash card. Some developers of applications for mobile devices with the Android 4.4.2 operating system are concerned about solving this problem by promptly preparing updates to their programs that can bypass this problem. Also, some manufacturers have solved this problem in firmware updates for their devices, as, for example, Sony did for the Xperia T2 Ultra and Xperia T2 Ultra Dual models. For those who want to be able to write programs to an SD card on Android 4.4.2, but this is not provided by standard capabilities, there is the SDFix: KitKat Writable MicroSD application, which can do all this, and is also free
Please note: you will also need root rights for it to work. Working with the program is very simple:
We hope that the instructions we provided for transferring user programs to a flash card will be useful to you, and your applications will find their place on the memory card of your phone or tablet, freeing up valuable space on your device. Be careful when performing operations with a memory card and always back up your data before you start doing anything with your phone. Good luck!
Setting up downloading applications to the SD card
Some users may have already changed the location where data is saved in the settings.
But the application is still loaded into the phone's memory. It is possible to bypass the system as follows:
- For those who have not yet changed the settings for installing files in Android, open the settings; Open Android settings
- We find here a parameter named “Memory”; Find "Memory"
- Next, find and open the “Installation location” item and click here on the line with the SD card. Find "Installation Location"
Now all your downloaded files from the browser will be downloaded to the flash drive. But the Play Market will still save files and programs to system memory. There's a reason we just set this to default. This is also necessary for the next instruction.
This may be useful: how to transfer contacts from phone to SIM card.
Lack of Visual C and Direct X required version
The next common reason why programs are not installed is the lack of Visual C++ and Direct X components. Visual C++ is necessary for programs written in the popular C++ language, and Direct X is required for most games. As with the NET Framework, there are different versions of these components.
You can find out the version of Visual C++ in the same way as the NET Framework - in the “Programs and Features” section.
And in order to find out the version of Direct X, click “Start” and open “Run” (or ctrl + R). Write down the dxdiag command and click OK.
As a rule, if the program does not install due to the absence of these components or their correct version, a corresponding message appears. The required versions of Visual C++ can be downloaded, and Direct X.
Danger of the problem
Tablets and phones can be equipped with built-in memory of 2, 4, 8 or even 16 gigabytes. But many people lack even this volume. A large amount of music, photos, videos and applications will quickly fill up the system memory. Because of this, Android will not allow you to install new programs, since .
Removing unnecessary applications and clearing the cache are just temporary solutions to the problem. You can transfer some of them to the built-in memory, but it’s not rubber either. The best option would be to buy an SD card. Having inserted it directly into your phone or tablet, you will certainly have a question about how to install downloaded applications onto a memory card. Transferring is possible, but the methods depend on the version of your operating system.
The method for solving the problem is different for certain OS versions. As you know, at the moment most devices run on Android 4.0, 4.1.x, 4.2.x, 4.4, 5.x and 6 versions, so here you first need to find out which one is installed directly on your gadget.
It's very easy to do. Follow these steps:
Now let's move directly to the solution.
Using system capabilities
When purchasing a phone or tablet, you must immediately purchase a memory card. By default, all information is downloaded directly to the internal drive, but through the settings you can easily arrange for automatic saving of photos, videos and music to an external card, the permissible volume of which largely depends on the resolution of the operating programs of the gadget itself.
Not all devices are designed to accommodate storage larger than 128 GB, so you should carefully read the phone's instructions before making a purchase. In this case, the internal storage will be open for applications, but its volume may not be enough for a large number of desirable games that become “heavier” as manufacturers improve them, and necessary utilities that make work and life easier.
Much depends on the modification of the gadget; sometimes such a simple method is available on highly equipped devices. First of all, you need to check whether you can get by with simple steps:
- indicate the path to save information to removable media when downloading from the Internet;
- download the utilities installed there from the internal card to the sd by logging into it through the “application management” tab;
- download the necessary software onto a USB flash drive via a computer and save it to the gadget’s external storage device via USB.
Actions for Android versions 5.0 inclusive
In older versions of the system, it is quite easy to understand the sequence of actions and free up internal memory, improving the speed of the gadget. To do this, just enter the main settings and go to the application tab, then select the “transfer to SD storage” option. The program itself will transfer the information.
Additional data storage, such as “gallery”, “music” and applications for reading e-books, after saving to external media, will automatically upload information to the SD card without additional settings. Thus, the internal storage will be freer, which will improve the speed of the device as a whole.
It is worth considering that the features of certain games and programs sometimes make it impossible to transfer them to an external drive. That's why the manufacturer's built-in programs are not installed on the SD, and their forced transfer can disrupt the processes inside the gadget. The operating system always warns about this possibility, so you should not be afraid of making a mistake.
Saving applications to an Android memory card from 4.2 to 5 inclusive is quite simple if you follow the following algorithm:
- Go to the “applications” tab and select the “downloads” section, where all previously installed software is located.
- Select the program to transfer from the list and click on it.
- Check data access and required amount of memory.
- Click the “record to SD” section, if provided.
Combining external and internal
Installing an application on an Android memory card from the fifth version and higher will require additional steps, since the system itself is designed differently than in older versions, but there is a new utility - Adoptable Storage, which allows you to combine internal and external drives into a single database.
When this function is activated, the gadget system itself will calculate the total amount of memory based on the storage parameters and display it on the display. In order to use the utility, you need to do the following:
- format the SD card and copy existing data from it, if it has been used previously;
- insert it into the device, and after the signal about the appearance of a new memory device, click on “set up” (installation);
- select from the menu options “use as internal storage” (use as internal storage);
- wait for the process to complete, which may take a long time, but upon completion, new information will by default go to the removable SD, despite merging the storage media.
Sometimes you urgently need to free up RAM and reset all applications, videos, music, photos to a removable disk. This is done in a few simple steps:
- through “settings” go to the storage (“storage”);
- scroll down the page until it says “transfer data to SD card”;
- confirm your desire and allow the system to complete the process.
Is it worth the transfer?
Many people try to install applications on a memory card without even thinking about the further consequences. But in fact, experts do not recommend doing this. It is possible that your card is slow, and this makes the operation and opening of the program not the fastest. Therefore, you should save applications to a memory card only if your drive belongs to the Class 10
or, much better,
UHS-I
.
Also, do not forget that any card is less reliable than built-in memory. And if it fails, this will entail the deletion of all information recorded on it. All applications moved to it will also be deleted. Therefore, leave the most important programs in the built-in memory. For example, it should store messengers and utilities designed to track expenses and income.
For modern mobile devices running the Android operating system, the problem of lack of space on the system partition of a smartphone is no longer as pressing as it was a few years ago. Manufacturers have long provided their phones or tablets with four, eight or more gigabytes of internal storage, a significant part of which is dedicated to the system. For most users, this space is enough so that applications can be installed without problems on the internal memory of the device, and not on an SD card.
But appetites and, accordingly, the amount of space occupied by applications are also growing, and if you are an active user of your smartphone, then one day you may well find that the space on its system partition is running out, or during installation of an application you will encounter an error caused by lack of space for its installation. Don't worry too much about this. The Google Android operating system provides its users with the ability to transfer already installed applications or install new ones to an SD memory card, if one is present in your phone or tablet. And for special cases, there are non-standard, but quite simple solutions to bypass system limitations. So, in this short instruction we will tell you how to install applications on the SD flash card of your mobile device.
Dalvik cache
Dalvik is a virtual machine that is used by Android devices to optimize applications. It also accumulates cache over time, stored in a hidden section of the smartphone’s memory. To remove Dalvik cache you need to follow these steps (not available on all Android gadgets):
Turn off the phone and start it in Recovery Mode. To do this, you need to hold down the power button and volume control at the same time.
In the Recovery menu, select “Wipe cache partition”. Control in this mode is carried out with the volume keys and the power button.
Go to the “Advanced Options” section. Click “Wipe Dalvik Cache”.
Restart your smartphone in normal mode.
Additional methods
If none of the above methods are suitable for your Huawei gadget, you should use the help of third-party utilities:
- Move to SDcard;
- AppMgr III;
- Recovery;
- Link2SD
Moreover, if you still can’t solve the problem, you can use a PC. By connecting the drive to a personal computer, the user has the opportunity to create additional partitions to store information from the application. The EaseUS Partition Master utility helps with this.
Transfer via Link2SD
This is needed when the phone does not support transfer to an SD card. Apps2SD is a popular app for this purpose, as is FolderMount, but both require root access.
We will look at Link2SD, which can work both with and without root rights. And it can be used not only for mass transfer to a flash drive, but also forcibly (even when it is prohibited by the system).
Launch Link2SD and give it root permission if your phone is rooted. Then select the app you want to transfer and select the Link to SD Card option.
The Link to SD Card (Data and Cache) option transfers application data and their cache, but requires root rights. To transfer more than one application at once, click the menu button in the top right corner and select Multi-select. Now tap on all the apps you want to transfer, go to the menu again and select the option you want: Link to SD card or Move to SD card.
The Move to SD Card option does not require root access, but it will only work if your phone supports the transfer to external storage feature. If you have root rights, you can forcefully transfer applications that did not initially allow this. But some of them may stop working after this.
You can get even more space using .
Danger of the problem
Tablets and smartphones today have different sizes of built-in memory. True, given the abundance of applications and the ability to connect different gadgets, the main memory may not be enough.
Of course, in our age, everyone understands that the elementary solution here is to connect an SD card, because today phones store not only contacts, but also a lot of useful and entertaining things.
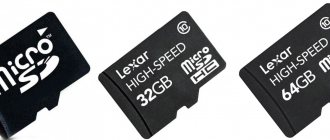
So modern microSD can add up to 8 GB of memory, microSDHC - up to 32 GB, microSDXC - optimally offer 64 or 128 GB, but the most expensive of them can accommodate 2 TB of information.
For comparison, music downloaded to a phone usually weighs 3-10 MB, a photograph on a smartphone takes 1-5 MB, and a movie of the poorest quality starts from 700 MB. Not to mention games for smartphones. In general, when purchasing a card, you will, of course, be guided not only by the capabilities of your device, but also by your needs.
It just happens that the card is finally inserted, the problem should get better, but here it is again: you download the application from the Play Market, and it again goes to the smartphone’s memory.
Clearing the cache is only a temporary measure. So why doesn't Android want to save to the card? The issue of forcing files to be moved to an external card directly depends on the OS version.
The phone does not see the memory card
There are several reasons why the phone does not recognize the card:
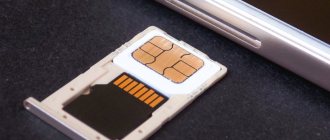
- Lost contacts is the first reason. Simply remove and reinsert the SD card.
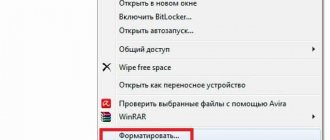
- Sectors are damaged. What to do in this case? Format the memory card.
- The reason is a block in the phone's security system. The service center can help you remove it.
- The service center will tell you if something inside the phone is not going well, and will help you fix this element, returning the device to a responsive “dialogue” with the memory card.
- Incompatible card. All you have to do is replace the card, carefully reading the instructions about the compatibility of your device.
When the device detects the presence of the card, you can try to transfer programs to it according to the instructions above. And the unloaded system memory will serve you uninterruptedly, save applications, videos and photos to your smartphone and will not bother you with unpleasant notifications when downloading new applications from the Google Store.
I hope we have provided you with real help and are happy to continue talking about the intricacies of modern devices. Also visit us with your friends in the VK group, on Facebook, on Twitter, as well as on the YouTube channel.
UpDron.ru was with you
Bye!
Increase Android memory with a MicroSD memory cardAndroid 5.1 and later
From version Android 5.1 and later, it became possible to increase the system memory on Android using a memory card. There are 2 ways to do this!
Method 1 - Through the menu
- Back up data from SD card to computer
- Go to the Android Settings menu and then “Storage and USB storage” or “Drives”
- Select “SD card” (you may need to go to the “Advanced” subsection)
- Go to the advanced settings menu and select "Settings" or "Storage"
- In the new window, select "Internal memory" or "Connect to internal memory"
- Read the information that after changing the memory, the SD card will be formatted and click the “Clear and format” button.
If after formatting you receive the message “SD card is slow,” then you need to select a faster memory card - When formatting is complete, you must transfer the data by selecting “Transfer now” and click “Next”
- After completing all actions, restart Android to avoid errors in the operating system.
How to return the work of an SD card from internal back to external memory
- Back up data from SD card to computer
- Go to the Android Settings menu and then Storage and USB Drives
- Select "SD card"
- Select "Portable media"
Method 2 - Through the terminal
If your manufacturer has not included a feature to combine Android internal memory with a memory card, then you can use the adb developer utility.
- Download adb
- Enable USB Debugging
- At the command prompt, enter several commands
- adb shell sm list-disks - to find out the memory card ID
- adb shell sm partition disk:NNN,NN private - command to create shared memory (instead of NNN,NN identifier value)
You can also use the ADB RUN program which can combine memory - Other command > SD Card Internal Memory.
Merging a memory card with an internal one
There is a great way to expand the local memory of your Android phone using a memory card. In other words, it will be combined, and the need to constantly change the save location will disappear.
Method 1
- Go to “ Settings ” and select the “ Memory ” section;
- In the “ Memory settings ” section, check the box next to “ SD card ”.
- The following message will appear: “The phone is encrypted. Before changing your save location, make sure the new location is safe."
- Check the card for viruses if you are not sure, then click OK .
- If the card is not particularly spacious, an additional message will appear: “The installed card has low memory capacity. Switching is not recommended. Switch?" Do this or replace the card with a larger one.
- After this, another message will appear “...When switching, data loss may occur, the phone will reboot for the changes to take effect...”. Click " Continue "
- Wait until your phone restarts.
After turning on the smartphone, the amount of internal memory will be increased by the “size” of the SD card, and files will begin to be saved to it. In the same way - when you reboot the phone, everything comes back.
Method 2
Try this:
- Go to “ Settings ” > “ Storage ” (if available);
- Click on the " Micro SD " button. Go to the menu (3 vertical dots);
- Click on “ Storage ” again;
- ABOUT.
- On the next page, clear and format the memory card.
- Wait for the process to finish
- Transfer the necessary data to Micro SD if necessary. All files downloaded after this will be placed on it.
Compatibility
Before installing a game with a cache on your tablet, be sure to check the hardware compatibility on the manufacturer’s official website. If there is no such information, do not despair: it is quite possible that everything will work out. But if the manufacturer’s website says that a particular game definitely won’t launch, it’s unlikely that anything can be done.
Please note that pirated games often come with cache, since when you download the application from the official resource, all the required content will be included in the package. So no one can guarantee the functionality of such a program. Please keep this in mind if the game behaves inappropriately after installation.
So how to install a game with cache? Let's figure it out, and we should start with the simplest method.
Stream music and movies
If you have a really large music library, you don't necessarily need to store it on your device. Services like Google Play Music and Amazon Music can store a large amount of music files and stream it to you whenever you want.
Five full-length films in HD quality can take up 15 gigabytes or more of memory. A dozen 1-2 minute videos you shoot will add a couple more gigabytes to this. So it is not practical to store all this on your gadget.
If you purchased a movie using Google Play or Amazon, then they can always be found in the cloud services of these companies. Don’t forget about services where you can watch videos online, without having to download them to your tablet or smartphone.
Link2SD program.
Unlike others, it allows you to export applications not only completely, but also in parts. That is, you can move individual libraries. Another advantage of Link2SD is that it is installed immediately in one package without copying files or running scripts.
After transferring the application with this program in devices running versions of the operating system up to 2.2, it begins to be displayed only after the device is rebooted.
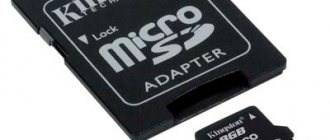
To export, 2 partitions must be created on the expansion card. One is based on the FAT 32 file system, and the other is ext2 (the limitation is not relevant for new versions).
Of course, these programs completely solve the problem. But in Android, how to install applications on a flash drive right away?
Install immediately
Of course, the memory of devices, especially phones, is not infinite. And constantly transferring programs using specialized applications or the built-in Android file manager is tedious.
And I would like to know how to install applications on a memory card on Android.
Unfortunately, by default, all applications are installed in any version of Android on the internal memory. The solution to this problem can be considered to be flashing the gadget with a third-party version of the OS. But this is a very troublesome matter. In addition, you need to have decent skills and knowledge in handling this kind of software.
After installing the application, if possible, immediately move it to the memory card. Following this simple rule will help you save built-in memory resources.
Install one of the cleaning utilities on your gadget. For example, Android Assistant. After a while, systematically launch it, and clean the system and clear the cache. Using this program allows you to clear the internal memory of temporary and unnecessary files (“system junk”), and thus save space.
Comfortable work
Make it a rule to uninstall applications as soon as they are no longer needed.
When downloading various multimedia information via a browser on the Internet, immediately specify the folder on the expansion card in the saving path.
By following these tips, you can ensure comfortable work on your device, even if its internal memory resources are small. And the developers will definitely answer us about how to ensure that applications are installed on the Android memory card with the release of one of the next versions of this wonderful operating system.
Many people face the problem that they cannot or simply do not know how to move applications and other multimedia data to a memory card. You can solve this kind of problem by changing the standard Android settings or by using third-party applications.
How to clean your device of unnecessary debris
By following the above steps, you can make significant progress in the process of clearing your memory. Once you have set the correct settings, you most likely will not have to do all the steps again from time to time. But you will have to use information on how to free up internal memory on Android by removing garbage often. So, by installing a special application (for example, Clean Master), you can make the cleaning process quick and easy.
The so-called garbage in the device, which occurs through the accumulation of cached data from the Internet, browser history, and applications, is a very common phenomenon. Periodic cleaning allows you to increase the free space on your device and speed up all actions.
If we look at cleaning a device from debris using the example of the most optimal and convenient Clean Master program, then there will be no difficulties in using it. You just need to select the “garbage” option and click “clean”. The application, conducting an in-depth analysis, makes sure to specify which files should not be deleted.
The essence of the problem
After purchasing a new device, the owner, who understands the controls, begins to customize the gadget “for himself.” Personalize by installing all new applications and gradually filling the internal memory. In the end, in addition to filling the RAM with many running processes, the internal volume is also filled to capacity. In this case, the system issues messages about this. Removing unnecessary programs and data solves the problem for a short time due to the constant influx of information and automatic installation of updates. Optimizing the system and deleting temporary files is also a temporary solution to the problem. There is nothing else left to do but transfer applications to the android memory card.
Let's start solving the problem
An inexperienced user would do this by first copying all the data to the computer and then moving it to a flash drive. Another solution could be online data storage. To do this, you need to download all the necessary “extra” information from your phone to the server of some specialized Internet resource for further storage and use at the right time. This is where the problem of accessing this data via the Internet arises. Unlike foreign countries, access to the network via wi-fi is still too poorly developed. And downloading through Edge will not only take a long time, but also be expensive.
Everything is much simpler. Transferring data to an expansion card is possible through the built-in operating system tools using a file manager. You just need to mark those that should be transferred. What if you need to move Android applications to the memory card? To do this, in this operating system, starting from version 2.2, this feature is implemented at the software level.
Open the gadget menu. Go to the “Settings” item. Next, go to the “Applications” sub-item and from there to “Application Management”. A list of installed programs opens in front of you. By clicking on the name of the desired application, we will see all the information about it. On the right there is a button that says "move to SD". If it is active (displayed in white), then this application can be transferred to the Android sd from the internal memory of the device.
Transferring files from the device's internal memory to a flash drive
To free up space, transfer data from internal memory to a USB flash drive. To do this, go to the “Files” folder and select the subfolder of interest (photos, videos, documents, etc.). Tap and hold a file for a second until it is highlighted. Select one by one all the photos/videos/audios that you want to transfer to another location or click “Select all” if there is such an option. Click the Move button. In a new window, select “Memory card”, and then select a specific folder. Please wait until the data transfer is completed. Repeat the same procedure with the rest of the information.
How to transfer files directly to your device
To transfer pictures, music and videos directly to the device, it is better to use a file manager. The ES conductor is simple and reliable to use. The main function of the manager is precisely to work with folders and files. This file manager is very lightweight, does not take up the already small amount of memory, and is convenient.
To transfer the necessary data, you need to select it with one long press. When choosing the “move” action, click on “SD-card”. The advantage of this file manager is that the menu allows you to immediately create new folders for transferring files.
How to interchange Android internal memory with a microSD card? (Root required).
Another popular method is how you can use a memory card instead of the internal memory of gadgets with small amounts of file storage. To set up automatic saving of necessary applications to the microSD card, you must install the Root application in advance. Next, follow these steps step by step:
Now all information will automatically go to the microSD card instead of internal memory. We have presented you with several options for how you can save applications to a memory card. Your task is to choose the best option for your gadget, depending on what operating system is installed there and whether there is a Root application.
Methods for installing programs
By default, Android games and applications are installed on the built-in storage of your smartphone, which may be too small. If you have an SD, you can make sure that some programs are installed there by default, thereby freeing up space for more information. Under certain conditions, you can transfer almost any installed program to a removable flash drive.
How to install an application on an Android SD card? There are several different ways to carry out this operation. The correct method depends on the operating system version and the data you want to move. In the settings of Android 6.0 Marshmallow, you can adapt the SD as built-in memory, automatically installing allowed games and software on the removable drive.
The fact that it is already installed with me is immediately recognized, so double installation is avoided. Of course, for me, as a guide, the advantage of a smartphone is, on the one hand, to receive updated weather reports on a location or train, as well as find accommodation, and secondly, the ability to use such universal genius for navigation as well.
Methods for installing programs
In addition to a route description with photographs from the route, cyclists can also access a profile of the hill and check out literature, points of interest and suitable train stations. Additionally, location cannot be set individually for specific apps, but only across all apps in the store. But who doesn't want to install a game that can take up storage space?
Some smartphones without a new operating system allow you to move an application to the memory card manually, but only if the developer allows it. An alternative way to transfer programs is to use the Link2SD application.
That's why you can only transfer applications to an external flash drive if absolutely necessary. It is recommended, whenever possible, to use this method for programs that do not require high speed for normal operation.
How to solve a problem
It is not always possible to determine the type of problem yourself. Often this is a system error, so to eliminate it you will have to debug installed programs. Suggested algorithm if the snapshot is not detected immediately after execution.
To do this, it is recommended to perform the following algorithm of actions:
- In the “my files” section, find the item “device memory” (may have a different name with similar content).
- Find a folder called DCIM.
- Move the contents to another folder or storage location.
- Delete the entire folder.
- Reboot your device.
- After a reboot, the DCIM folder will appear again, but with a high percentage of probability - without a system error.
Does your Android not save photos or videos you take to the memory card? The problem may lie in system settings, card incompatibility, or even system failures of the device. Common errors in which a phone or tablet does not save new information to a CD card or internal storage, as well as methods for solving such problems, are discussed in the information provided.
The memory on smartphones is not rubbery, despite the huge amount of information that many of us store on them. That is why some manufacturers to this day do not refuse the possibility of expanding the built-in memory using MicroSD cards.
Current flagships support cards with a capacity of up to two terabytes, which greatly increases the internal reserves of smartphones. However, this does not solve another problem - all applications are automatically installed in the internal memory, and its quantity cannot be expanded. In this regard, we decided to write an article on how to make sure that everything is saved to a memory card. It offers several methods for owners of different devices - from budget models with 4-8 GB built-in to flagships on the latest versions of the Android operating system.