Purpose of the recovery area
The Recovery Mode recovery environment is an indispensable tool for developers and engineers dealing with programming or customizing the Android OS. However, ordinary users of mobile devices often resort to it.
Considering what Recovery mode is, it is necessary to note its main capabilities:
- Resetting the gadget to factory settings (Hard Reset), when this cannot be done from the standard menu;
- Installation of custom firmware;
- Activation of Superuser rights;
- Creating a system backup with all user data and settings;
- Restoring Android using a previously mounted backup;
- Allocation of system partitions on an external micro sd memory card;
- Connecting the device to a computer to work with the ADB debugging bridge, etc.
It should be noted that you cannot do without Recovery on Android if you cannot enter the graphical menu of the operating system, as well as if your smartphone or tablet is turned into a “brick”.
Wipe data or reset settings
Next on the grid of options is Wipe.
If you are flashing a ROM, you will need to erase at least some parts of the device, if not all. (Follow the instructions for the ROM you are flashing to see what you need to erase.)
In TWRP, the default option is factory reset, which wipes the entire device.
Click the Advanced Erase button and you can select specific partitions to wipe - Dalvik Cache, System and Cache will be needed for most ROMs. Data will erase your data and this is often necessary. Internal Storage clears your internal storage and this is what you would do for a full factory reset, but it is rarely needed when flashing a ROM.
In any case, make sure you back up your data properly and not just using Nandroid Backup. To make backing up and restoring your application data easier, check out our Helium guide.
Again, once you have selected the sections to erase, you will need to swipe the slider to confirm. Once you do this, there is no going back.
How to enter the Recovery environment
Transferring a mobile device to Recovery mode can be done in several ways:
- Using a combination of mechanical keys;
- Via the ADB debug bridge;
- Through special software, which is installed directly on the phone.
In the first case, to enter Recovery Mode, a certain combination of the Power and Home buttons (if available) and the volume rocker are used. However, this combination may differ among different manufacturers. Thus, in almost all Nexus series smartphones, the resuscitation area is loaded using the Power + Volume Down keys. For Samsung, the current set is “Power” + “Home” + volume rocker sandwiched in the middle. The above steps are performed with the device turned off.
If you cannot find the required combination, you can open Recovery on Android using the ADB debugging bridge or its automated version ADB Run:
You can also get into recovery mode using additional software installed directly on the mobile device. One such application is Quick Boot. Just install it from the Play Market and, after launching, click on the appropriate button.
Why doesn't my Android phone go into Recovery?
There are two types of situations when the recovery program is not available:
- The phone turns on, but it’s impossible to enter “recovery”;
- The phone does not turn on and does not go into recovery.
In the first case, the software may fail, the phone buttons may not work, or incorrect actions may occur when trying to enter Recovery.
In the second case, the reason lies in a discharged battery (which is easy to clarify by putting the smartphone on charge) or in the inoperability of the phone’s hardware or firmware.
Often the problem can be solved without resorting to expensive repairs.
How to work in the recovery environment Recovery Mode
In the Recovery area, there is no graphical interface to which all owners of smartphones and tablets running Android OS are accustomed. And touch controls don't work there either. Therefore, it would be a good idea to consider how to use Android Data Recovery mode.
The main window of standard Recovery is a list of functions. Moving between menu items is done using the mechanical Volume Up/Volume Down keys, and selecting an item is done with the Power button.
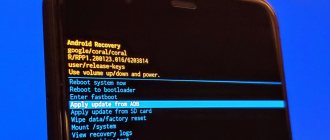
Once in stock Recovery Mode, the following tools will be available to you:
- Reboot system now. Used to reboot the mobile device and enter the Android GUI.
- Wipe data/factory reset. Clears the device's internal memory of installed applications, notes, contacts, etc. At the same time, personal photos, videos and documents will remain intact. This function allows you to get rid of various operating system failures.
- Wipe cache partition. Removes all information from the system cache. It is used when the installed software does not work correctly, as well as before flashing the gadget’s firmware.
- Backup and restore. Creates a system backup and restores the phone using previously created points.
- Mounts and storage. Allows you to clean one of the system partitions.
- Advanced. Opens additional Recovery capabilities (restarting this mode, erasing the dalvik cache, etc.).
You should work very carefully in the Recovery recovery environment, since all actions performed are irreversible and can lead not only to the permanent deletion of all user information, but also to turning Android into a “brick”.
Using custom Recovery
The stock recovery mode has somewhat limited capabilities, which in some cases are simply not enough. So, you won’t be able to reflash your smartphone using it or install the required application from a memory card. Therefore, advanced users replace the standard Recovery with a custom one (CWM or TWRP), which is equipped with more advanced functionality.
As an example, let's look at the installation procedure and subsequent use of ClockWorkMod (CWM) Recovery:
The installation of Android CWM Data Recovery will begin. This process will not take much time. After it is completed, you can enter the custom recovery environment using the same keys that were used to load the stock Recovery.
In addition to the standard set of tools, the new resuscitation area will be supplemented with the following functions:
Having figured out how to work with the Recovery environment, you can flash smartphones or tablets, reset settings, create restore points and perform other specific actions without third-party help.
Dear site reader! Dear Android OS user!
The Android operating system has one “secret” mode that allows you to do non-standard operations in some non-standard situations. I mean Recovery Mode
(
Recovery Mode
), which is recommended
to be used with caution (!)
. Because it is possible not to restore, but on the contrary, to seriously damage the system if you have little idea what you are doing. Therefore, entering this mode is not done in an obvious way and differs for different models.
So, Recovery
or
Recovery Mode
is a special device boot mode that allows you to restore the system or install updates for it.
It starts with the system completely turned off (!)
device using the combination of mechanical keys
Home + Volume Up + Power
for Samsung,
Volume Down + Power
for Nexus.
Here the “ +
” sign means the following procedure: you need to press the first key, then,
without releasing it
, press the second and,
without releasing the first two
, press and
hold
the third.
After the product logo appears, you need to release the Power
and continue to hold the others until you enter the mode.
In general, the key combination specific to your manufacturer may be different, so I would advise checking it before experimenting.
Stock Recovery Mode and its functions
Stock Recovery
– this is a stock program (that is, installed on a new device, “out of the box”).
There are also various Custom Recovery
- these are third-party programs with greater capabilities. But I’m not talking about them here, since installing them instead of stock recovery usually voids the warranty on the device.
Among the functions of stock recovery is deleting user data
,
system updates
(exclusively with firmware approved, signed and stamped by the manufacturer) and others.
functions
that you see on the screen after launch mean:
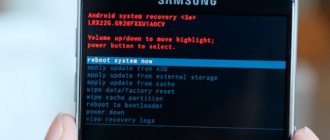
1. Reboot system now
: Reboot the phone to normal mode.
2. Apply Update from SD-card
: Install the update from the memory card.
3. Wipe Data / Factory reset
: Deleting
all personal data
, resetting to factory settings, in common parlance just a wipe.
4. Wipe Cache Partition
: Deleting the phone cache (user program settings).
5. Install zip from SD-card
: Install the program as an archive from a memory card. This archive is usually the official update. Switching between items is done with the volume keys, and entering the selected item is done with the power key.
Mobile phone users often wonder how to exit Recovery mode on Android. Sometimes it happens that a recovery screen appears on the phone and there is no way to start the system normally.
When someone turns on or reboots their device, it automatically enters Android System Recovery 3e mode. Before fixing this problem, you need to understand what Recovery is and why this mode can start at the wrong time.
Method 4: Troubleshoot hardware problems
The most difficult to eliminate cause of the failure in question is hardware failure. To calculate the culprit, follow these steps:
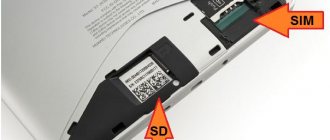
- Turn off the device, remove the memory card if there is one, and try to start it again. If the smartphone (tablet) turns on normally, the problem is solved, but the card should be replaced.
- Repeat the procedure from the previous step for the SIM card - often a faulty SIM card leads to freezing at startup.
- It is also worth checking the battery - perhaps it is very discharged and the system does not have enough energy to fully start. Checking this is quite simple: turn off the device completely and connect it to the power supply (first make sure that the unit and cable are known to be in good working order). The appearance of the charging indicator indicates that the battery, controller and power connector are working properly, and they are not the cause.
If you have gone through these steps and found that the source of the failure is not the memory card, SIM or battery, this means that you are faced with a serious problem such as internal memory failure or processor failure. Such problems are almost impossible to fix at home, so contact a service center
This concludes our material on eliminating freezing on the splash screen when you turn on your Android device. Unfortunately, the most common cause of this problem is a hardware defect.
We are glad that we were able to help you solve the problem. In addition to this article, there are 12,259 more instructions on the site. Add the Lumpics.ru website to your bookmarks (CTRL+D) and we will definitely be useful to you. Thank the author and share the article on social networks.
Describe what didn't work for you. Our specialists will try to answer as quickly as possible.
What is recovery mode?
What is the Android system recovery screen for? This feature on the device is used to enable several very useful options and can be an effective tool for customizing the phone in the hands of an experienced user.
One of the most useful options on the system recovery screen is the ability to reset the device to factory settings if you cannot access the operating system. This can be extremely helpful if your phone won't turn on properly, won't respond to touch screen touches, or won't allow you to access settings. The fact is that if for some reason the user fails to enter the options of his device, the ability to reset to factory settings will be blocked for him.
Recovery mode helps solve many problems associated with Android system malfunction. If you want to reset your device to factory settings using this function, you must first turn it off and then press and hold certain buttons.
Depending on your phone model, these could be volume keys, power keys, home keys, etc. This will boot your device into system recovery mode. Then you can erase all user data on your mobile device if you select the Wipe Data (or Factory Reset) option and confirm the reset using the Delete All User Data item. As a result, all files will be deleted from the phone.
Part 3, Android Data Recovery with Android Stuck in Recovery Mode
There is a chance that you will lose data on your device even if Android phones and tablets come out of recovery mode. So how to recover lost data after fixing error without command on Android. Android Data Recovery is a good choice for you to take into account. This is an excellent Android file recovery software designed especially for those Android users to quickly get their lost data back to their device after fixing it. Android recovery mode doesn't work.
Android Data Recovery
- Recover Android data from both Android phone, internal memory, SD card, SIM card and tablets.
- Recover deleted photos, music, videos, WhatsApp files, SMS, call log, contacts, etc.
- Backup your entire mobile phone or restore specific data to your computer.
- Supports devices such as Samsung, LG, Huawei, Sony, HTC, Sharp, Windows Phone and more.
This passage below will give you a detailed guide to extract your data stored in the internal memory of your Android device such as contacts, messages, photos as well as videos, etc. Please follow the steps below.
Step aerobics 1
. Download and run the Android data recovery program.
Download Android Data Recovery from the official website. This software applies to both Windows and Mac. Then install as per the instructions and double-click its desktop icon to launch it.
Step aerobics 2
. Connect your Android device to your computer via USB cable
When you see "Connect your Android device to PC" on the main interface, follow the instructions and connect your smartphone or tablet to your computer using a USB cable until you receive a successful connection message.
Step aerobics 3
, Enable USB debugging and authorize the software.
Configure your device to allow the program to access its internal memory. To continue connecting your device, click the OK button on your device when a window pops up asking you to allow Android Data Recovery to access your Android device stuck in recovery mode.
Step aerobics 4
. Select the file type you want to recover
A list of data types will appear on the interface after the connection is established between the Android Data Recovery software and the Android device. In the right window, select the type of data you want to recover, such as Documents, Message Attachments, Call Logs, etc.
Step aerobics 5
. Recover lost data
Click the Next button to start scanning your Android device. Once the scanning process is complete, click "Recovery" and select the file destination where you want to save this data. Now you have recovered your deleted data when your Android phone is successfully stuck in recovery mode!
A simple way to solve the problem
If the device cannot exit from system recovery mode, then most likely this is due to a failure of one or more buttons used to access Recovery. For example, if the phone uses the volume down and power keys, a situation may arise where the volume button is malfunctioning and the device “thinks” it is pressed. This leads to the fact that during startup the phone thinks that the user is trying to start Recovery mode. First of all, you need to make sure that the physical buttons on your mobile device work correctly, and especially the volume keys. Sometimes it happens that visually they look good, but they do not function properly.
Before proceeding to the next step, it is highly recommended that you turn off your phone. It is not safe to remain in Recovery mode and manipulate the buttons, as this may lead to accidental deletion of information on the device. Next, you need to try to press the keys several times. If it turns out that they are stuck, then a few clicks can help them return to their original position.
After such manipulations with the buttons, you need to try to turn on the phone and check whether the operating system boots.
If the device starts up normally, you will need to back up all important information as soon as possible. If the phone becomes seriously faulty or physically damaged, it may lose all important data.
After you have created the backups, you can turn your device off and on again to see if it can start normally again. If your phone is no longer stuck on the system recovery screen, then the problem has been resolved.
Part 2, How to fix Android recovery mode not working
Solution 1: Fixed Android recovery mode not working with keyboard shortcuts
Step aerobics 1
. You can try different key combinations below because they are different for each device. If one of them doesn't work, you can use other button combinations below and find the right one to get your Android device out of recovery mode.
- • Hold down the Power button, Volume Down, Volume Up, Home button to open the menu.
- • Hold down the Volume Up and Volume Down buttons at the same time
- • Hold down the Power button and Volume Down.
- • Hold the Power button and turn up the volume.
- • Hold down the Power button, Volume Down button, and Home button.
- • Hold down the Power button, Volume Up button, and Home button.
Step aerobics 2
. Continue and select "Wipe Factory Reset" or "Wipe Cache Partition" as you need when you see the recovery menu appear. Once the process is completed, go and restart your smartphone or tablet.
Step aerobics 3
. Once "Reboot system now" turns blue, click "Volume Up" and press it. Congratulations! Your Android recovery mode crash has been fixed and you can use your Android device as usual.
Solution 2: Fix the "No command" issue using flash memory
Step aerobics 1
. Install TWRP on your Android device via ADB
To fix Android recovery mode not working and No Command issue, first download the latest version of TWRP on your PC or Mac and follow the instructions on your computer to install it. Then rename it to TWRP.img and place it on your desktop.
Step aerobics 2
.Enter side loading mode
You need to highlight recovery by pressing the Volume Down button and select recovery using the Power button because your Android phone can only go to the bootloader menu.
Step aerobics 3
, Flash ROM on Android device
Select one custom ROM and flash it via ADB Sideload. Kill ADB with the ADB kill-server command and reboot it. Then use ADB Sideload Desktop or ROM.zip to flash your ROM.
Step aerobics 4
, Flash application package
Once the ROM is flashing, you can start the ADB side boot process. Then just click "Reboot System" and you have fixed recovery mode not working successfully on Android.
other methods
If the above steps did not help, the reason for the spontaneous boot of Recovery may not be related to a malfunction of the buttons. The failure may occur as a result of installing a third-party firmware (ROM), attempting to access the root of the phone, or installing a custom recovery module (for example, ClockworkMod or CWM). The installation was probably unsuccessful, so you might want to try again. Such operations must be performed with extreme caution as they can cause some serious problems, for example, if the steps are performed incorrectly.
When installing third-party software related to firmware and obtaining additional settings, you should always carefully study the accompanying documentation. It is usually published on the same web resources where users download the necessary files.
If Recovery mode crashes for no apparent reason, it is most likely a hardware issue related to the physical buttons on the device. To eliminate the small possibility that it is not software dependent, you should consider selecting the Wipe Data/Factory Reset option on the recovery screen. This feature will fix any errors or crashes, remove viruses, and return your phone to its default settings. As a result, all user information on the device will be irretrievably lost, since the backup option will not be able to be launched, but in some cases, such a radical method helps eliminate the problem.
You need to carefully check your phone for physical damage or liquid penetration. Damage is usually visible to the naked eye. When it comes to moisture intrusion, many phones come with built-in LDI (Liquid Damage Indicator) indicators that alert users if liquid has infiltrated that could cause damage. If all of the above tips did not help resolve the problem, then you should contact a specialist in repairing Android devices.
"(by Dreamer...) recovery was mentioned, but what it is and what can be done by replacing it with a custom one was not described in detail. Meanwhile, this is one of the most important components in fine-tuning the phone, which allows you to replace the firmware or make a backup copy of the current one. In this article I will try to correct this unfortunate omission.
What to do if Recovery does not turn on
1. The most common reason why the owner of an Android smartphone cannot get into “recovery” is the wrong steps to launch this mode. The procedure is different for phones from different manufacturers. To enter recovery mode, you use various combinations of pressing the volume, power, and return to the main screen buttons. There are many combination options and it’s quite easy to get confused in them. Therefore, if you cannot enter “recovery,” check which combination of buttons calls up this mode.
2. If you are sure that you are doing everything correctly, make sure the buttons are working. You can check their operation when the phone is loaded.
3. Try running Recovery from the console by connecting the phone to the PC and using the Adb Run program. For it to work, USB debugging must be enabled on your smartphone.
Another option is to install the android SDK on your PC, connect your Android device, go to the Fastboot folder and open a command window on your computer. The “adb reboot recovery” command should launch the desired mode.
4. Launch “recovery” using the “Terminal” application installed on your smartphone, available on Google Play. To reboot the phone in recovery mode, you need to launch “Terminal” and sequentially enter the commands “su” and “reboot recovery”. The phone will reboot into recovery mode. Instead of this program, you can use the Quick Boot application, which allows you to achieve a similar result.
5. If “recovery” is not called programmatically, the reasons may be damage to the recovery console due to unsuccessful firmware or other user actions. You need to reinstall Recovery on your phone using one of the following programs:
- TWRP Manager;
- ROM Manager;
- ROM Installer.
These programs can repair most phone recovery consoles on their own.
After this, the Recovery function should work.
6. What should I do if neither the phone (tablet) itself nor the recovery mode turn on?
Make sure that the reason is not a discharged or damaged battery of the gadget. Connect the charger, wait about five minutes and try to turn on the gadget again. If the device does not turn on, the problem is a faulty electronic part or a software malfunction. In the first case, you will need to contact a service center, since without special equipment it is impossible to independently localize and repair a breakdown of the display, motherboard or other component of the device.
All that remains is to try flashing the gadget using the Flash Tool program. Instructions for working with it can be found on the official website of the program or on numerous sites and forums dedicated to flashing firmware for Android devices. You may need to additionally download drivers so that the computer can correctly recognize the phone or tablet when connected.
Android and bootloader
For a more complete understanding of what Recovery is in general, in my opinion, it is also worth talking about what a bootloader is and how it is connected to all this. So, Bootloader is a bootloader - an application that is the very first to launch on your device, reads its configuration, and based on it, either loads the operating system (Android). Analogues on desktop OSes are MBR on Windows and Grub with LILO on Linux.
| Android Bootloader |
In addition to loading the OS, the bootloader provides the ability to select an OS to launch (if there are several of them), select the OS startup mode (for example, “Safe Mode in Windows”), and also launch auxiliary applications, which includes Recovery. In some cases, the bootloader always provides a menu for selecting OS\modes\applications, in others you need to press a certain key/key combination to display it, and in others there is no menu at all and alternatives to the main OS are launched by pressing keys and\or their combinations. On desktop OSes, the first two options are most common, on mobile operating systems, the last two are most common.
Simplified OS boot scheme
note. The Bootloader menu in Android is often mistakenly called the device BIOS. But this is wrong, because... The bootloader and BIOS are completely different things with completely different tasks.
Advanced settings in TWRP
In the Advanced section of TWRP there are several options that can be used.
Fix permissions
Fix permissions can be used if you're experiencing a lot of app issues, such as frequent crashes (and we mean frequent - randomly closing the app won't solve it).
Fixing permissions only takes a couple of minutes, and there are no downsides to it.
ADB Sideload
ADB Sideload allows you to connect your phone to your desktop computer and download apps through ADB, which is available through the Android SDK. This is typically used if you are replacing a system file with a customized version.
File manager
File Manager, as its name suggests, is a tool for accessing files stored on your Android device.
What is Recovery
Recovery is an additional application for restoring\resetting\modifying\replacing the firmware\OS of a smartphone. The standard recovery of the vast majority of smartphones allows you to perform only the first two operations. Custom, i.e. non-standard, user-set recovery allows you to do much more. To install a custom recovery, as a rule, you need root privileges on your device (specifically, when installing from the device itself, without the participation of a computer) and, in some cases, a modification of the bootloader. Installation is carried out either using special applications in the market, or using a computer. It is also possible to launch custom recovery using a computer without installing it on the phone (via adb). Instructions for installing recovery may vary from phone to phone, so they will not be given here. They can be found without problems on the Internet and on the Russian forum 4pda and foreign xda-developers in particular, but in general, as a rule, it is enough to install a certain application from the market (more about them below) and use it to install recovery. As you can understand from the preceding section: Recovery and the firmware itself are not directly related to each other, therefore, modification of one of the components, in the standard situation, will not affect the other, which means that if you, say, screw up the current firmware of the device, it does not become “ brick” and can be easily restored by installing another one via Recovery.
TWRP vs ClockworkMod Recovery: which one to choose
The two main stock recovery systems for Android are TWRP and ClockworkMod (CWM).
In most cases, you don't have to choose between them; The rooting method you choose for your device will be based on using one or the other.
TWRP and CWM have similar feature sets and there are virtually no differences between them. They have different user interfaces and are not compatible with each other. A Nandroid backup created on one cannot be restored using the other.
“Standard” functions of custom recovery
- install
- mount
- allows you to mount/unmount various partitions. This is required in rare cases, usually when installing system modifications. You don’t need to touch it unless it’s explicitly stated on the page describing the component being installed, or the installation will not display an error stating that the required partition is not mounted (for example, something like “error... no mount /system”).
— installs firmware\kernel\system utilities (for example, a set of applications from Google for cyanogenmod) from a special file. Such files are ordinary zip archives with a certain structure. Some of these archives come with a special utility: Aroma Installer, which is essentially a graphical installer with the ability to select installation options. The presence/absence of Aroma Installer has nothing to do with the quality or popularity of the firmware/kernel/utility.
backup\restore
- perhaps one of the most important components - allows you to make a full or partial backup of your current system. It is EXTREMELY recommended to make full backups when changing one firmware to another, or one built on a different version of Android (for example, when upgrading from cyanogenmod 9 to 10) and partial backups (boot and system sections) in case of “minor” ones (i.e. within one versions, for example, from 10.1.1 to 10.1.2) firmware updates. Also, modern recovery generates an md5 sum for the backup archive, which allows you to control its integrity (no damage). You can disable it, but I don't recommend it. I would also recommend keeping at least 2 recent backups. If the last one gets damaged (I personally haven’t had this happen, but there is a possibility), we have the opportunity to recover from the penultimate one. The probability of damage to both backups is much lower than one (if you do not consider physical damage to the media where they are recorded).
wipe\format
— cleaning\formatting internal memory partitions. In general, formatting is not required in the vast majority of cases; usually a simple wipe is sufficient. It is recommended to reset the cache and dalvik-cache partitions when changing the firmware. Clearing the data partition (aka Factory Reset) leads to resetting all user settings, as well as applications installed by him, in other words, the firmware returns to its original state. The system partition stores the firmware itself and, as a rule, is automatically formatted when installing a new one.
Solving the problem (succeed 0/failed 1)
This problem can arise not only when updating the Recovery firmware, but also when changing the firmware to a new one or updating the firmware of other partitions.
Why does this error occur and how to solve it:
1. The downloaded recovery image is not completely downloaded, or is broken - download the custom recovery file again or download it from another site.
2. MD5 amount does not match - please note that at the end of the recovery file there is an MD5 extension, it is used to verify that the file is intact or broken, but if you change at least one letter in the file name, then recovery will be considered broken. If you are sure that the recovery is not broken, then remove the MD5 extension at the end of the file. 3. Error with the COM port - make sure that the MicroUSB cable is intact, without damage, and the plugs are not bent. On your computer, use only those USBs that are directly located on the motherboard, do not use USB hubs. 4. Error with drivers - update Samsung drivers, update motherboard USB drivers.
5. Reboot the device with each new firmware - if the firmware is successful or not successful, reboot the device, otherwise the next time you update the firmware, an error will appear in Odin (succeed 0/failed 1).
6. Make sure that the file being flashed is for your Samsung - if you start flashing someone else’s file that is not from your Samsung smartphone or tablet, then at a minimum you may get an error (succeed 0/failed 1), and at most you will break the device.
Modern custom Recovery
ClockWorkMod\ClockWorkMod Touch
| Perhaps the most famous custom Recovery, which is recommended in the vast majority of firmware instructions and is supported by almost all modern smartphone models. ClockWorkMod Touch, unlike the original, has a touch menu and is installed only in the paid version of RomManager. The big advantage of CWM Touch, compared to other touch recovery, is the ability to control physical buttons (volume and power buttons), which will allow, in case of problems with the sensor, to return the original firmware and return it under warranty without any problems (if, of course, you didn’t forget to reset something like the firmware counter in smartphones from Samsung). Among the additional options, we can note the possibility of creating an SD-Ext partition: roughly speaking, a piece is “bitten off” from the memory card into a separate partition, formatted in Ext2/3/4 (file system linux) and is attached to the main memory of the smartphone: which allows you to install more applications on those devices where the manufacturer did not take care of the internal memory. The partition size can be set from 128Mb to 4096Mb (4Gb). |
However, this recovery has one drawback - when creating a backup, it is impossible to choose what exactly to save (boot\system\data) - everything that requires additional time and space on the drive is saved. Also from my own experience: the CWR Touch on the SGS3 cannot install the CyanogenMod 10.1 update obtained using CyanDelta. A small hint: it is not necessary to install CWM Touch through the very expensive Rom Manager Premium - you can easily get by with cheaper (or even free) tools, like Mobile ODIN. You can download official recovery images in img format from the following link: https://www.clockworkmod.com/rommanager Other formats (for example tar for ODIN) can be found on xda-developers.
There is also a modified version of CWR Touch, which contains additional settings (design) and options (choose what to save in a backup copy) - in general, a very, very nice thing. It's called PhilZ Touch Recovery
, you can download it at xda-developers
Installed using the RomManager applicationDownload free version
Buy for ~186r
4EXT
| It is very reminiscent of ClockworkMod Recovery, so 4EXT can even be mistaken for a kind of add-on - it can do everything, plus a little more. It differs from CWR in supporting themes (both in text and touch modes) and some additional functions. By the way, Touch Recovery appeared with them much earlier than with CWR. Among the additional functions: the ability to connect a memory card as a drive from Recovery itself (quite convenient when experimenting with firmware), as well as convert Ext3 to Ext4 and vice versa (irrelevant for Android 4.x). Personally, I liked the touch mode much more than in CWR - the lines are wider, i.e. It's easier to navigate and there are icons to make navigation easier. |
There are some drawbacks: in touch mode there is no way to control the menu using physical buttons - i.e. If the sensor breaks down, restoring the original firmware will be much more difficult. And what else I didn’t particularly like was the rather small list of supported models. In general, if you often work with firmware and your smartphone model is supported by 4EXT, I recommend it. It costs less than CWR (Touch version) and is more convenient. And if the sensor breaks down, nothing prevents you from flashing a regular CWR using a computer and restoring the original firmware from it.
Installed using the 4EXT Recovery Control applicationBuy for ~93r
TWRP
| The youngest of all three Recovery. It only has a touch interface, but it also provides a separate view for tablets (see screenshots). The touch interface is self-sufficient and is not a kind of add-on over the text interface (like CWR and 4EXT), which in my opinion is more convenient. Particular attention is drawn to the element for confirming any operation - it is designed in the form of the famous “slide to unlock”. In general, using the TWRP interface is noticeably more convenient than that of its competitors. And I haven’t yet mentioned the changeable design themes, which can affect not only the appearance, but also the functional arrangement of elements. Among the functional differences is the ability to select partitions saved in the backup, and, in addition to the standard ones, you can add a backup copy like this - You can also add a cache and Recovery itself. I was also very pleased with the ability to immediately specify a name for the backup archive - very convenient. For example, I gave the original firmware the name “original”, which allows me to skip it when clearing backup copies of unnecessary ones without specifically looking for them among similar names. Repeating the words from teleshops, “but that’s not all” - the backup copy can be compressed (takes up less space, but at the same time it takes significantly longer to create) and disable the generation of MD5 sum (it is created faster, but if the archive is damaged, this will not be detected ). It is also worth mentioning that when creating a backup, TWRP immediately, even before starting, shows the amount of memory occupied by the partitions, as well as the free space on the drives. In general, when it comes to backup/restore, TWRP is head and shoulders above CWR and 4EXT, which is good news. Just like 4EXT, this Recovery allows you to mount a memory card like a drive to a computer without switching to the firmware. Moreover, this is done even on SGS3, where full-fledged firmware cannot, without special crutches, connect a flash drive as a regular drive, and not via MTP. What is also notable about this recovery is its support for technology full disk encryption (full disk encryption), which can protect your data if your phone is lost. However, it is quite possible to bypass it, so you still shouldn’t store any particularly valuable information on your smartphone, at least in open form. Nevertheless, this is a significant advantage of this recovery for those who care about the security of their data. TWRP on Smartphone | TWRP on Tablet |
In general, this recovery is perhaps the best that exists at the moment: convenient, functional, completely free. Highly recommend. I almost forgot - when creating an archive with a backup copy, this miracle of programming thought is capable of using several cores of your smartphone - which has a very positive effect on the speed of operation.
Installed using the GooManager application(MENU => Install OpenRecoveryScript)
Download free version